Australian Party, Family Fun, Feast on This, Fun with Friends, Kids Stuff, Parties, School Events

The Land Down Under – a World Studies party

7th– 8th Grade Unit Study on Australian Culture

Well, y’all, today was a privilege of privileges!  I got to throw another school party for my grand’s World Studies class.  We seriously had sooooooo much fun! Praise the Lord for His graciousness.  I love sharing these class parties with you all in the hopes that you will find something inspiring, or useful, that you can do with your kiddos.  I can barely organize my thoughts to tell you about it all.  I’m blogging about it with a full heart that truly did not want the time with them to end.  It was a case of having too many things that I wanted for the kids to experience (story of my life), and having much too small of time for us to actually accomplish it all with quality.  We managed to squeeze everything in, but we sure could have used another couple of hours.

Their teacher very capably led their studies through the chapter on Australia and Polynesia in their World Studies book, and then generously and graciously allowed me to step in for a brief moment at the end of the chapter, to share the things I’ve collected from all over the world, which in this instance were a few things from the Land Down Under.  The Lord has graciously provided over the years for me to get to have these things, and not only that, but also to allow me the opportunity to utilize the deeply compelling, God-given passion that’s in my heart, which is to research, and plan, and cook, and decorate, and bring the cultures of other peoples to life.

This party was all about Australia, from the indigenous peoples to the settlers.  We learned about Digeridoos, Dancing Sticks, Boomerangs, and Bull-roarers.  We ate Aussie Meat Pies “with sauce” – the national food of Australia, Tim-Tams, Pavlova, and some varieties of licorice “lollies.” We were able to experience a sniff of Vegemite (the kids were too chicken to taste it – although I had snuck some into the meat pies when I made them, so they actually had tasted it and didn’t know it – Ha!)  And we all got to taste a glassful of Bundaberg Ginger Beer.  So delicious!!!!  We also listened to some Australian music, a mix of both the indigenous peoples and some modern top-50.

Side note: Ask me how glad I am to have a Cost Plus World Market fairly close-by.  Unfortunately, they have discontinued carrying ANZAC Biscuits and didn’t have any Lamingtons. The even more sad thing was that I was too pressed for time to be able to make very many of the things at home that I wanted to this go around – but I have included all the recipes below for you (and myself), in case you (or I) ever want to try this party (again) at home for a Birthday, or dinner party, or family get-together, or for your school, or Homeschool World Studies unit, or for a church function (perhaps you have some displaced Aussies in the congregation who are maybe feeling homesick, or missionaries to the Outback whom you could honor), or whatever the occasion!!!  Perhaps you just want to try some of the lovely foods from down under?


Okay, I’ll start with

Music and Decorations…

I had ordered this tablecloth (above) on Amazon, but it never came. ☹ 

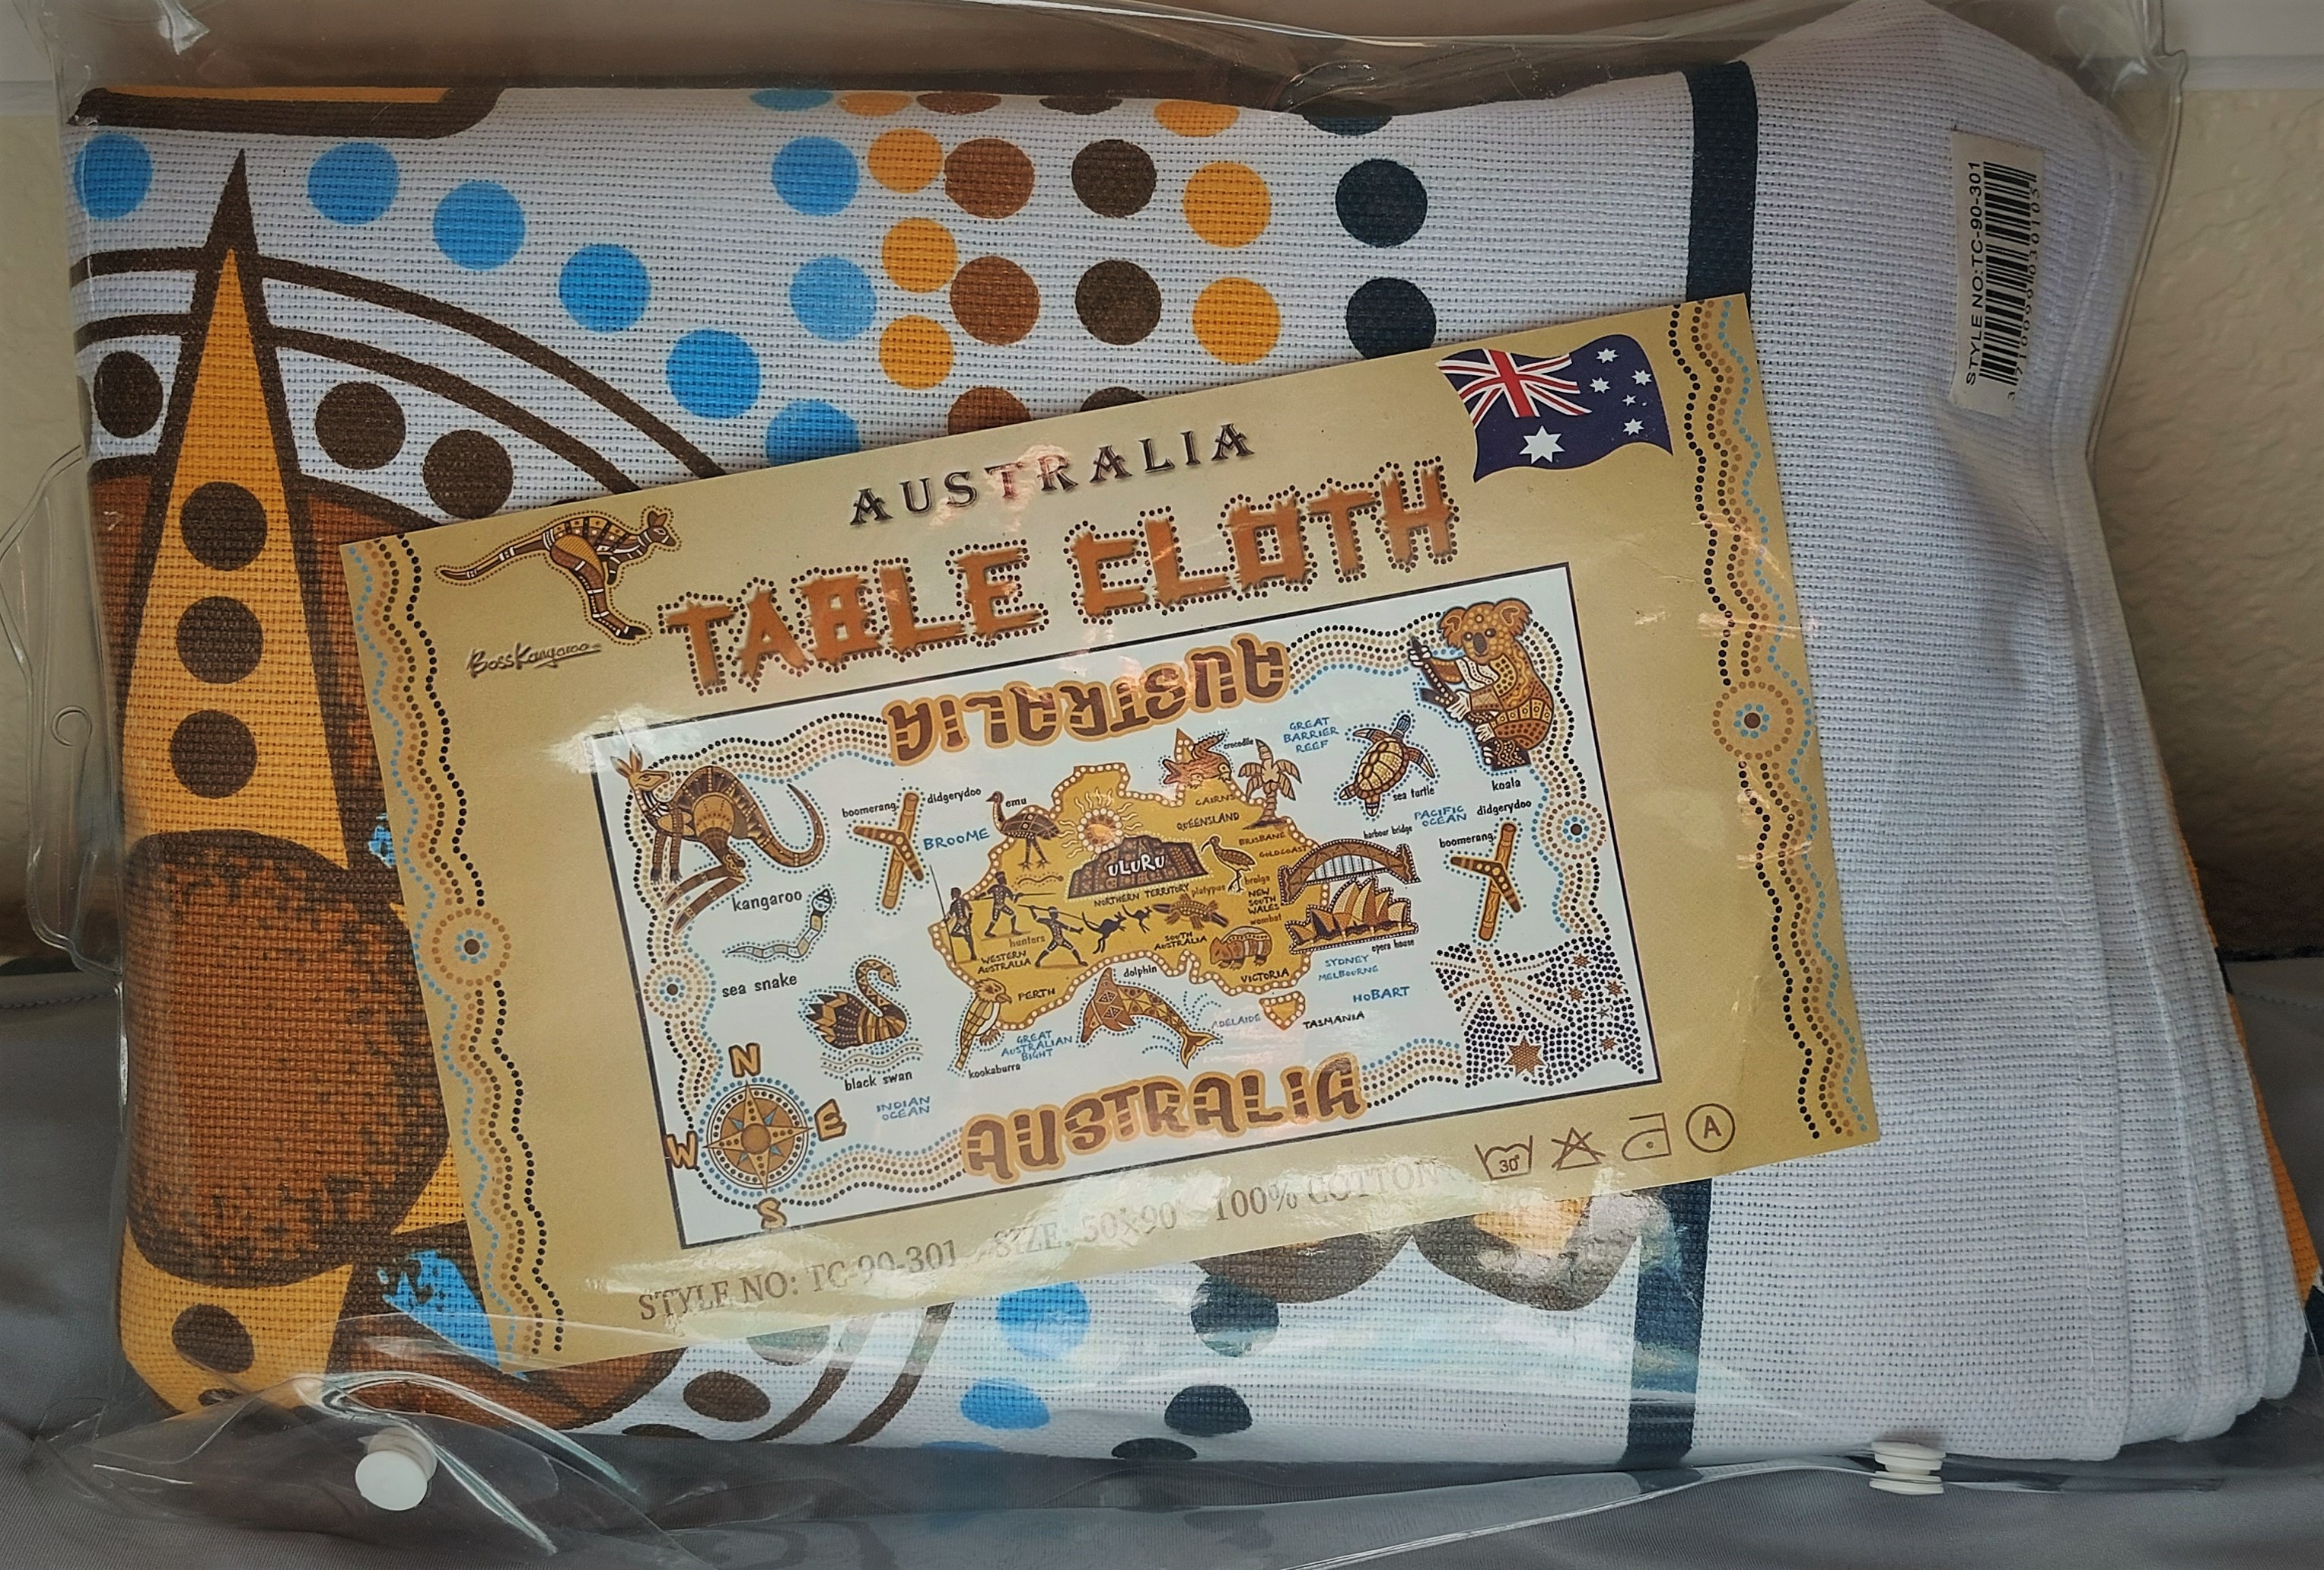
Fortunately, I found this one on eBay and it arrived just in the nick of time. 😊

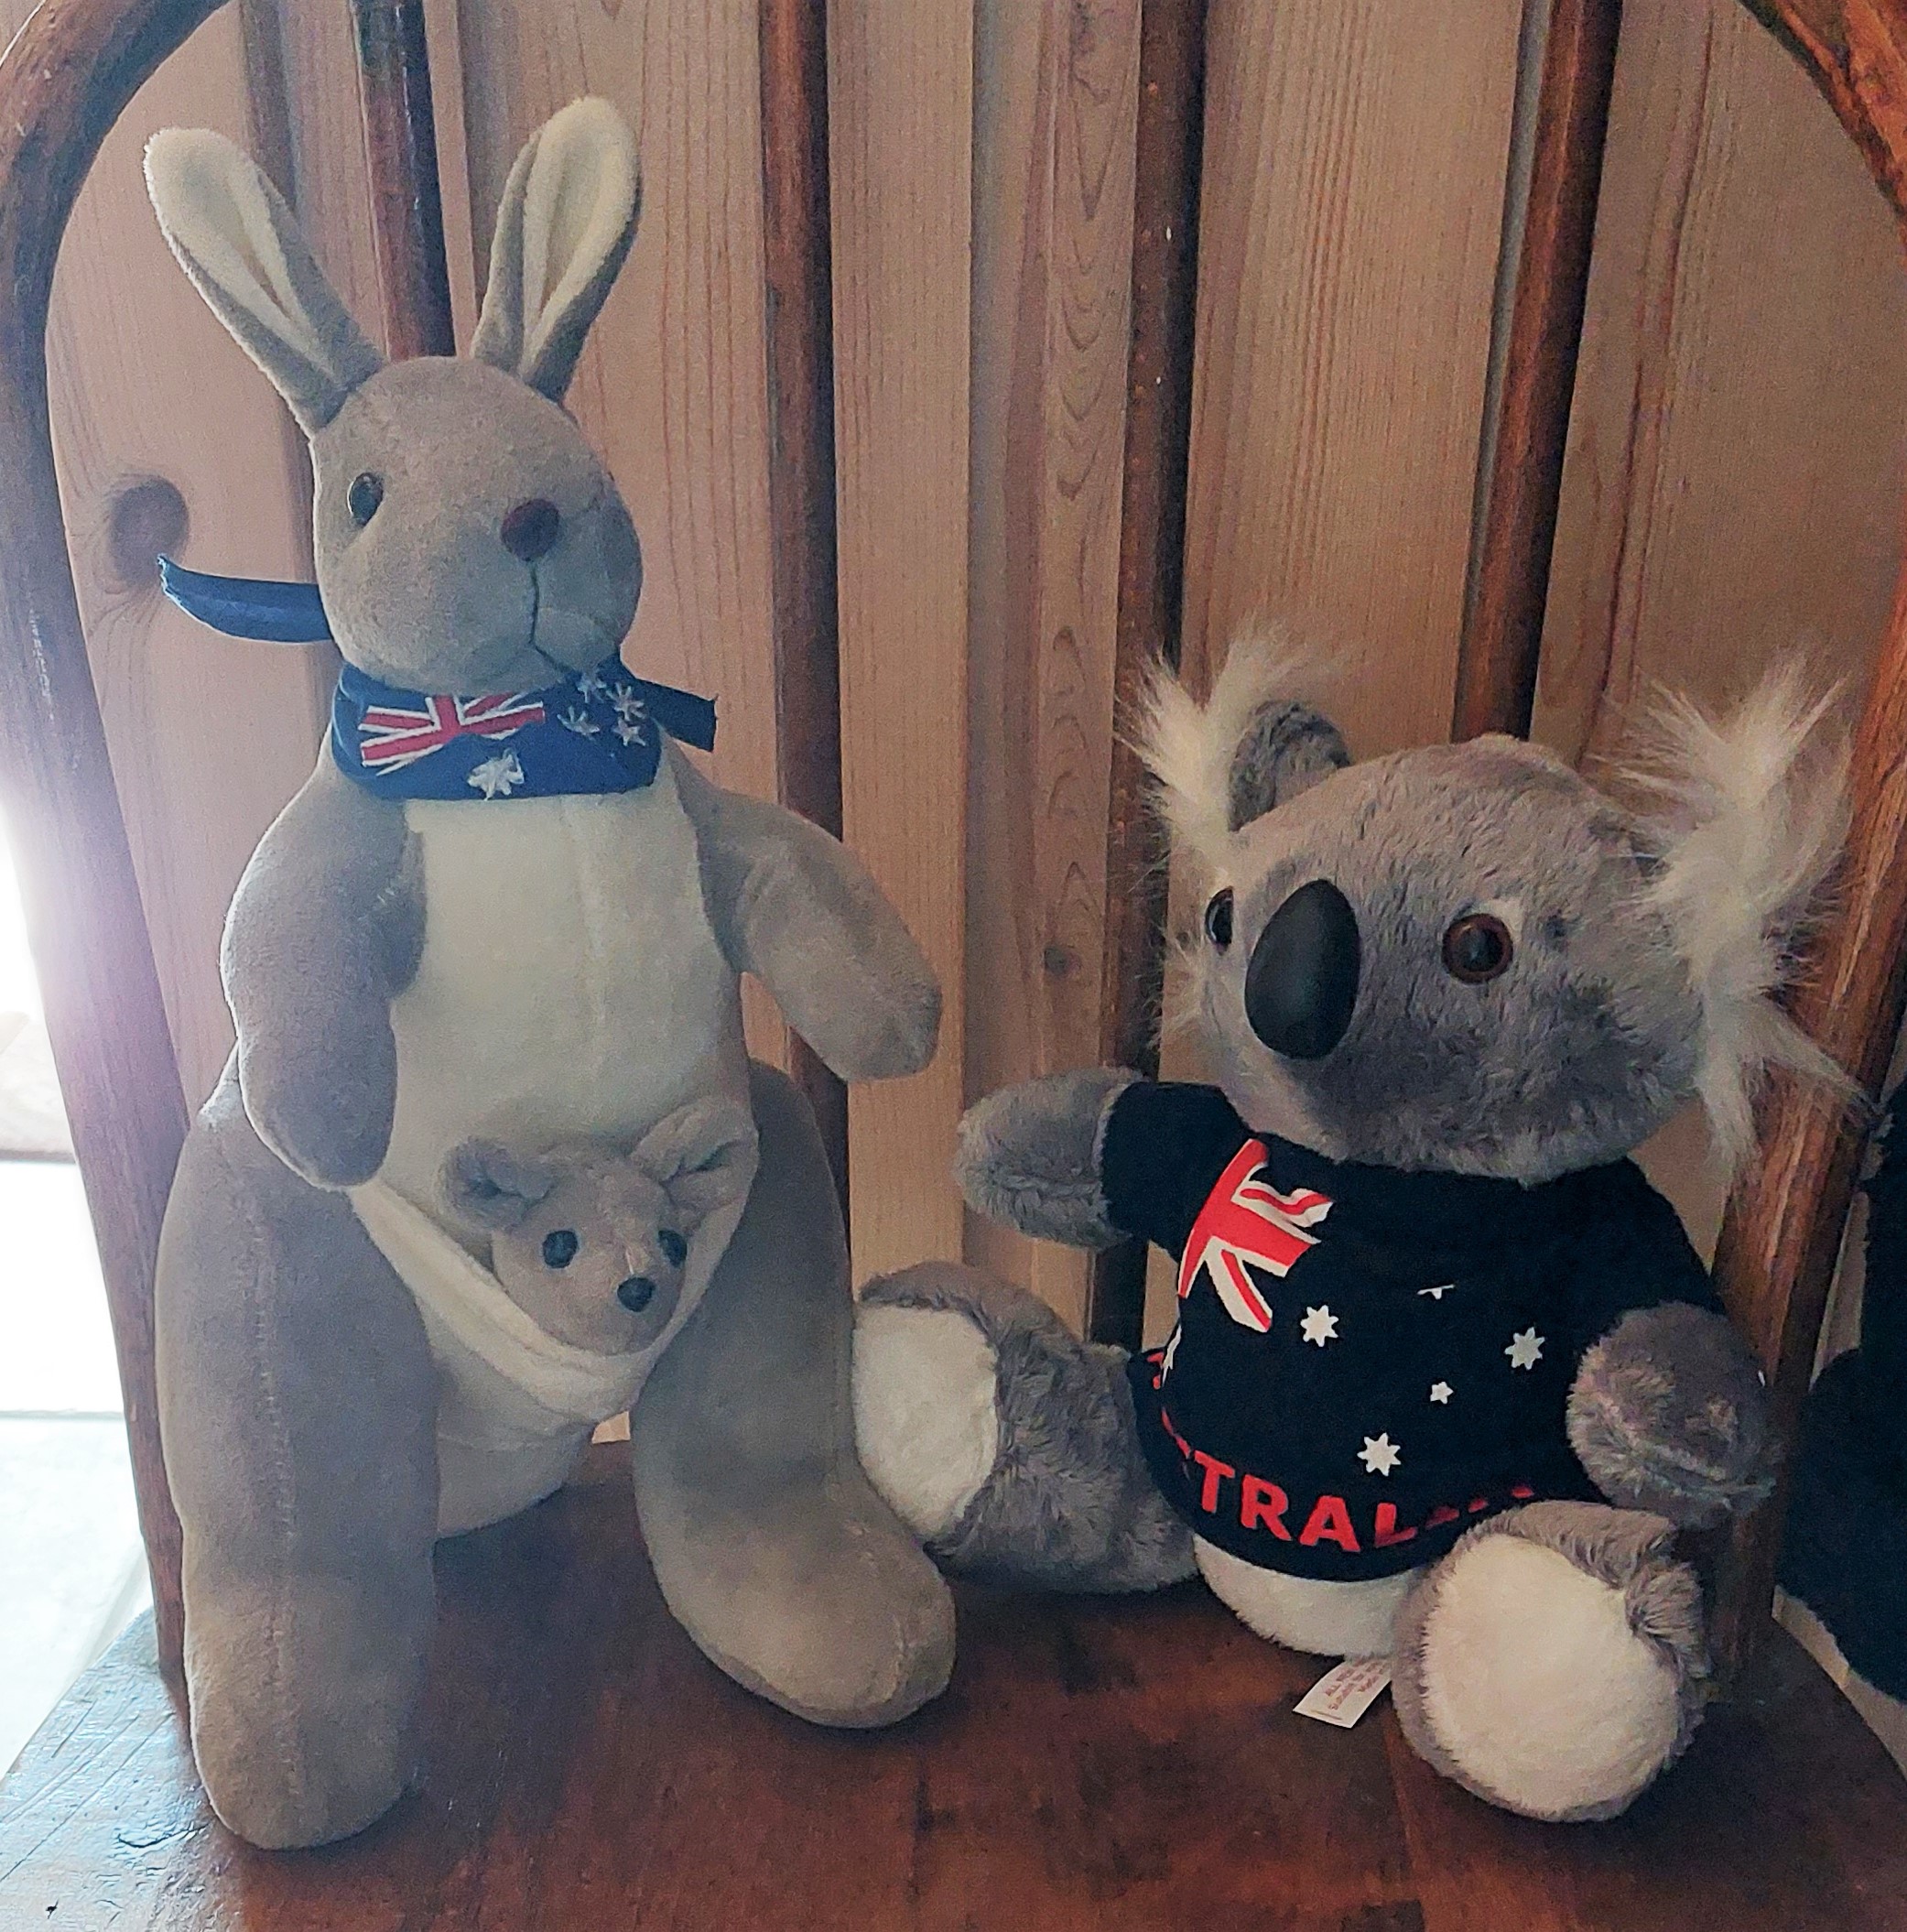
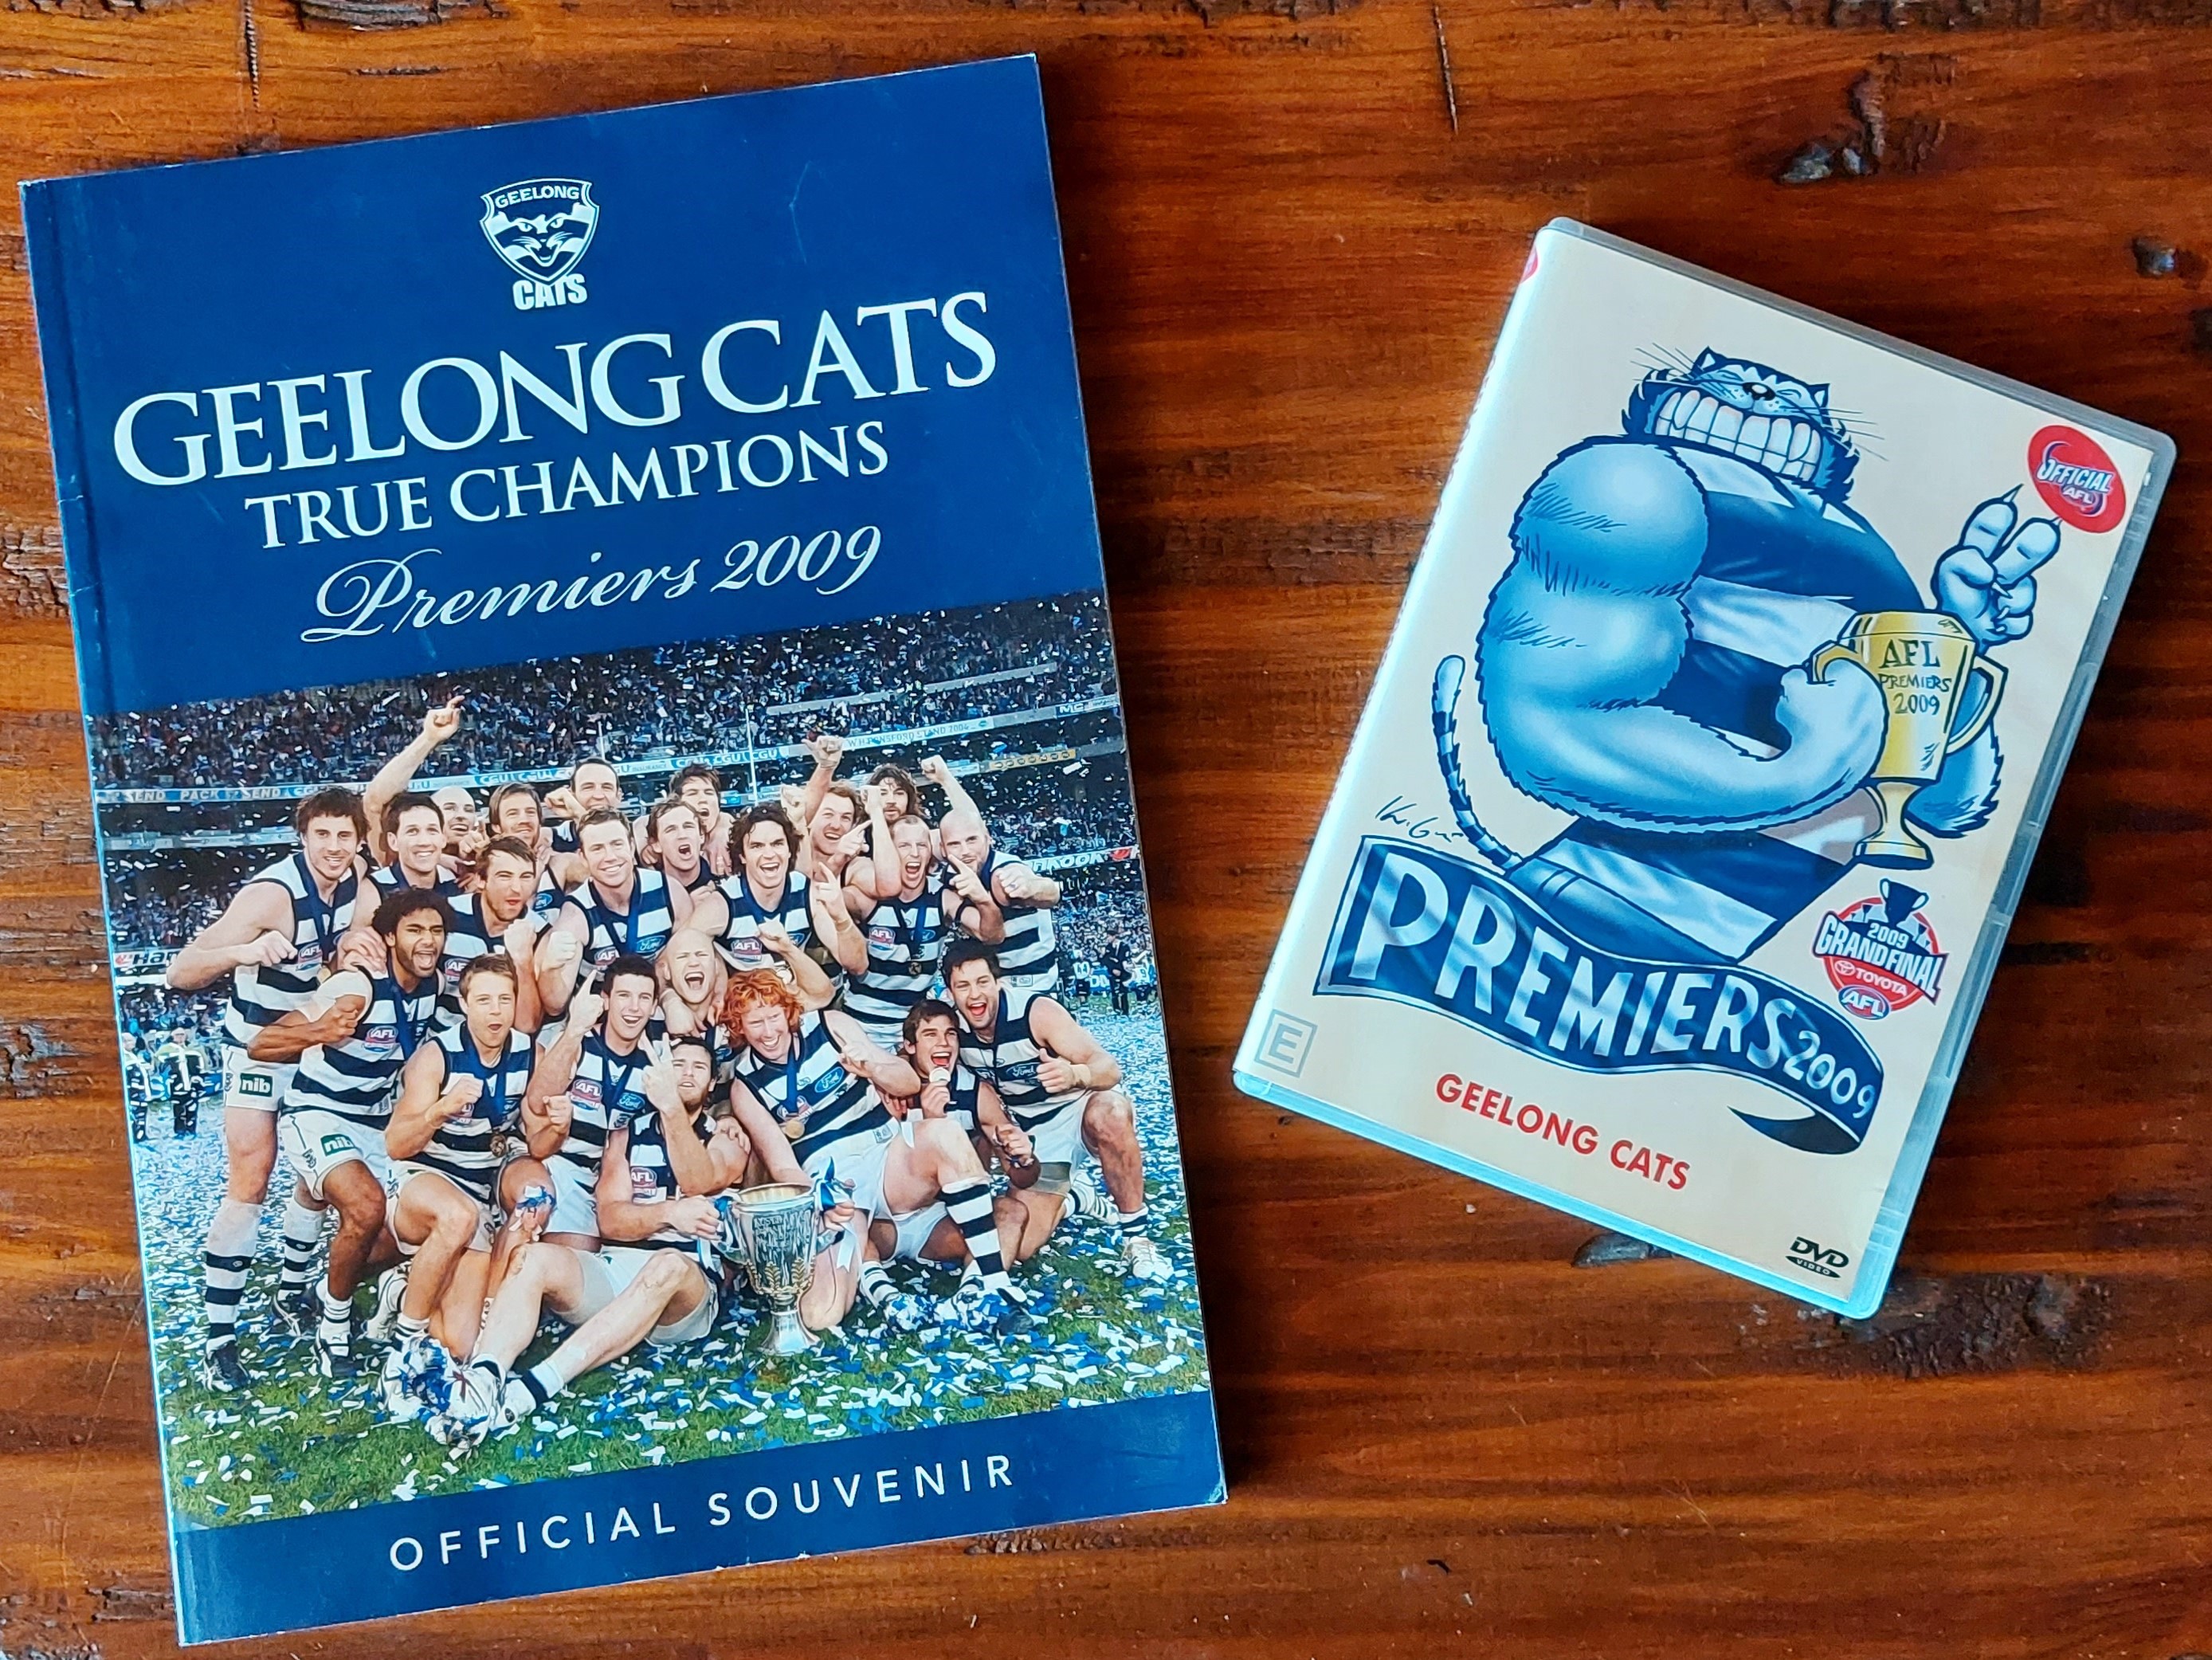
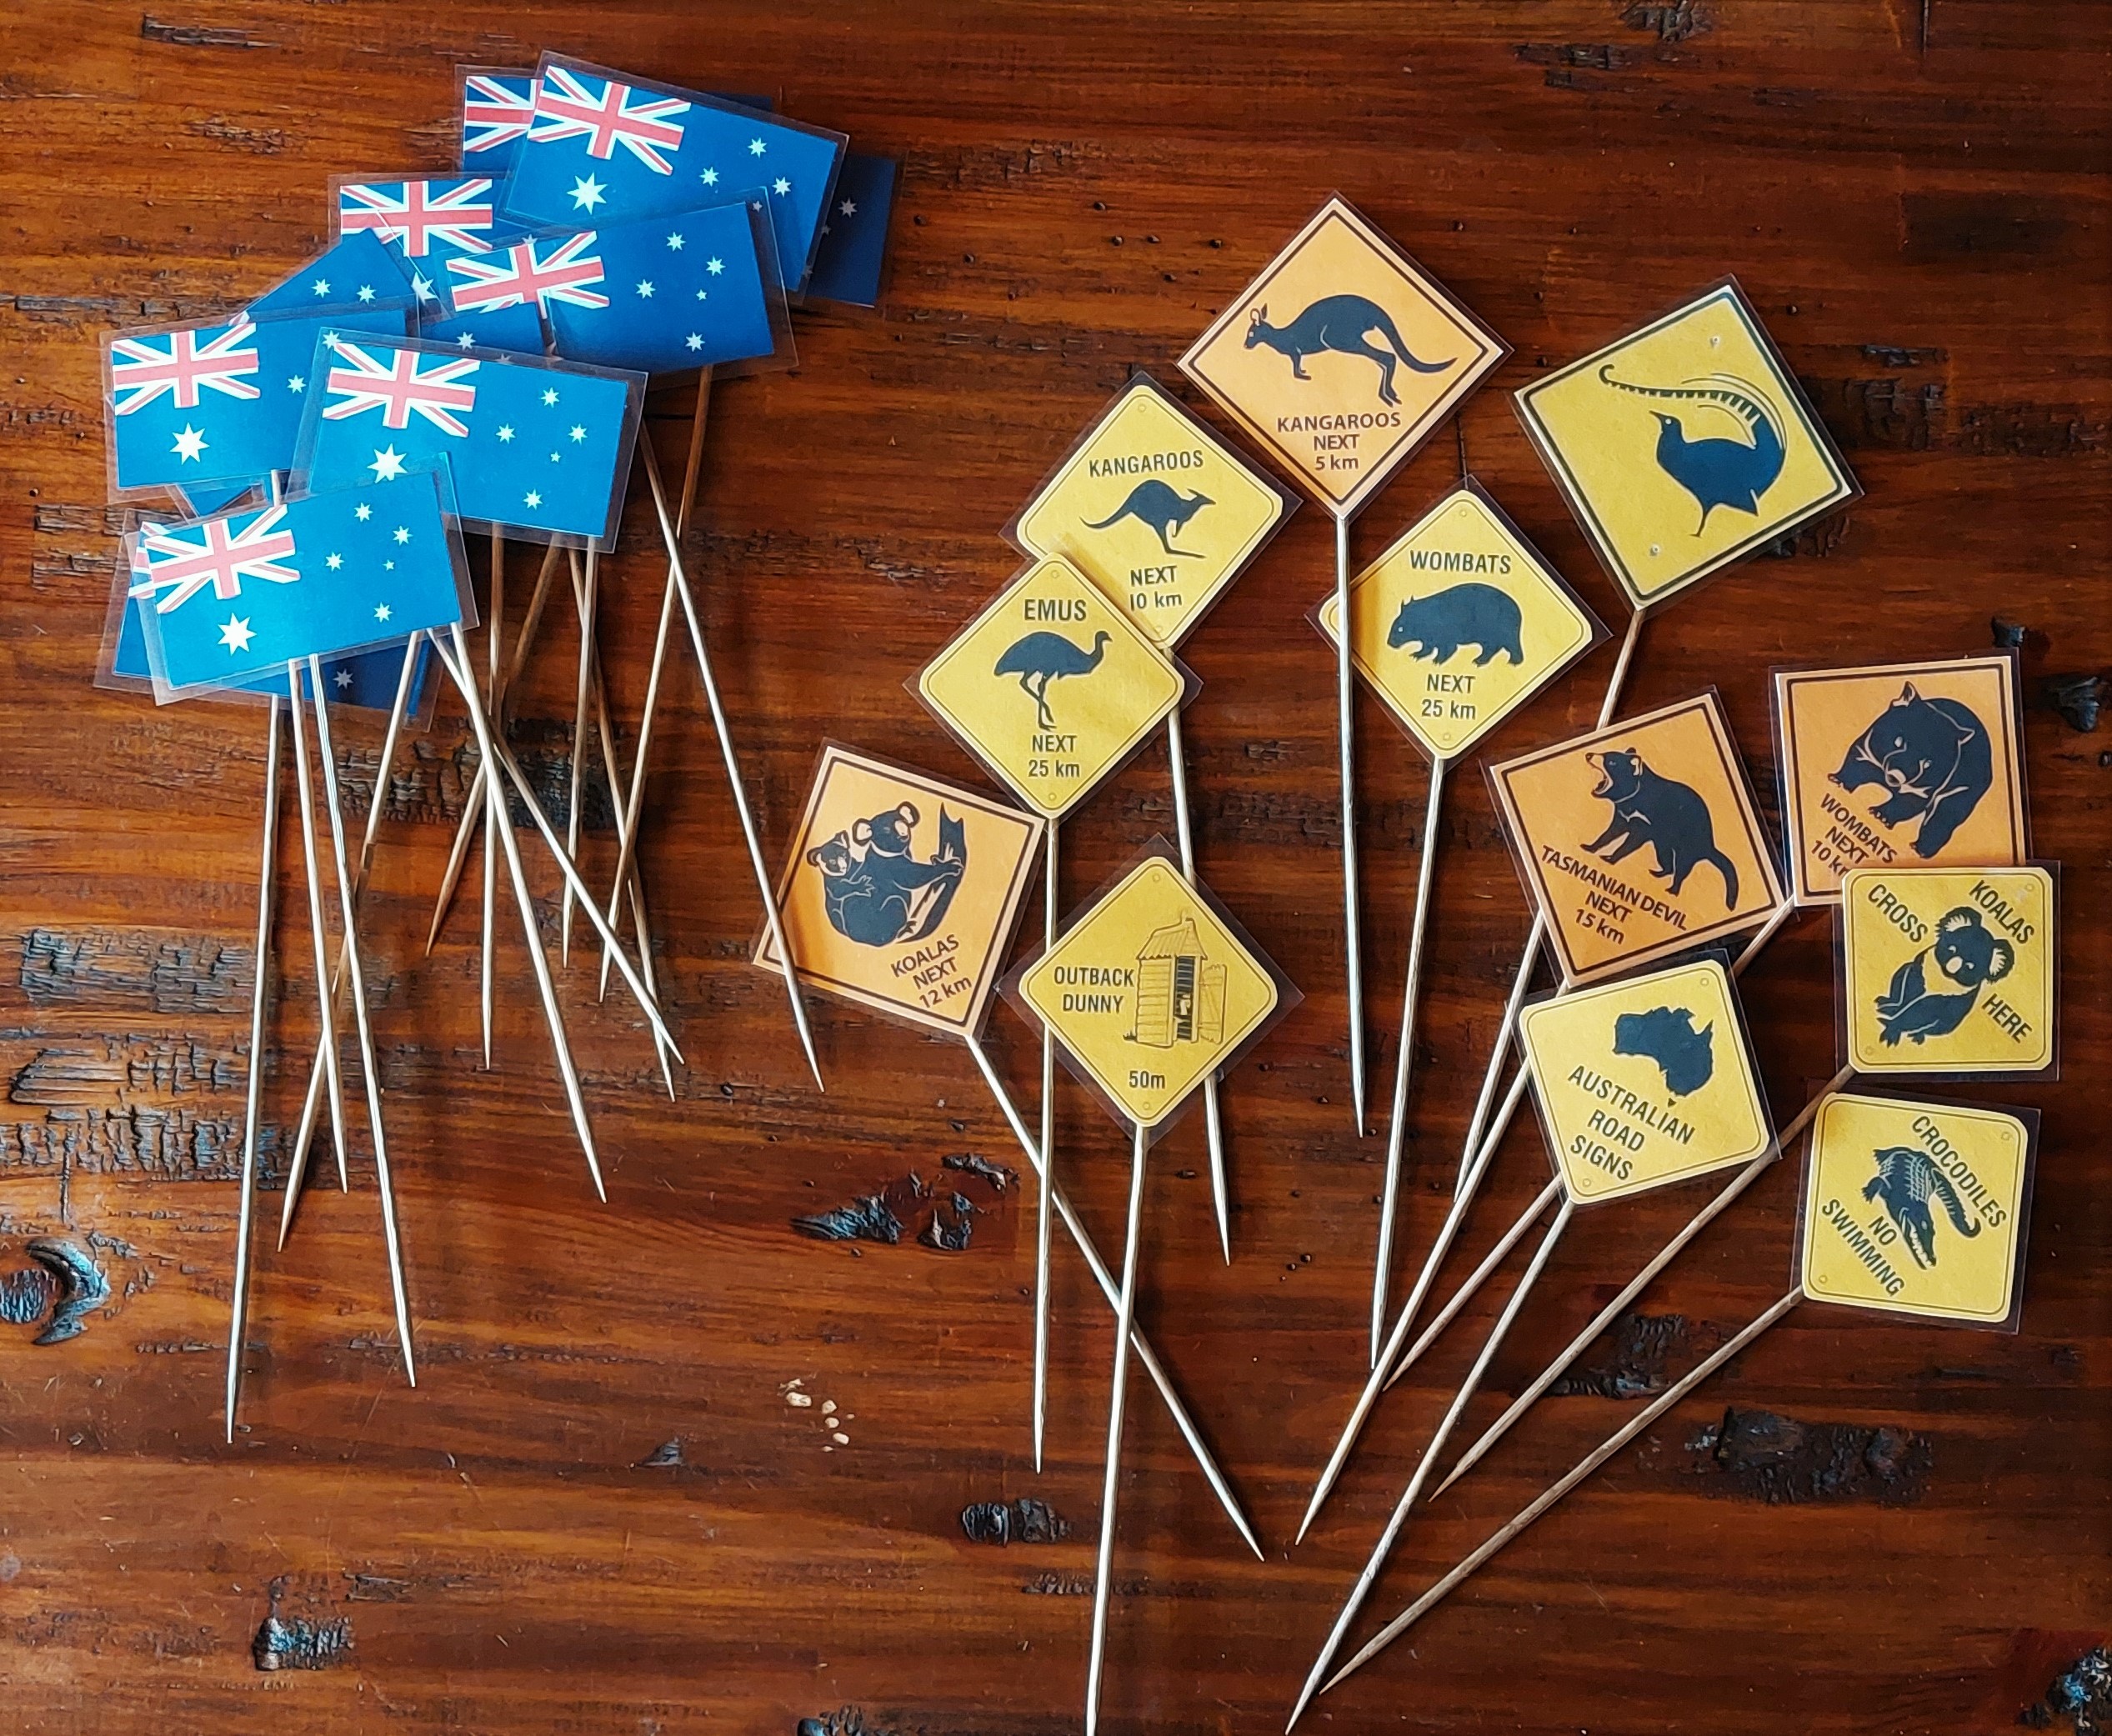
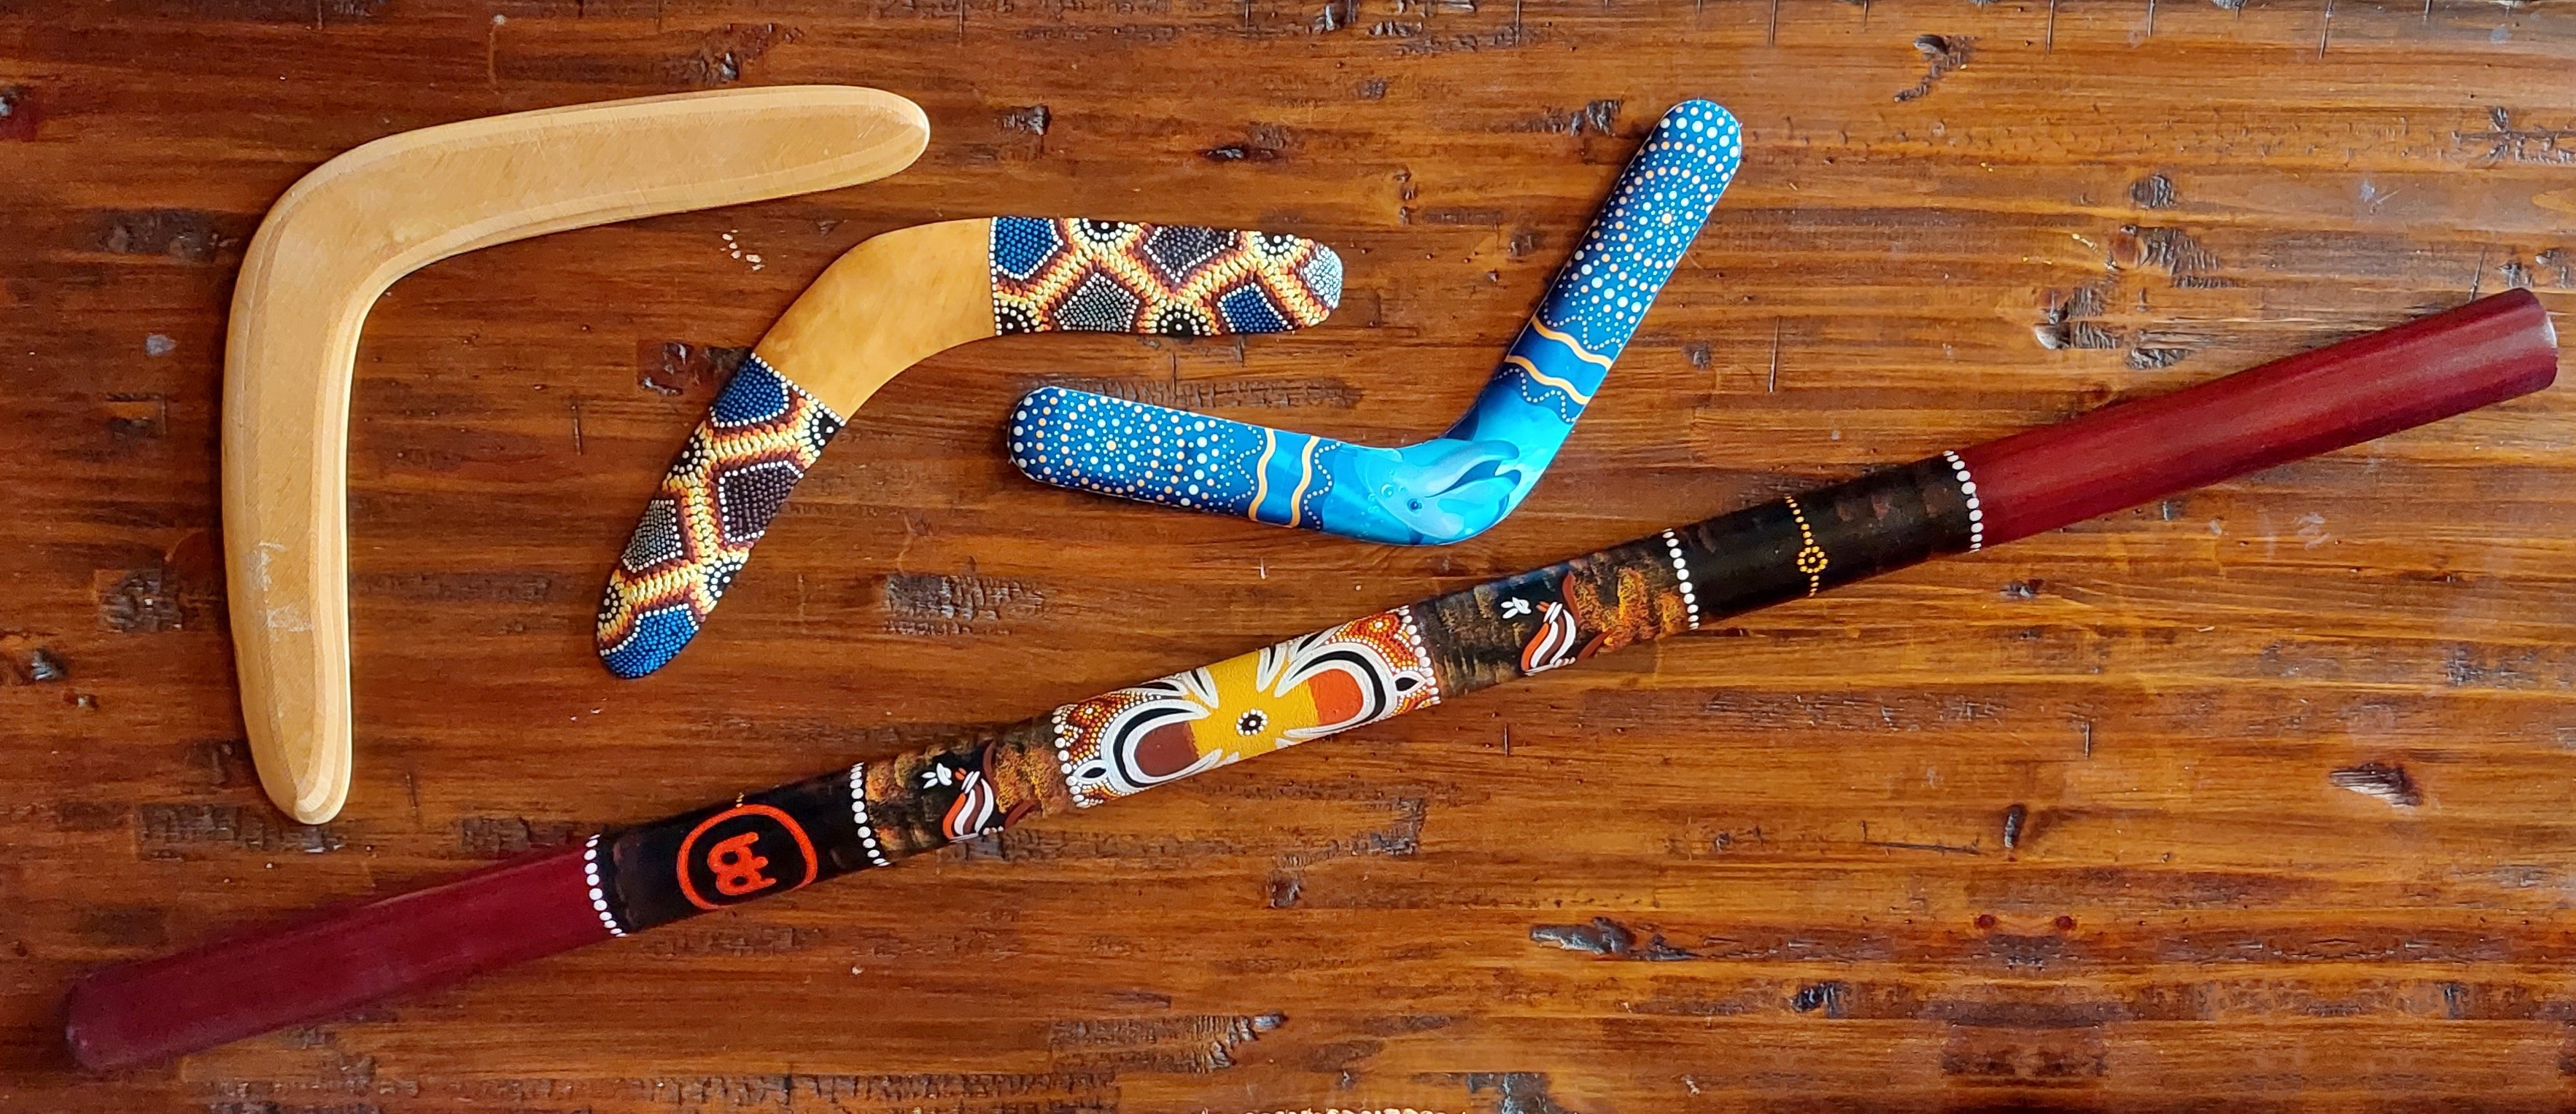
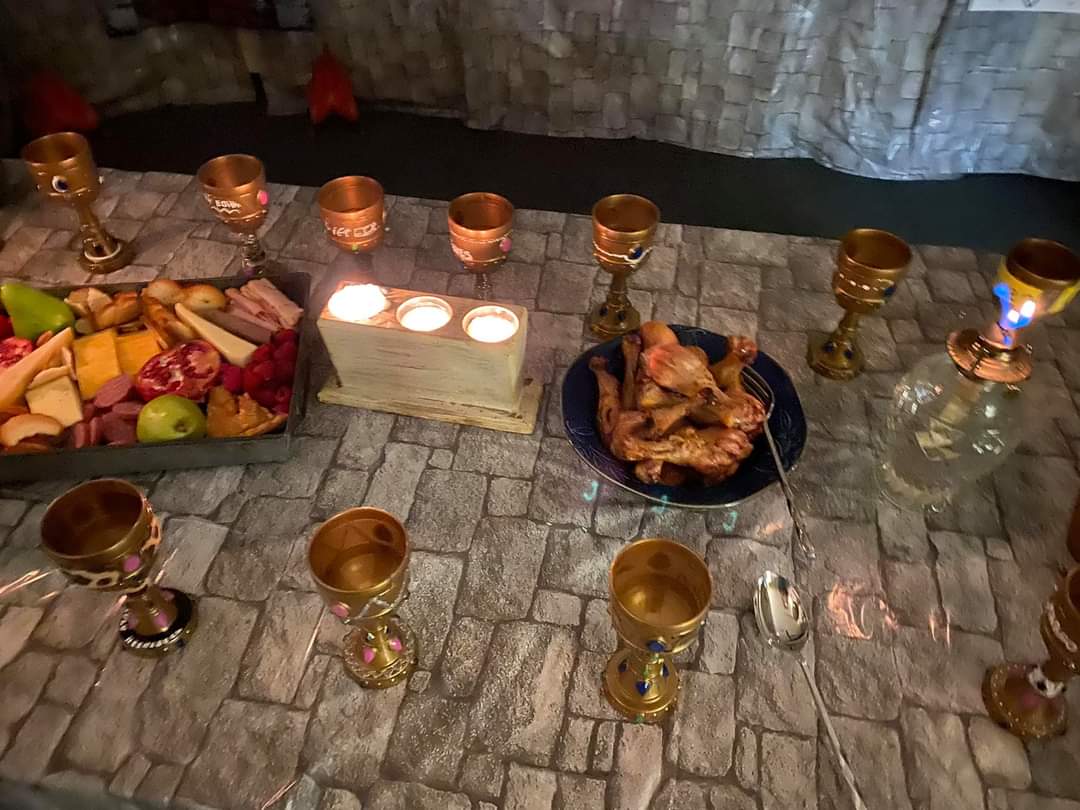
The food on the table also served as decoration (more on that below), but I also tossed around a few stuffed animals, some real boomerangs, and some Aussie flags and road signs to lend atmosphere.  One of the student’s fathers had a real digeridoo, which he allowed his son to bring to the party.  It was really heavy, made from a real tree, and decorated with real tribal designs.  It was very cool.  I also contributed to the party decoration by wearing a t-shirt that said “G’day Mate!” on the front of it.  It made me happy all day just wearing it. And I had made some little road signs and Aussie flags to scatter around on the table. I have a friend who lives in Geelong and is a huge “footy” fan, the Cats in particular. She sent me some souvenirs of the 2009 Premiers, because of course the Cats were champs that year!!!!! I wished I could have found stuffed animals of all the Aussie animals, instead I ended up getting a t-shirt, which featured at least 10 of them.

This is the music I had playing when the kids entered the classroom, so they could hear what digeridoo sounds like, but I was cautious about playing it for a long length of time, or too loudly, or to meditate on the sounds too closely, since the indigenous people call it “dream music.” I don’t know if the sound of it opens you up to a spirit world (the way worship music does for Christians), but I didn’t want to go there.

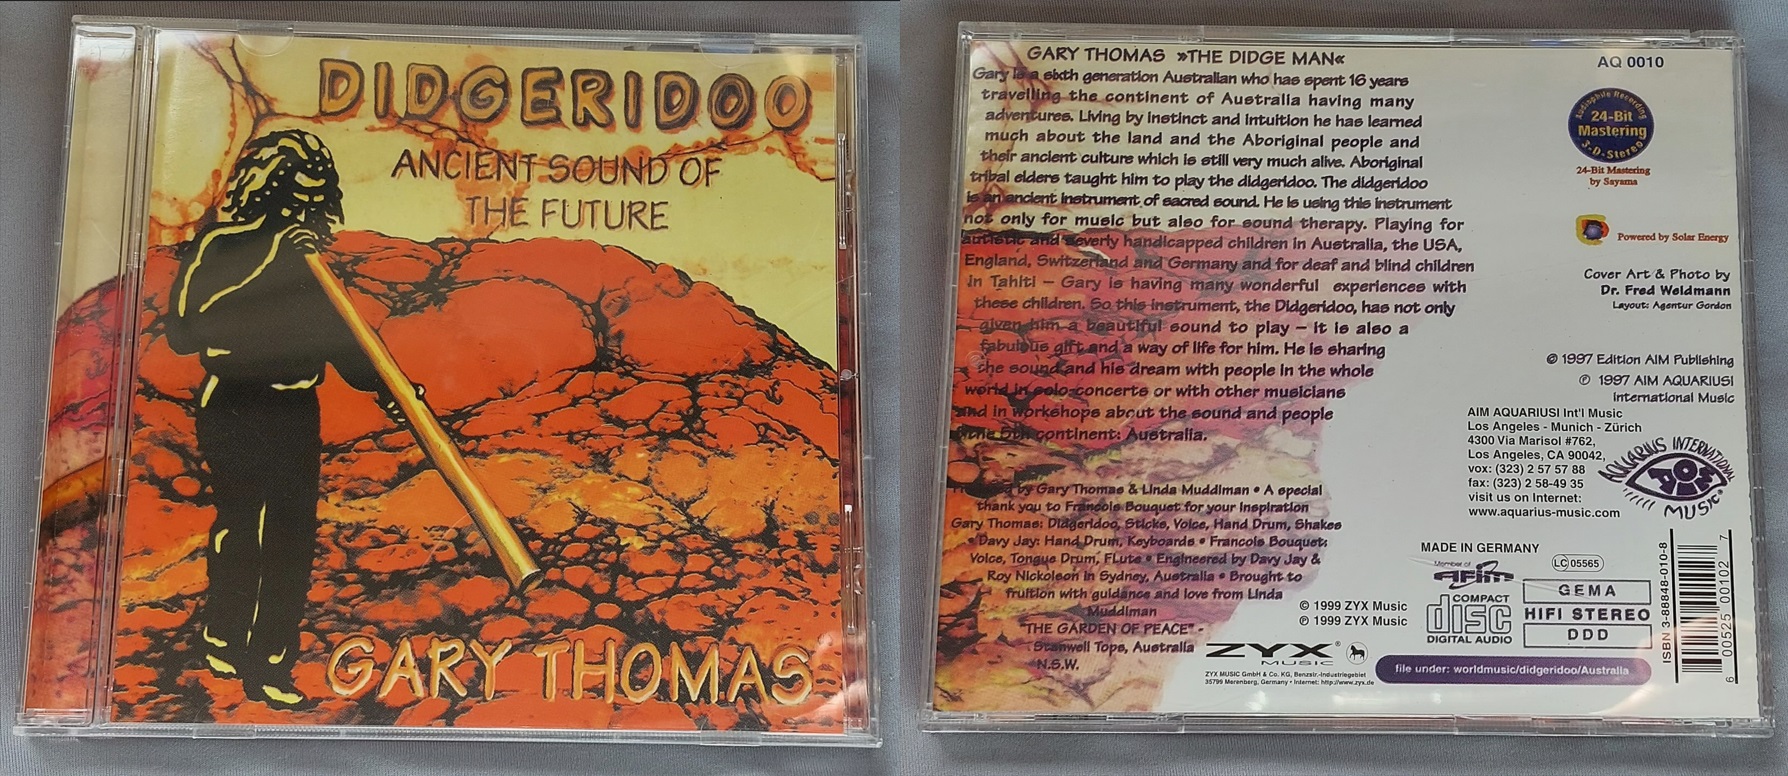
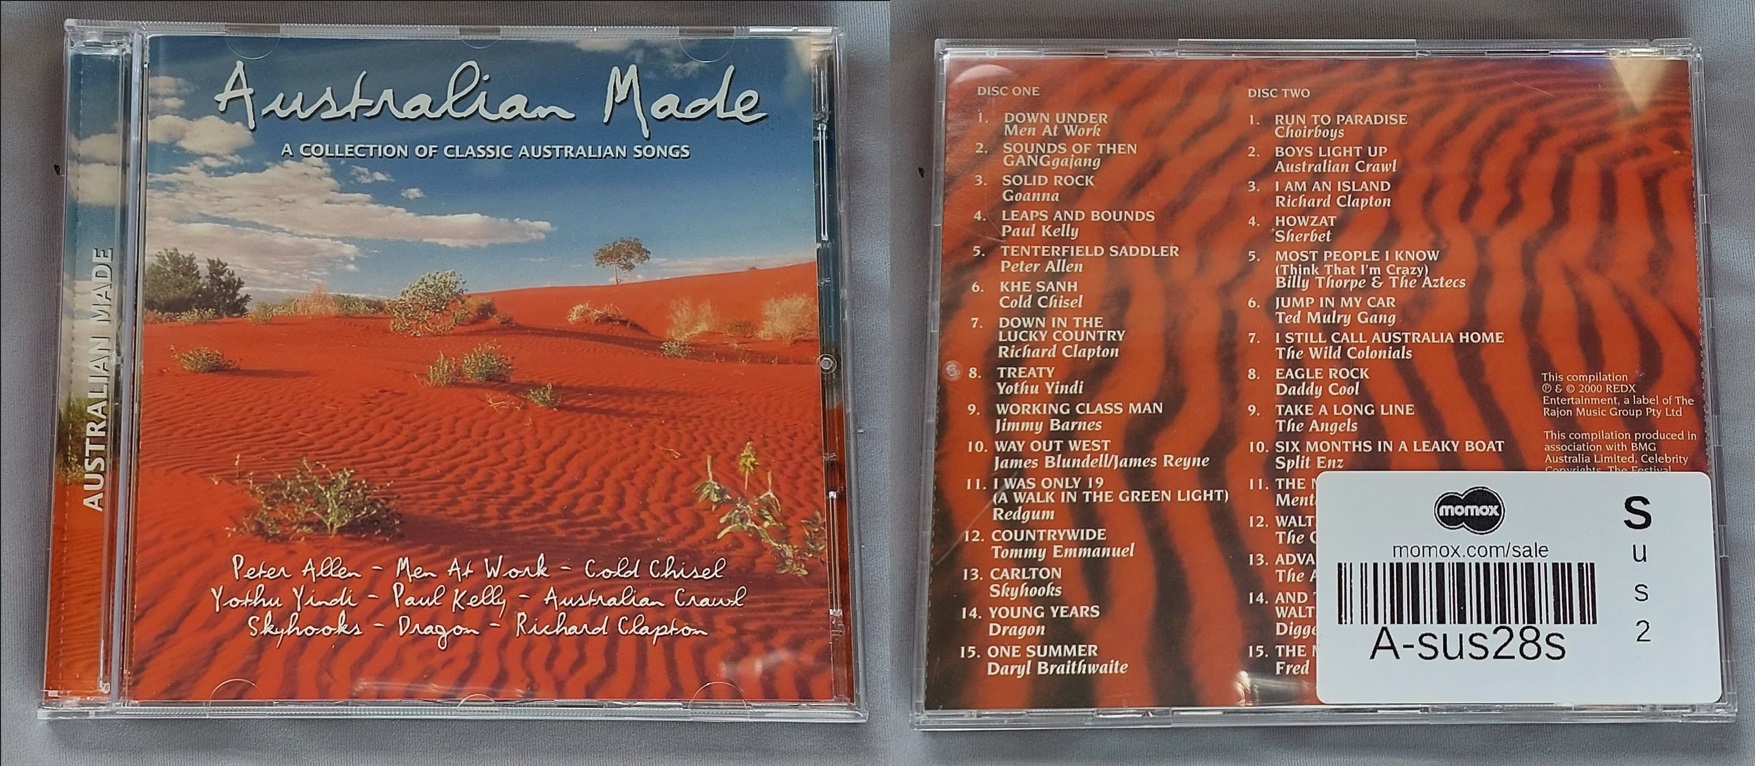
And this is the CD that I played after we had made our dancing sticks.  I found a used original online for $6 – a find of the century as it is out of print.  It has all the favorites on it.  “Down Under” by Men at Work, Waltzing Matilda by The Outback Singers, and an audio passage from The Man from Snowy River by Fred Hollows.  Absolutely perfect!!!!


Crafts

Digeridoos

So, I wanted the kids to have an opportunity to try playing a digeridoo, but I didn’t want them passing around my real digeridoo and spreading germs during cold and flu season.  So, we made one per kid using gift wrap tubes (which I had asked parents to provide, while they were massively available during the holiday season). The kids then used paint to decorate their digeridoos with various tribal designs. 

How to make a Digeridoo out of wrapping paper rolls:  https://www.koolkidscrafts.com/make-a-didgeridoo.html

How a real Digeridoo is made, by David Hudson:  https://youtu.be/2lBZ6yPW9WU

How to play a Digeridoo, by David Hudson:  https://youtu.be/0XlEkeot7HM

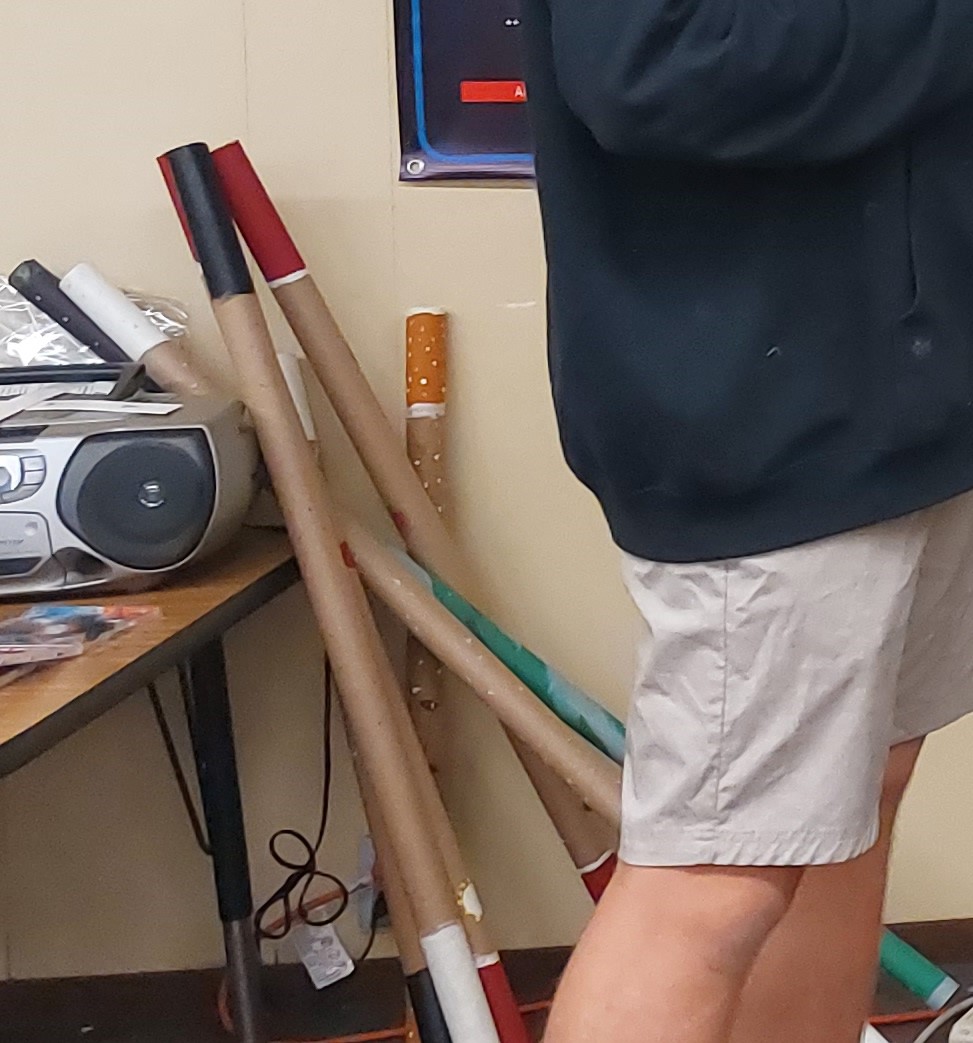
And then we all tried to play them.  It definitely takes some skills. I didn’t manage to get a photo of the kids playing them, but I did nab this photo of some decorated ones that the boys had done.
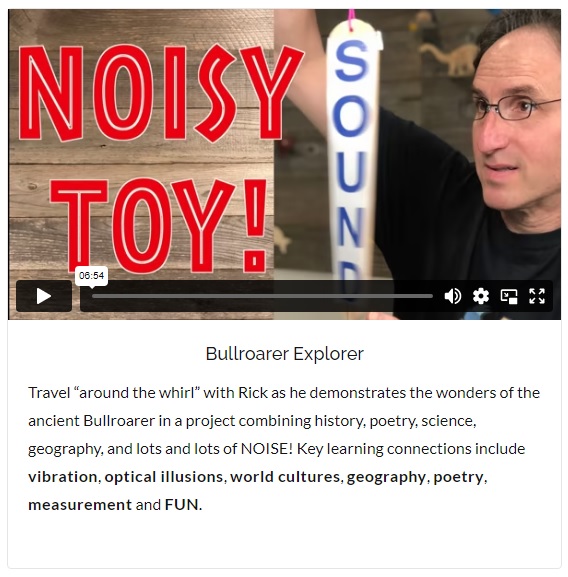

Bullroarers

The first thing was to show the kids the video clip of Crocodile Dundee demonstrating his Bullroarer skills in a scene from the second movie: 

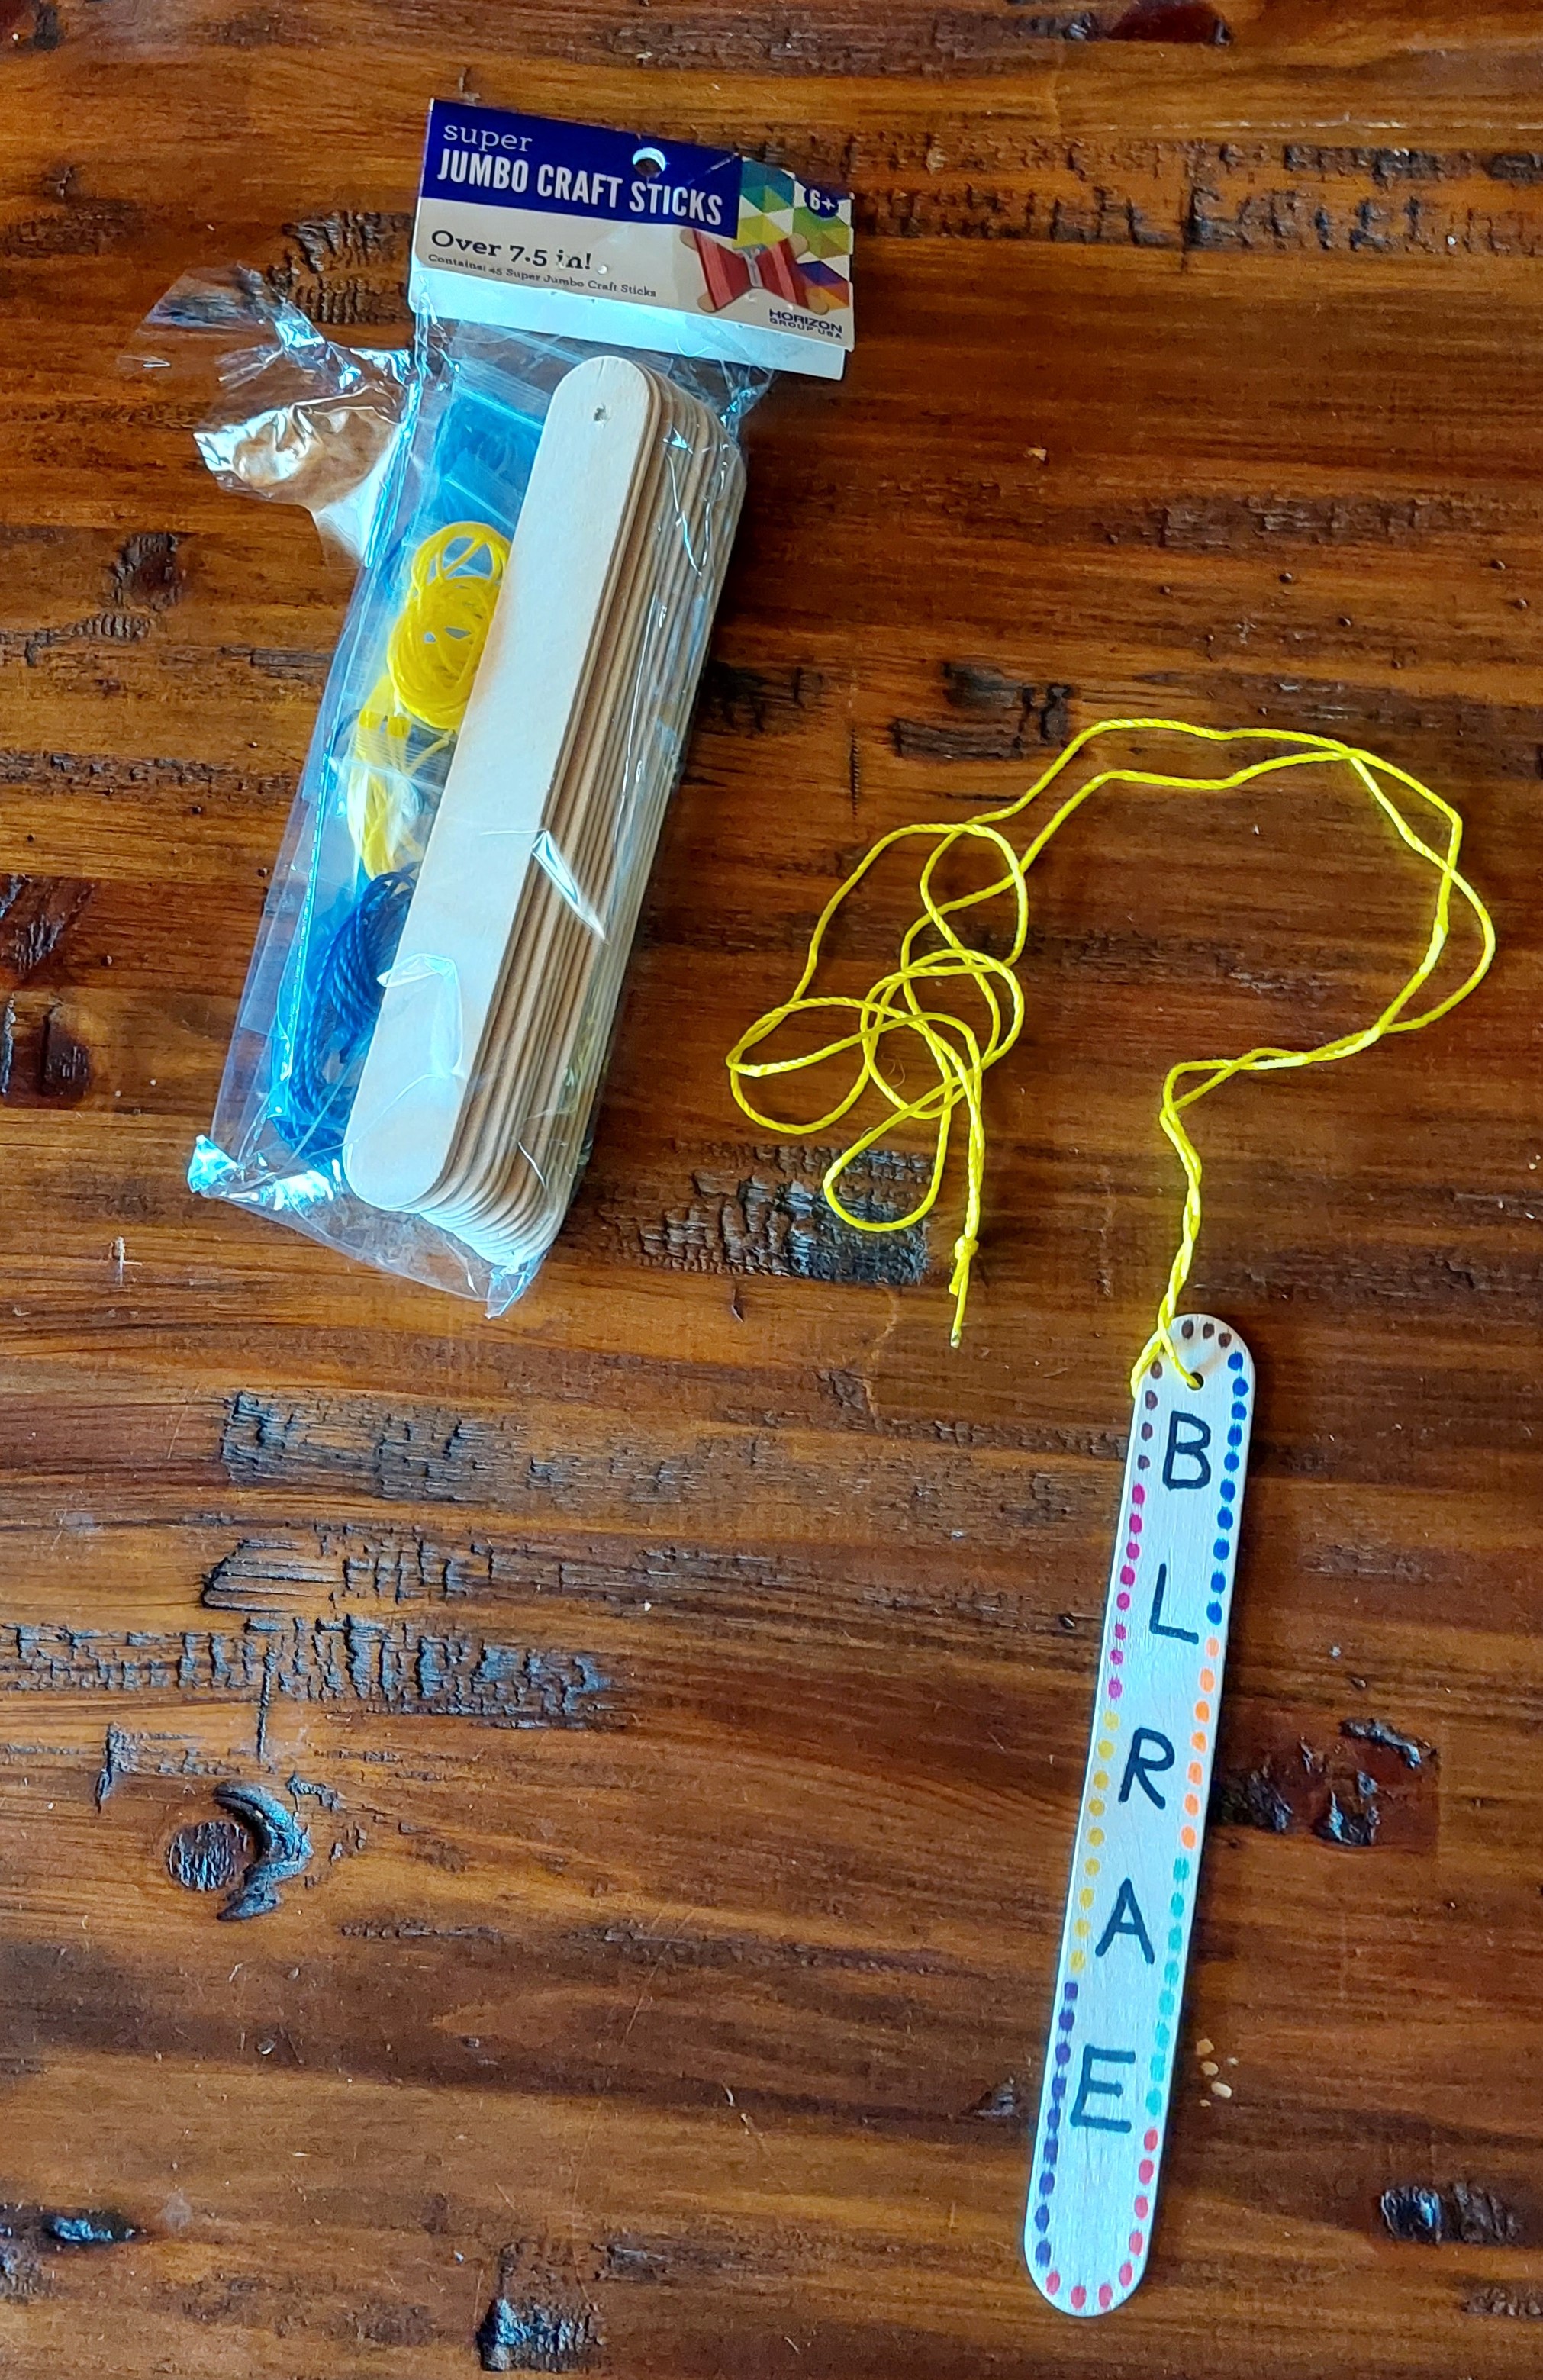
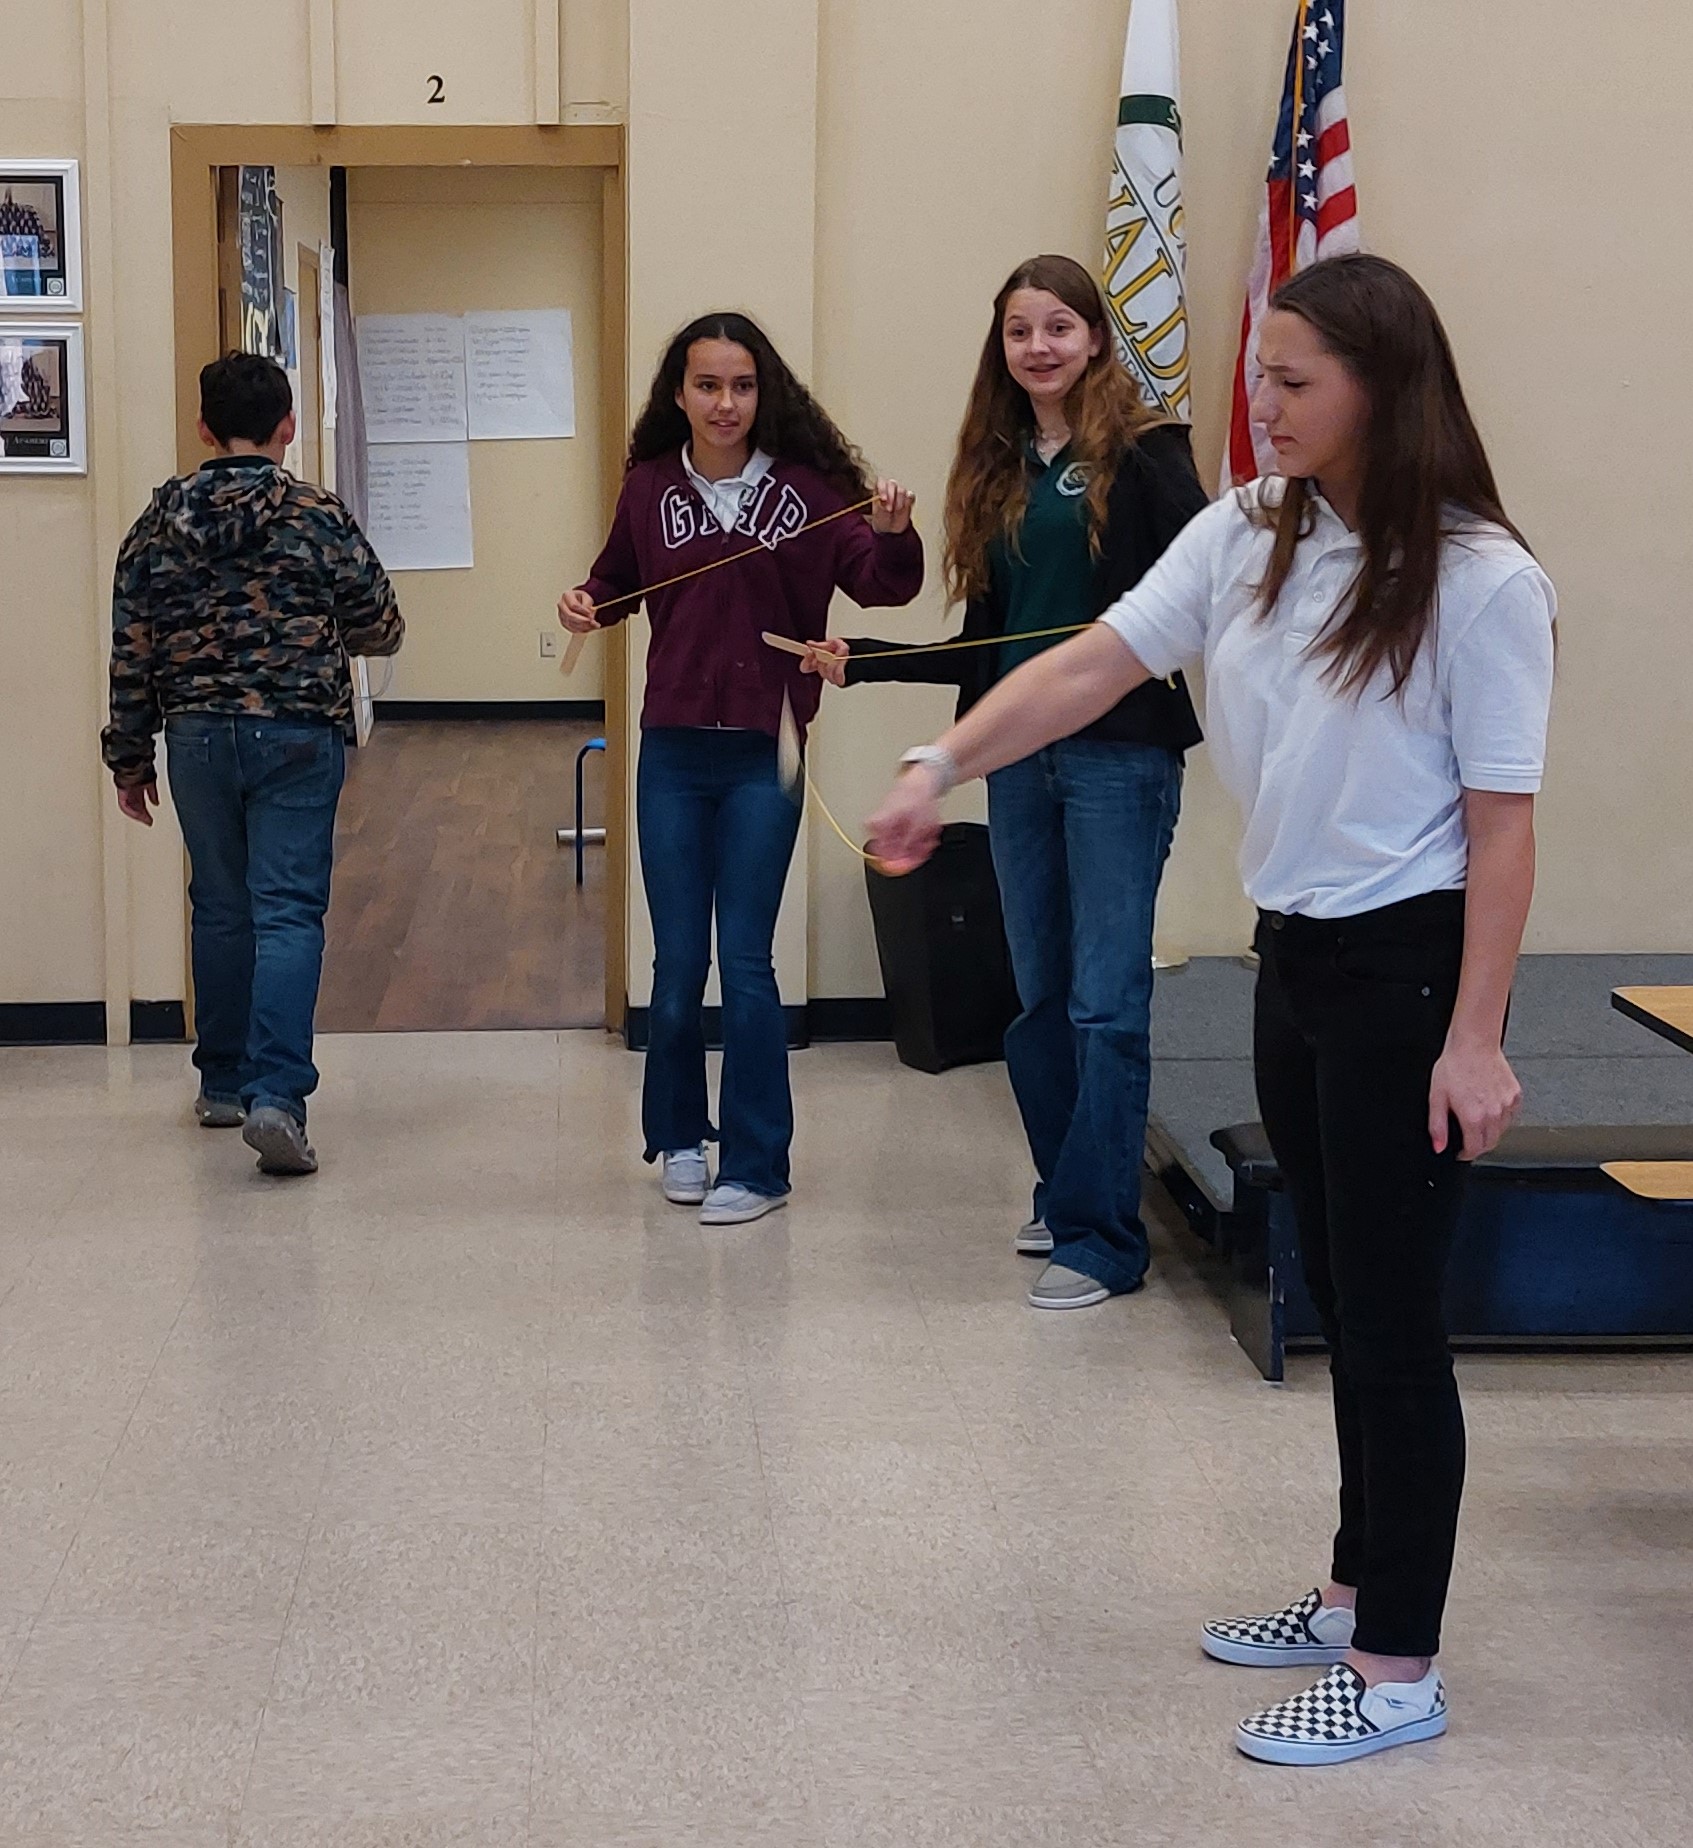
Normally Bullroarers are heavy pieces of carved wood threaded with a strong thick string or thin leather strap, but I found a kid’s craft version that worked like a snap:

How to make a kid’s Bullroarer:

https://www.schooloftoy.com/freeprojects/

Click on the link above and then scroll down to the bottom of the webpage until you see this video, pictured below:

I premeasured lengths of thin paracord and stuffed them in baggies, and I also predrilled holes in the jumbo craft sticks (tongue depressors). It made it super easy to pass out the elements. All the kids needed to do was thread the string through the hole and they were ready to use.  I had the kids decorate their sticks with Sharpie markers, and then we all went out into the great room to give them a whirl, (literally)!  This was probably the most fun experience of the whole party.


Boomerangs

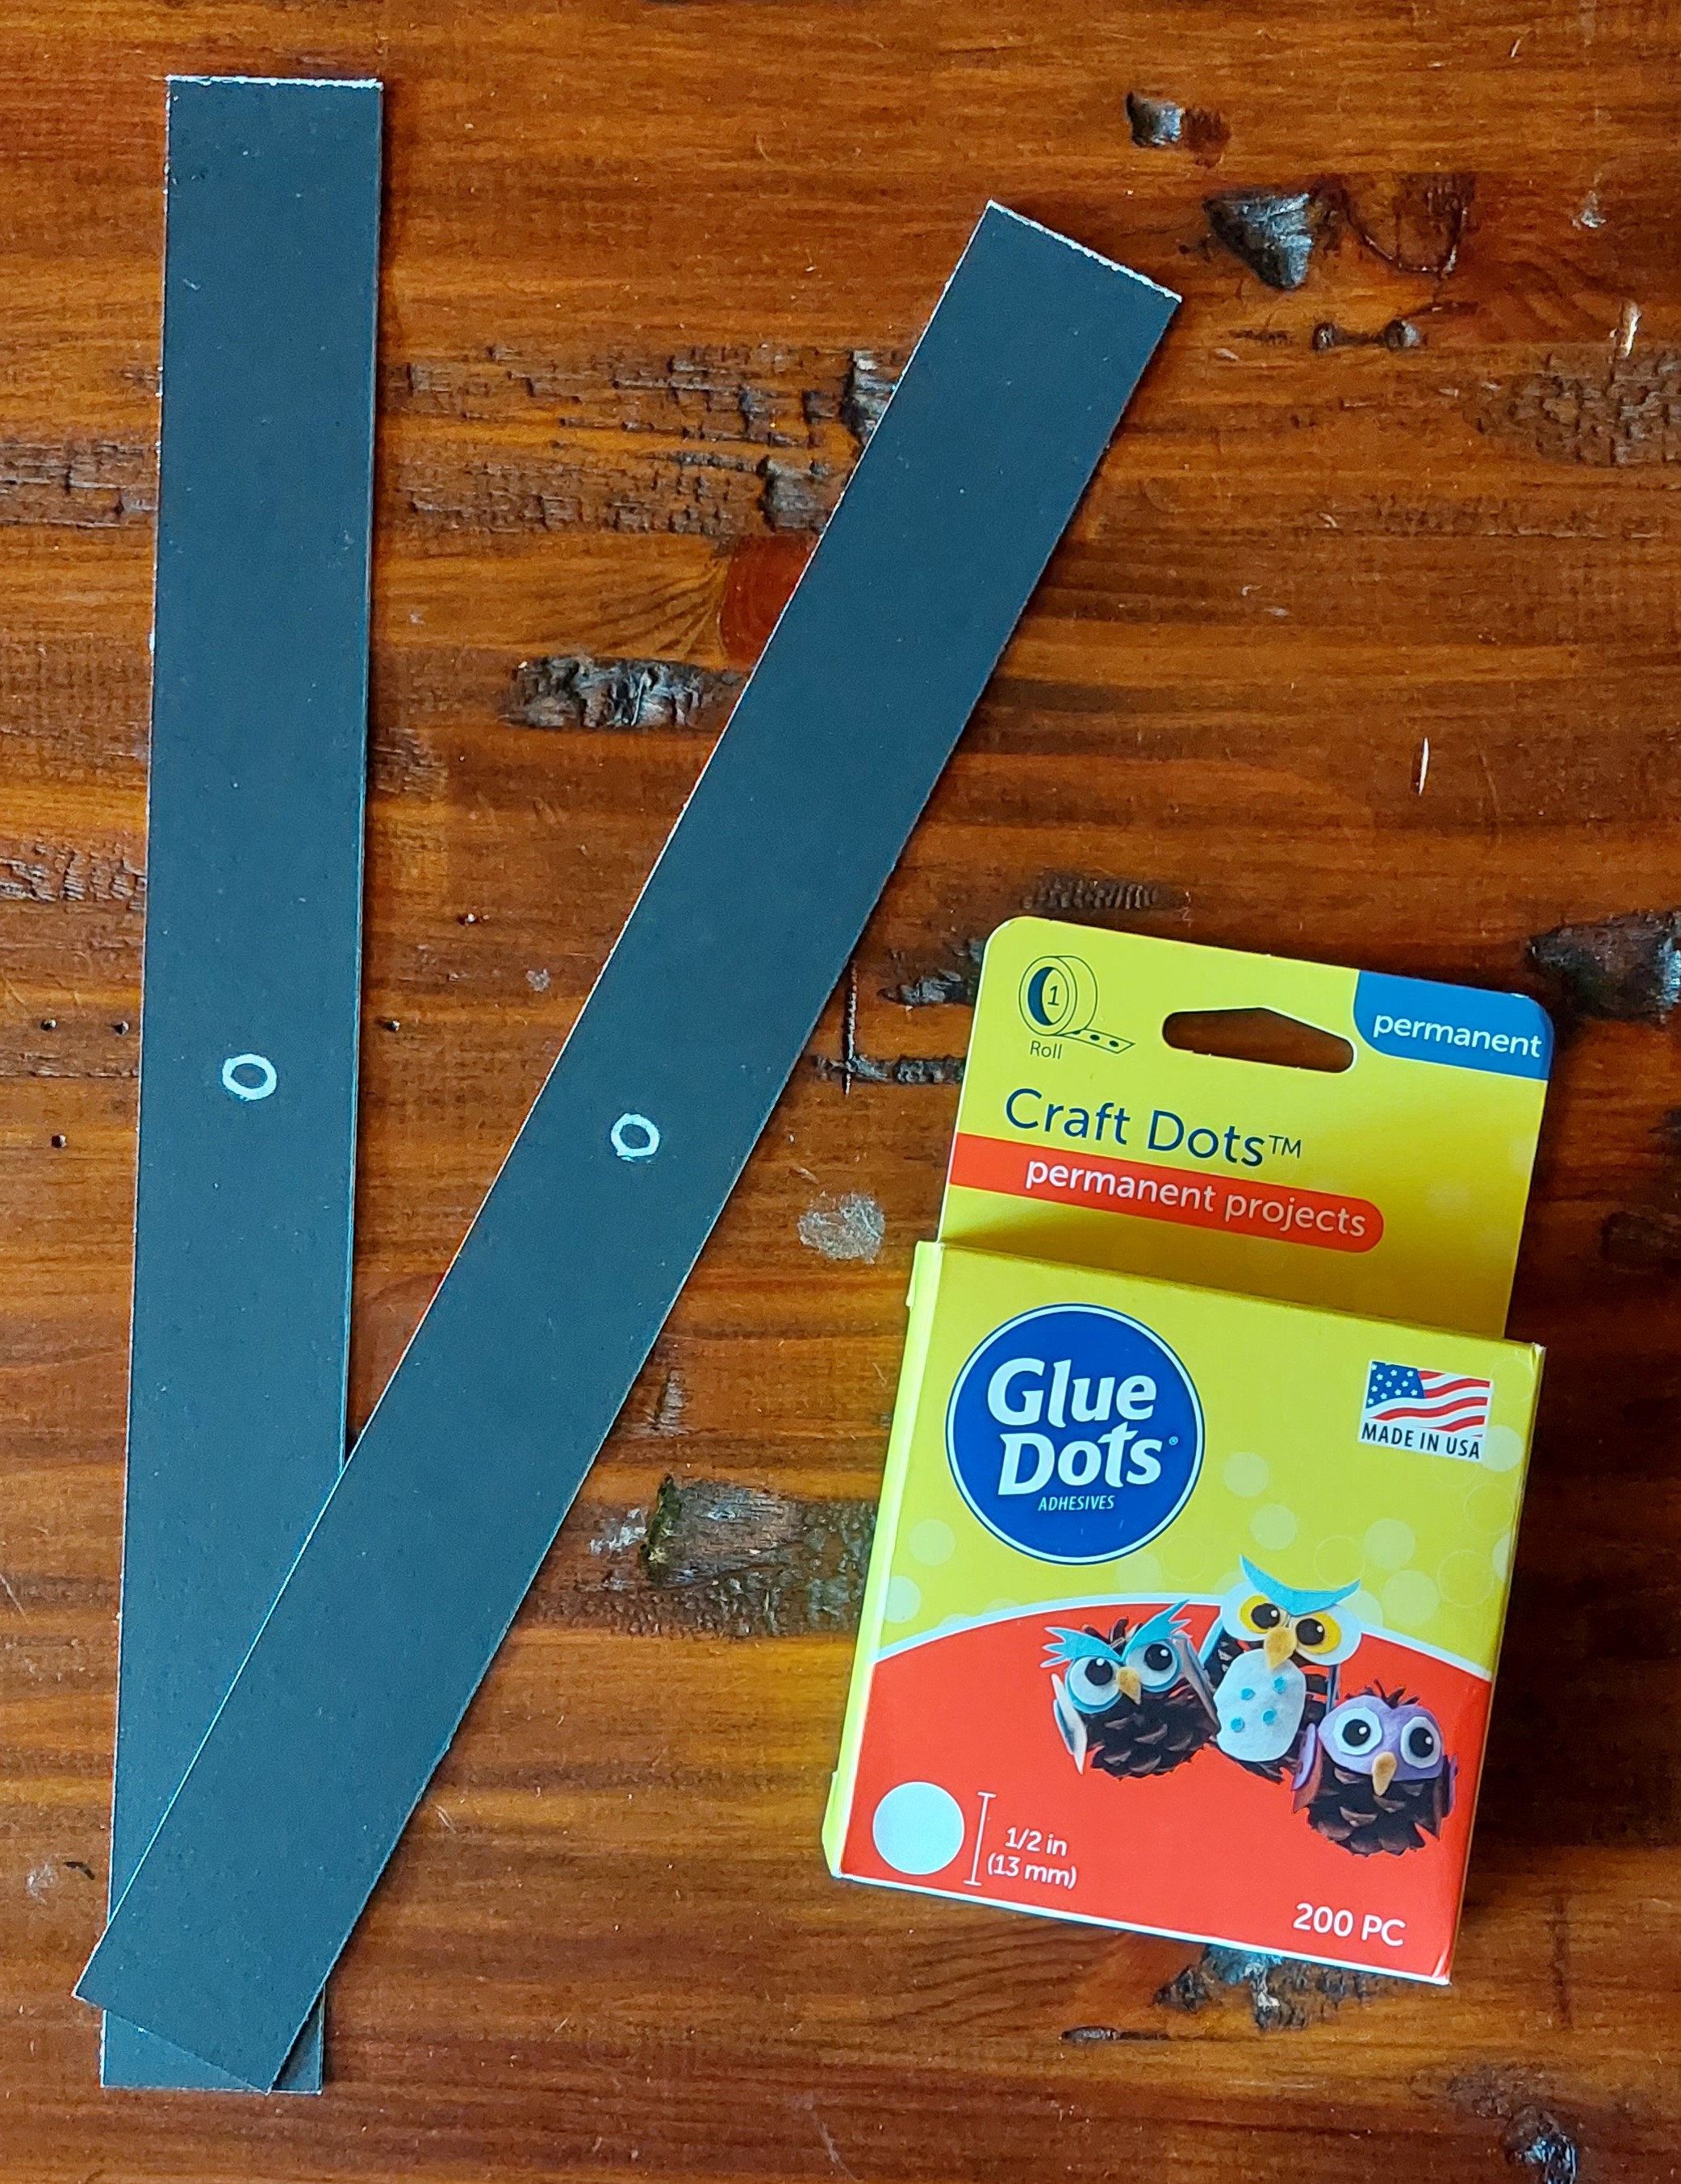
The same man (David Hudson) who did the video on digeridoo playing also did one on how to make a cardboard boomerang, which he called a “Roomerang.”  The kids watched the video, and then I passed out the strips of cardboard that I had precut.  I marked the center to help the kids be able to attach the two pieces properly, and we fastened them with glue dots, which worked like a charm.  I had made a few as examples, and also so that I could test them to see if they really worked.  They did, but, not as well as his did in the video, but maybe with practice. I found that they worked best when held between thumb and pointer finger right at the base and flicked vertically, and sort of towards your right (if you are right-handed). It takes a little practice.


How to make a kids’ Carded Boomerang (“Roomerang”) with David Hudson:

   https://triballink.com.au/wp-content/uploads/2020/03/How-to-Make-a-Roomerang.webm

In this video (link above) he also talks about the designs, which are special to the Gubbi Gubbi/ Kabi Kabi people. These were my examples:


Dancing Sticks

And finally, our last activity was to make the dancing sticks.  The same David Hudson as did the Roomerangs, and Digeridoo has a teaching video on how to make the dancing sticks, I basically followed his instructions, except instead of using the clear shipping tape that he uses, and then wrapping it with string, I used a decorative Duct tape to save a step.  I also used Bamboo because I have it growing in abundance in my yard and am always looking for useful opportunities to get rid of it. Come to find out, bamboo does grow in the very northern area of Australia.


How to make Dancing Sticks, video featuring David Hudson:   https://youtu.be/u-6yEYPiYsE


Food

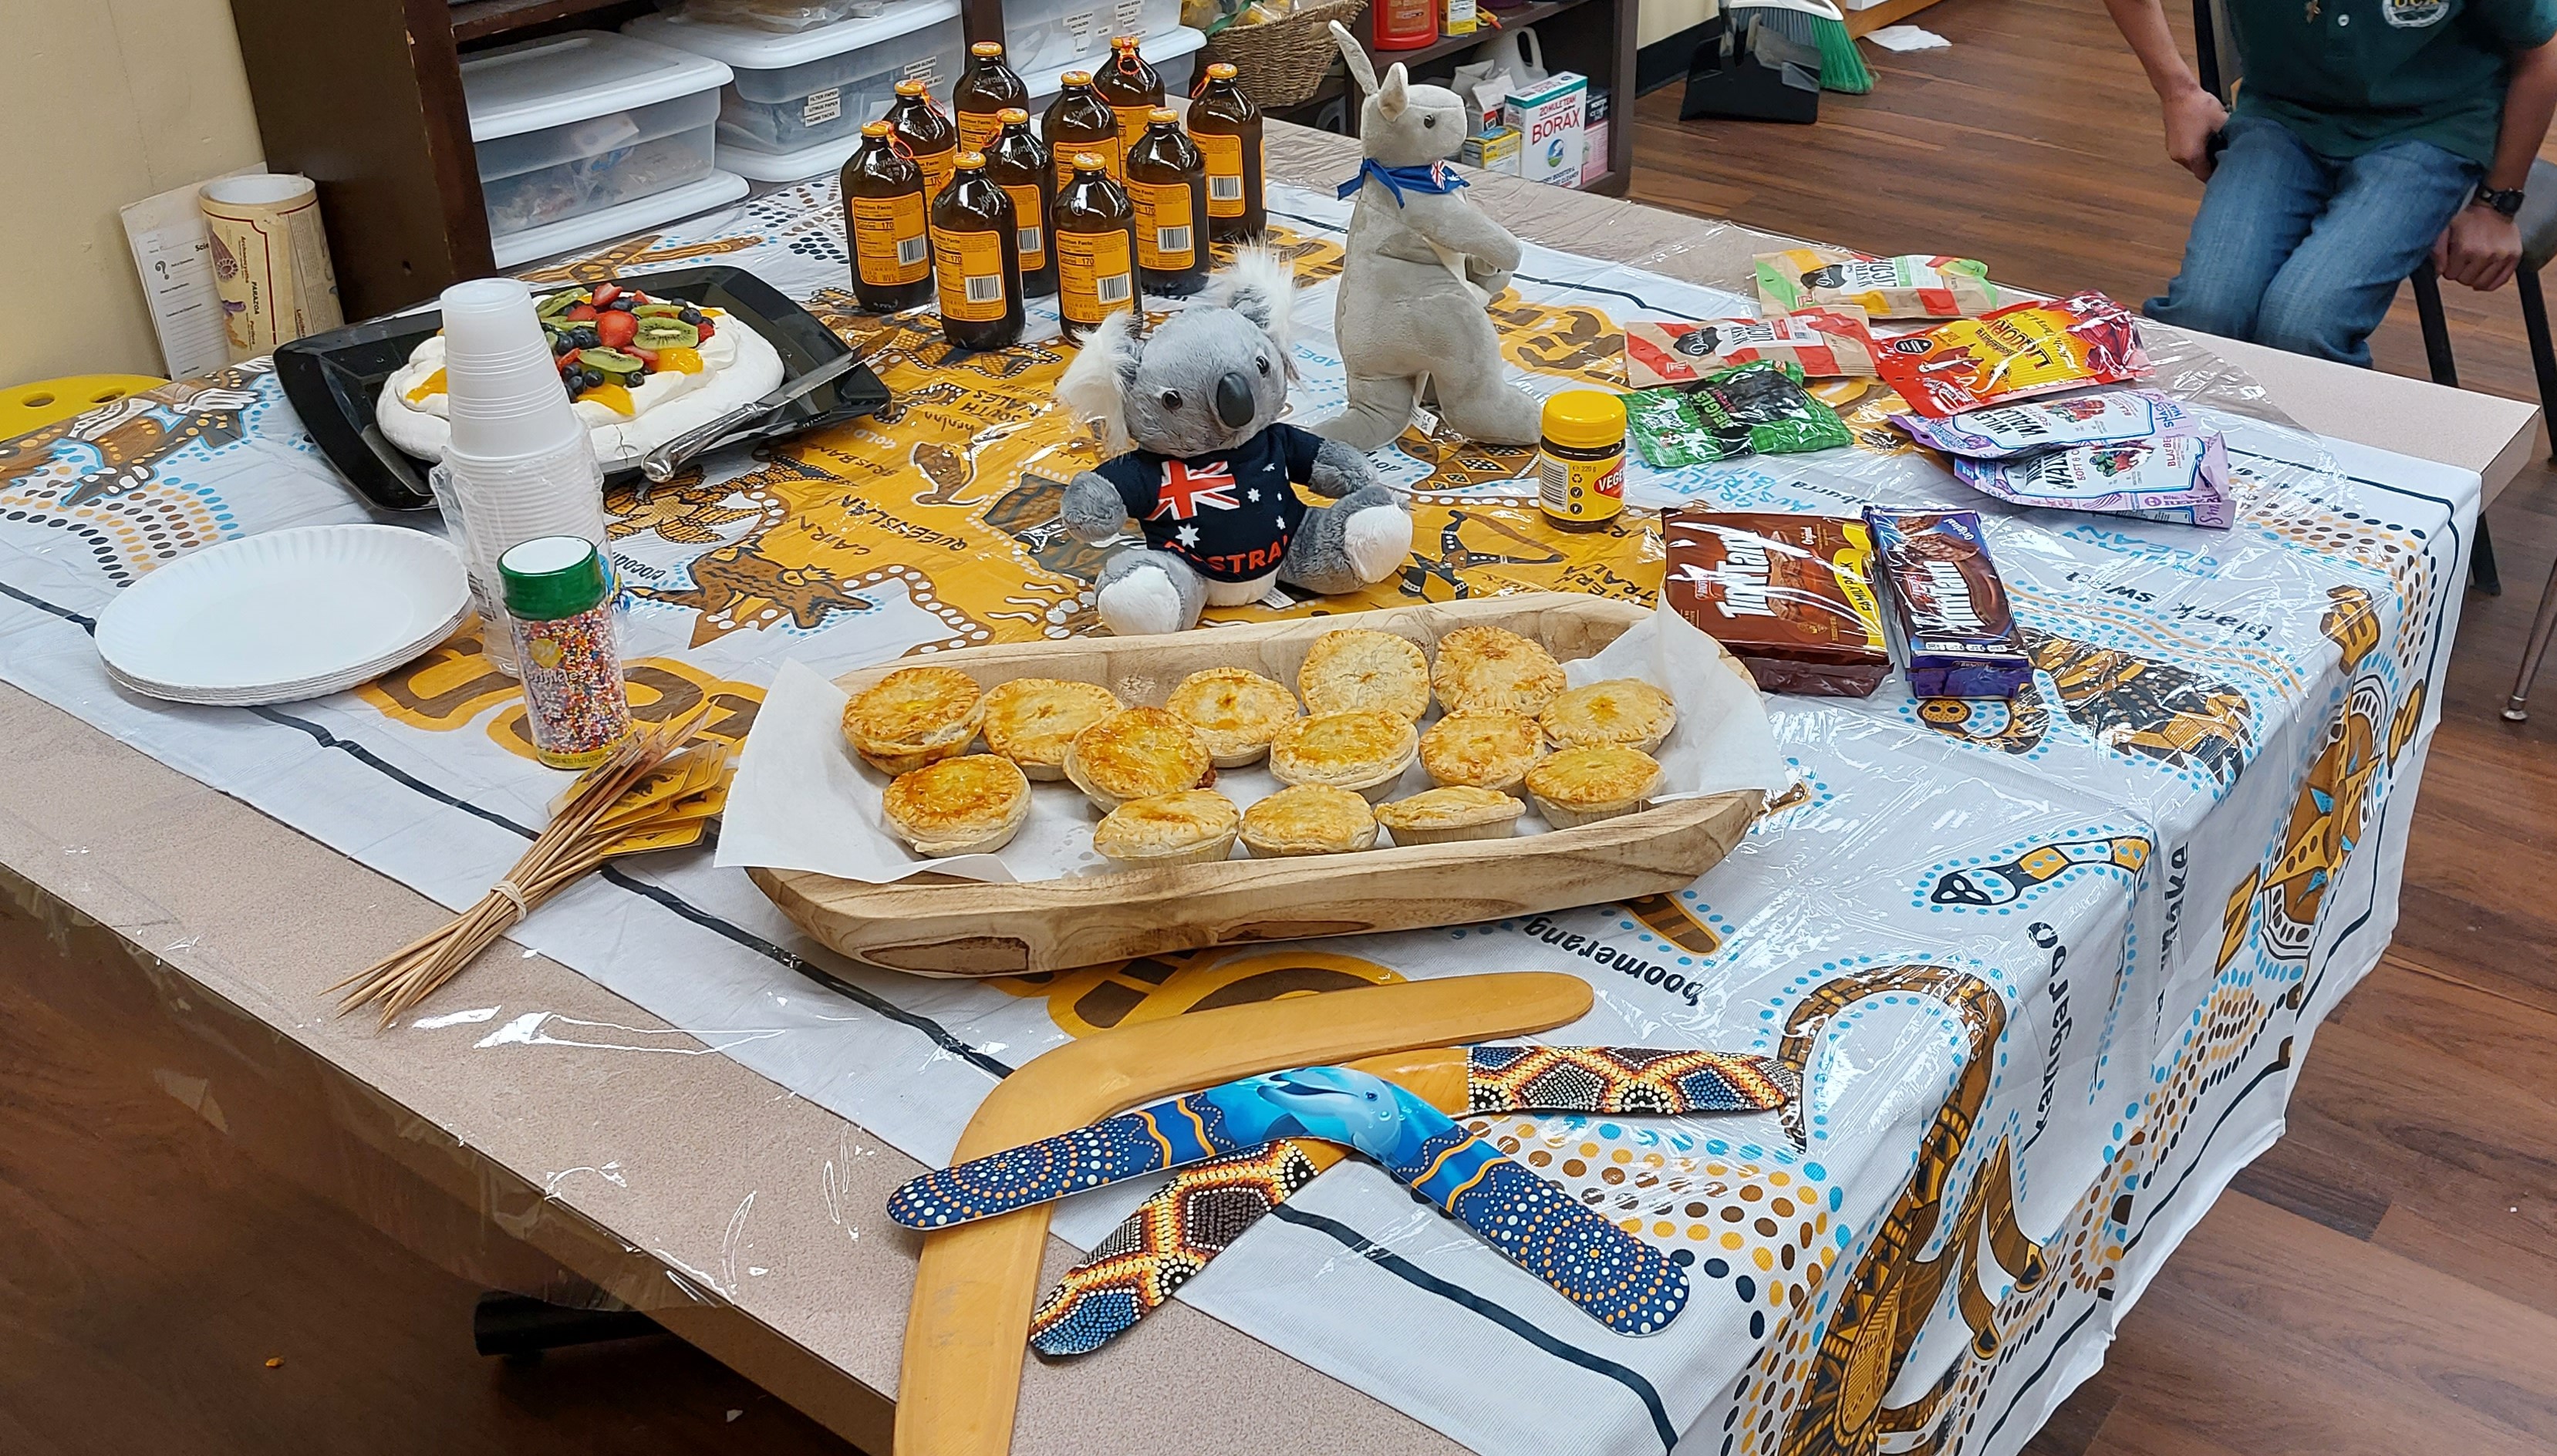
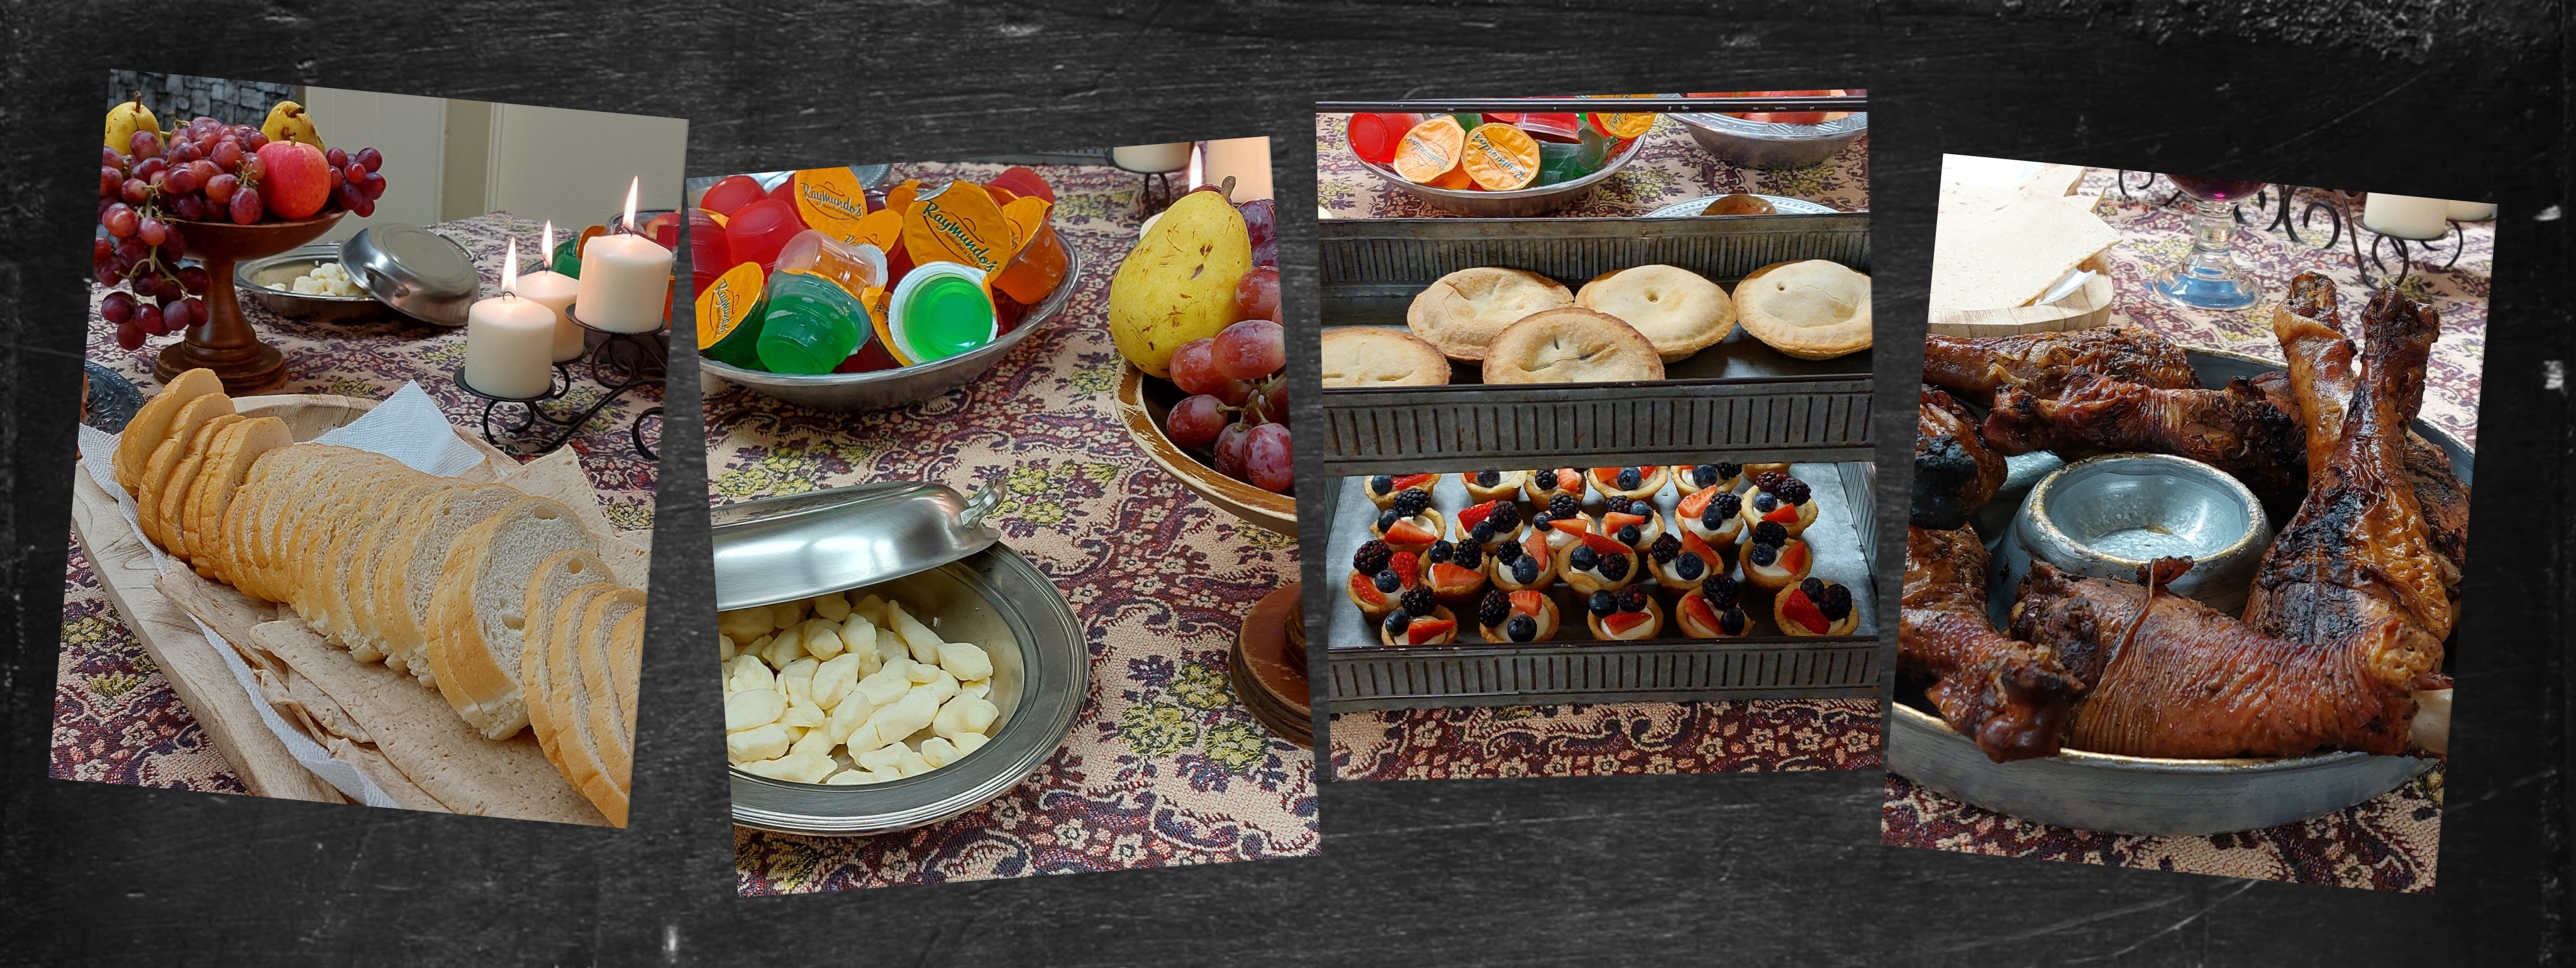
What Australian party would be complete without food? Top of the list has to be the national dish of Australia – the Aussie Meat Pies, and then Tim-Tams, Vegemite, and Pavlova!  I really had ambitious plans for this party, and although I didn’t have time to make everything I wanted to, I’m including the recipes for everything I wanted to.  That way, if you (or I) ever want to make these lovely morsels, we’ll know where to find all the recipes in one place.

First things first, Americans need to know how to eat a Vegemite Sandwich, because most of us try it and do it all wrong, and end up spitting the nasty gack substance out into the garbage can with a majorly disgusted look on our faces.  So, I thought it fitting to let Hugh Jackman give us a proper demonstration:

Hugh Jackman on Jimmy Fallon: https://youtu.be/P_sUhTWtvG4

I found Vegemite at Cost Plus World Market, but unfortunately the parent who was supposed to bring the white bread and butter for the party, well ooops they forgot.  Meh! It happens. 😦   So, I wasn’t able to make a Vegemite Sandwich for the kids to try, nor was I able to make Fairy Bread for the kids to sample either.  I was disappointed, but we had lots of other stuff to eat and do, so I eventually got over it. LOL


This is Fairy Bread:

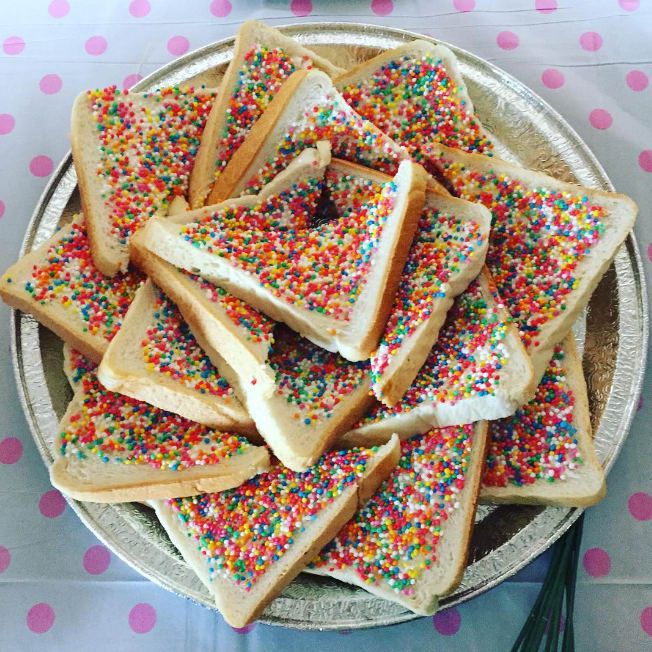
All you do to make the Fairy Bread is toast and butter some slices of the cheap, soft, white bread (just like you do for the Vegemite Sandwich) and then cover the topside with sprinkles.  They can’t be just any sprinkles though; to be truly OZ-thentic they need to be the tiny round sprinkles you see in the photo.
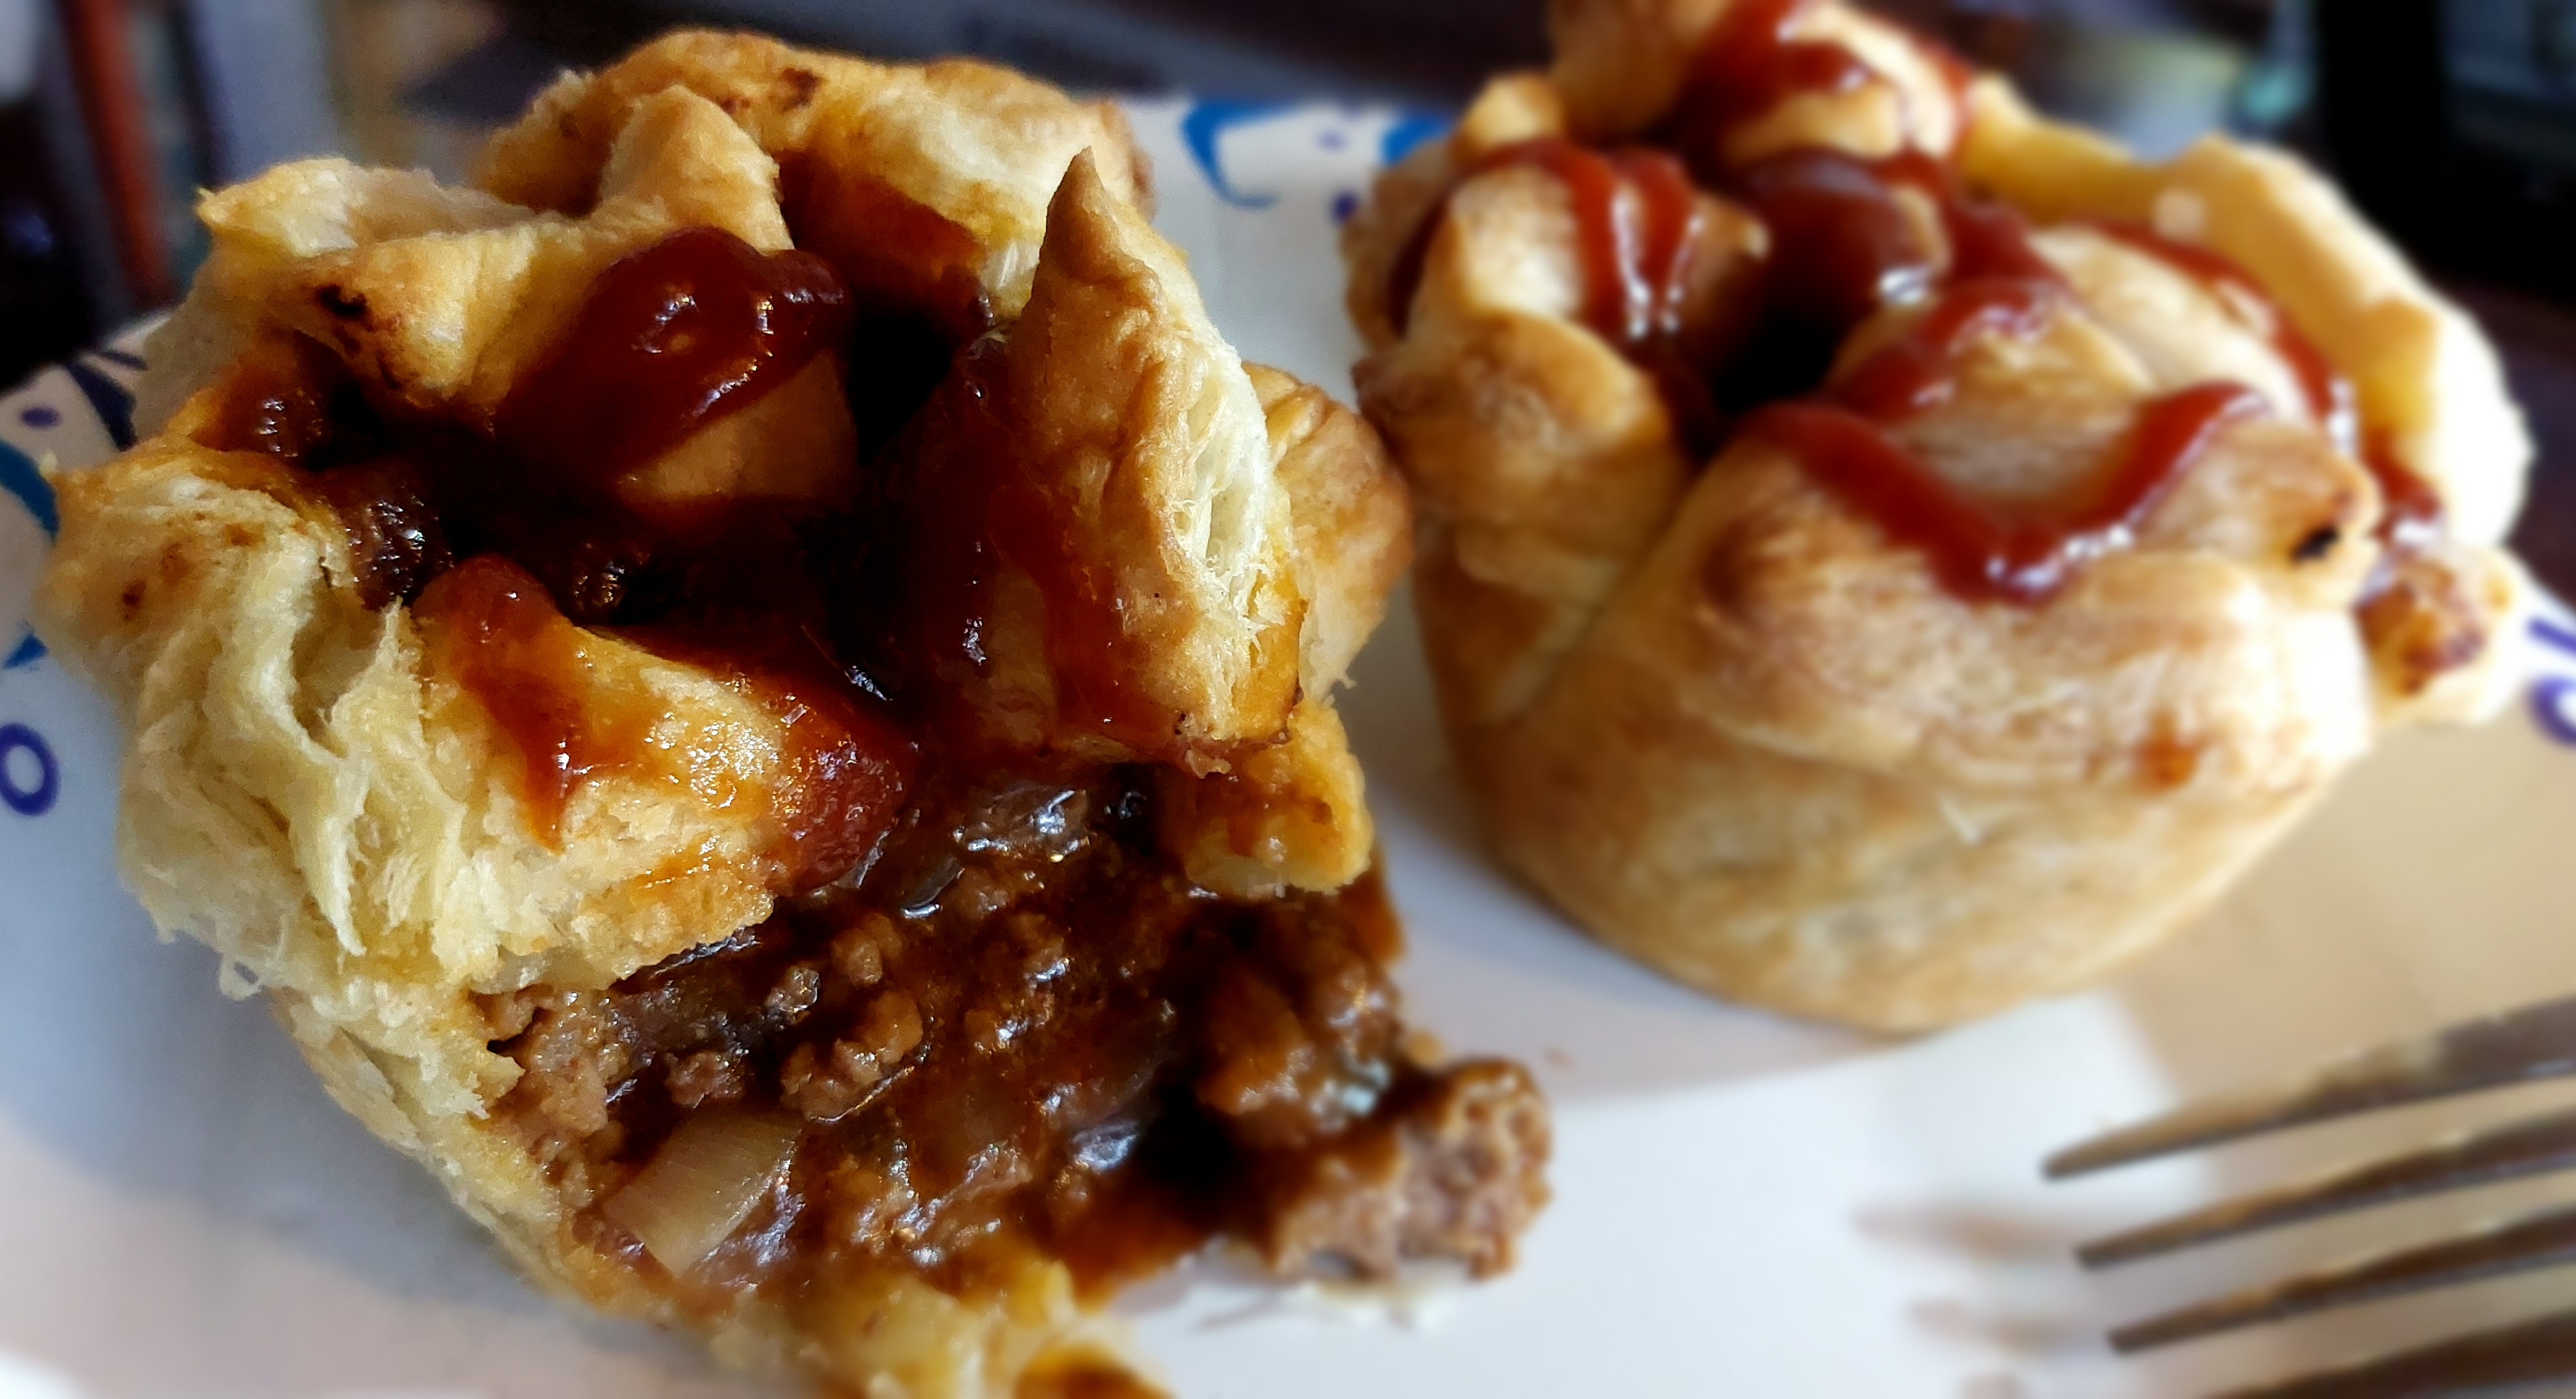

Aussie Meat Pies

I made a batch of these before the party just to see what they tasted like, and I think they are quite similar to a sloppy joe in a pie crust.   I did them exactly the way Aussie Girl Can Cook does in her video, but to be authentic the bottoms of the pie are supposed to be a “short crust,” which, in America, is just a regular pie crust, and only the tops of the Aussie pies are supposed to be puff pastry. I made mine in a muffin pan. And I didn’t have enough puff pastry to do the tops properly, so I used the little bits of corners that I had snipped from the squares to make them round. Didn’t have to cut a vent hole that way.

So, because I was extremely pressed for time, this is how I made mine for the party:

Mrs H’s Aussie Meat Pies

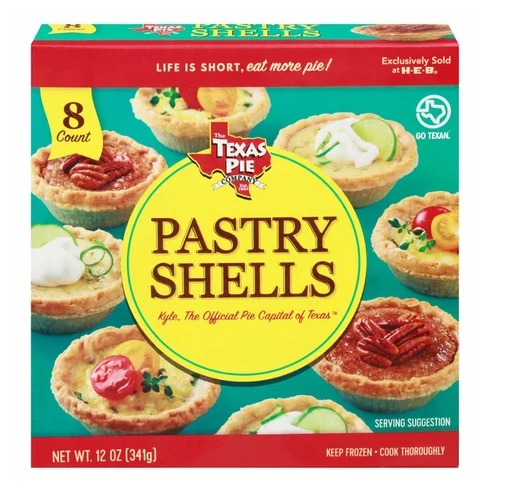
3  12-oz. packages (8-count each) of Texas Pie Company Pastry Shells, sold exclusively at HEB

1  17.3 oz. package Pepperidge Farms Puff Pastry Sheets

2 pounds ground beef

1 onion finely chopped

1  24-oz. can Hunt’s Manwich Sauce

Enough chicken stock to make a little gravy

1 tsp. Vegemite

I started my process 2 days before the party by cooking the beef filling first and then placing it in the fridge.  Cook the ground beef until browned, add onion and cook until slightly softened.  Pour in the Manwich sauce and stir.  Let simmer on stovetop for about 10 minutes.  Add enough chicken stock to make the gravy and let it cook down to thicken. Stir in the Vegemite and remove from heat.  Let cool slightly and transfer to a food storage container. Place in fridge overnight.

The next day take the frozen Puff Pastry out of the freeze and set on counter top to thaw.  Take the Pastry Shells out of the freezer also and arrange on a cookie sheet.  Flatten the edges of each shell to remove the decorative ridge, then put the shells in a 350 degree F oven for 20 minutes (as directed on the package).  Pull the shells out of the oven and immediately begin filling each with about a small ice cream scoop full of the chilled meat mixture. 

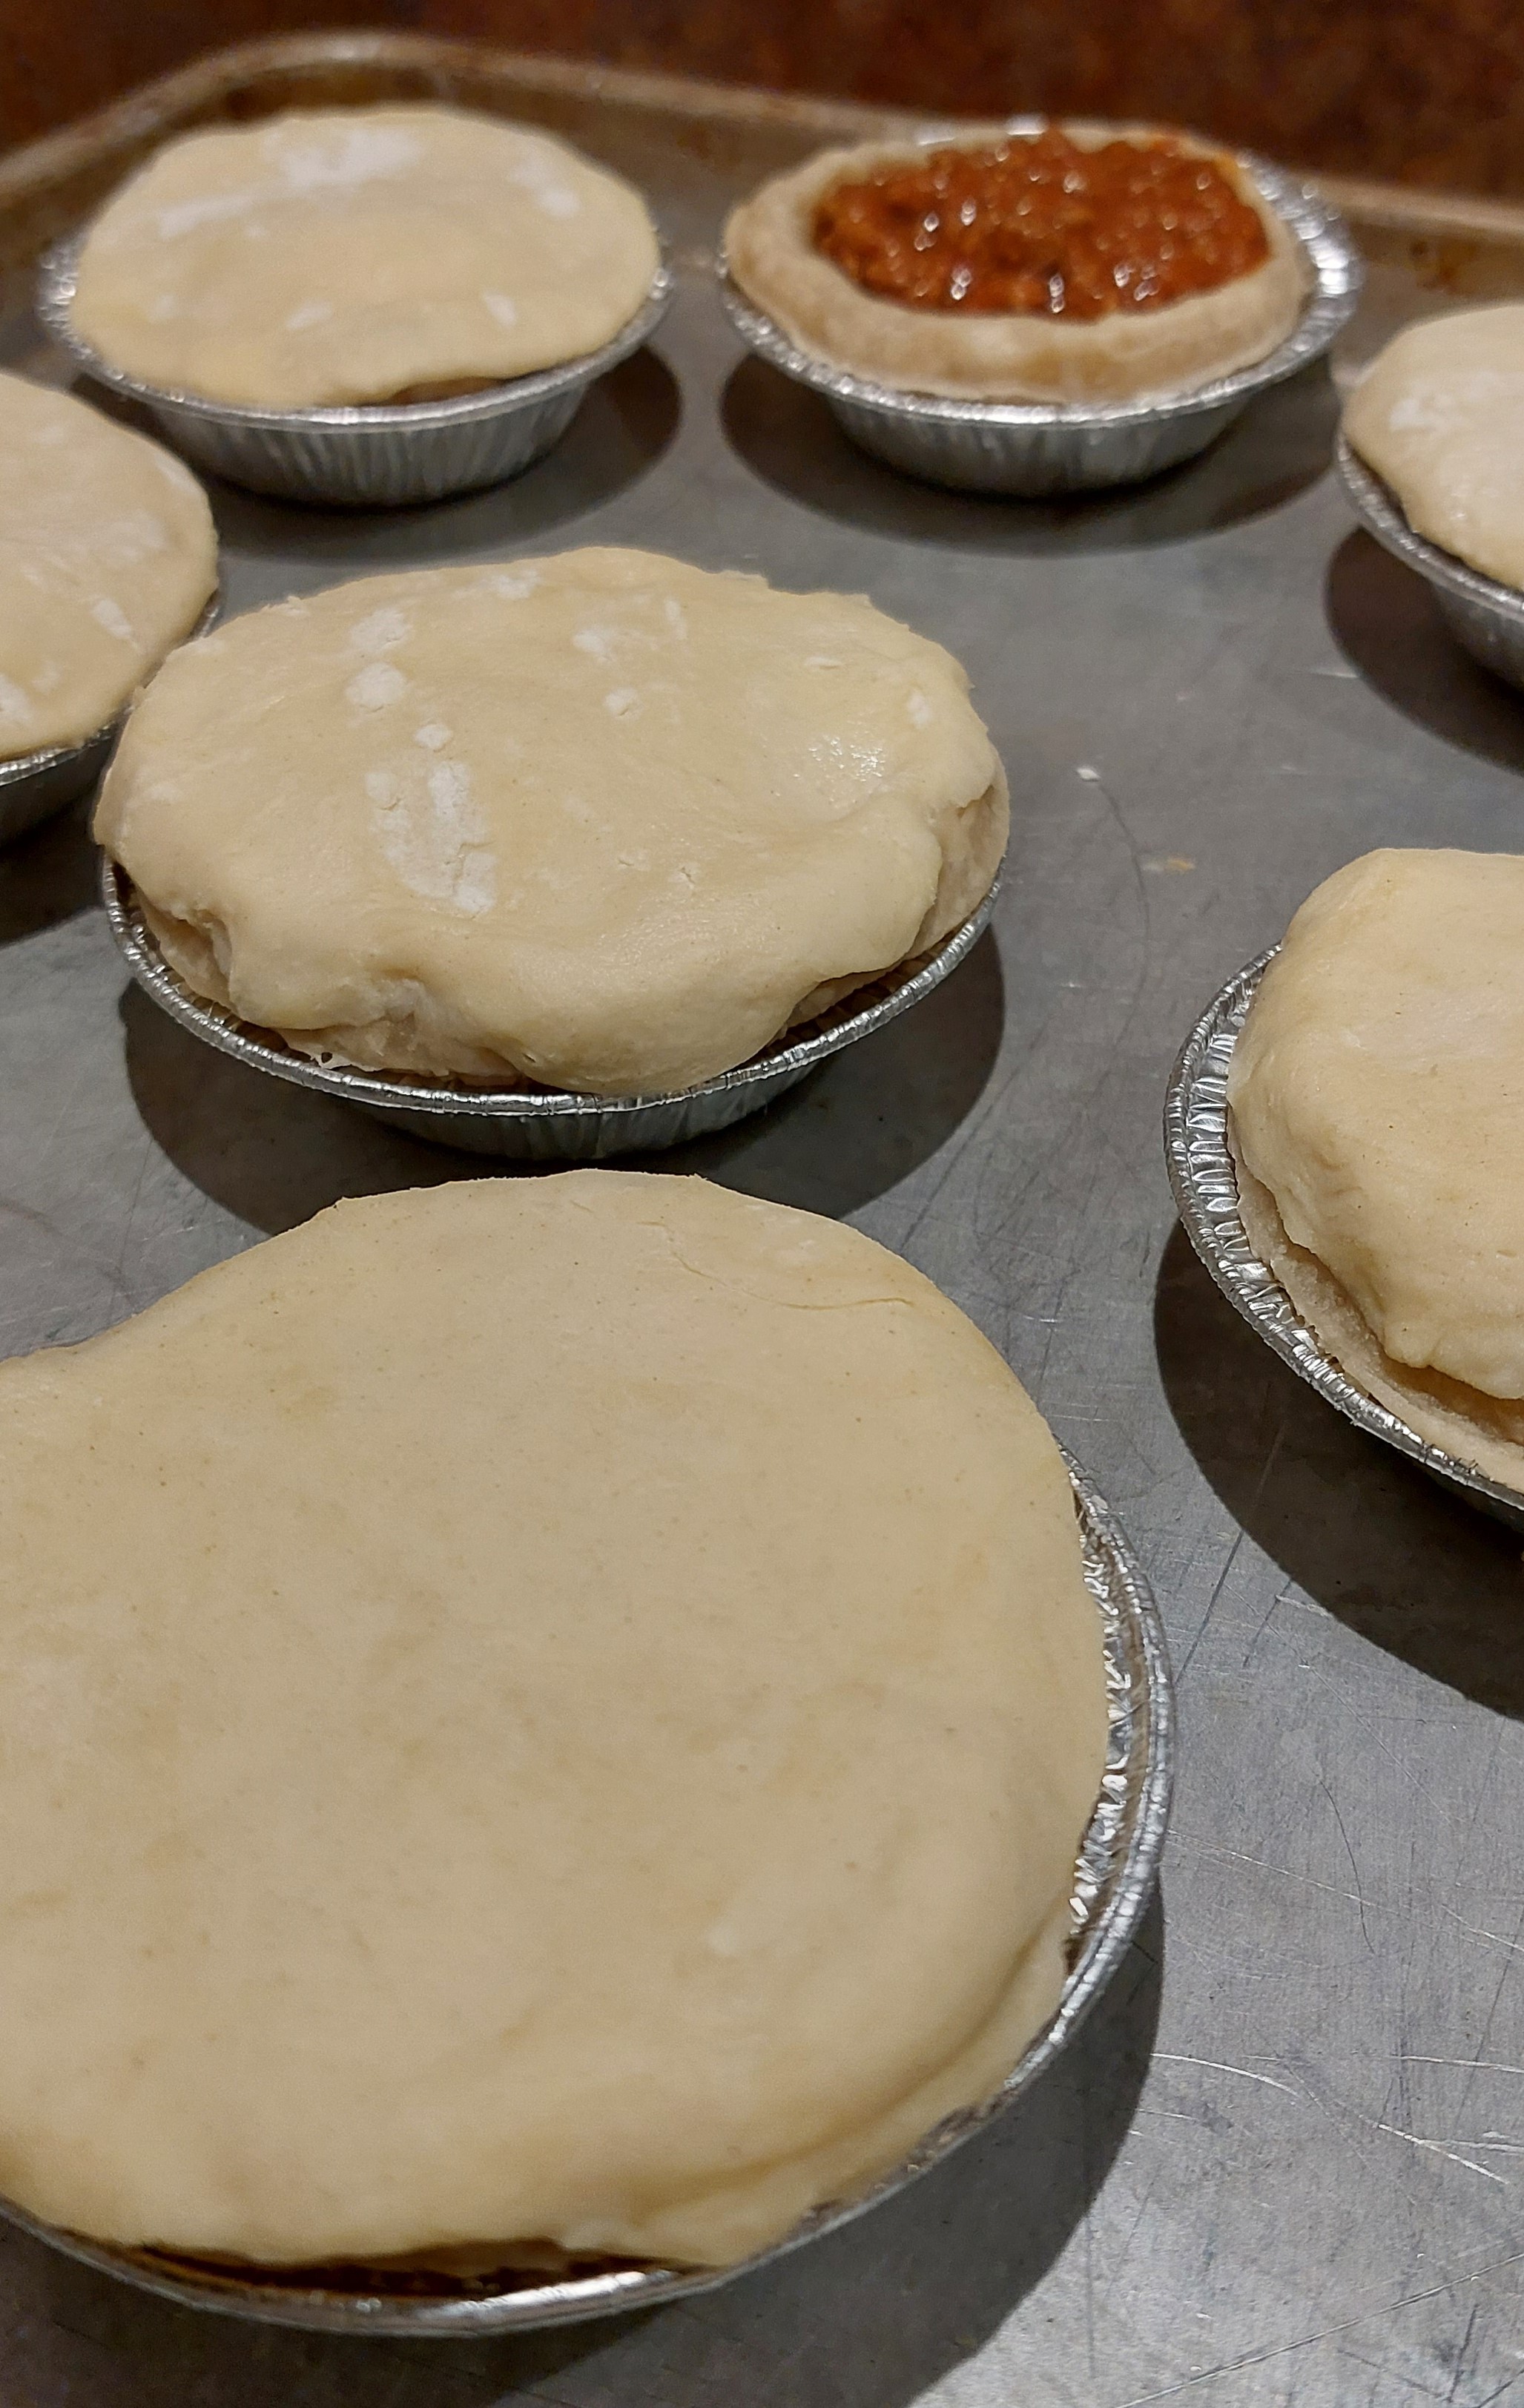
On a slightly floured work surface, unwrap and gently unfold one sheet of puff pastry. Use a drinking glass or biscuit cutter (that is roughly the size of the tops of each pie), cut circles in the pastry.  If you run out of dough, the bits can be collected and gently kneaded on a floured surface and then rolled out with a rolling pin.  Let rest a few minutes and then cut more circles.  One package should cover 24 little pies, if you are frugal.  Take a circle of puff pastry and hold it in one hand, dip a finger of your other hand in a cup of water and moisten the pastry all the way around the edge on one side.  Lay the moistened side down on top of a meat pie, stretching if needed, and then press it against the pastry below with your thumbs.  Use a fork to seal the edge all the way around.  Continue with the next pie, and the next, until you have finished covering all your pies. 

Beat an egg or two in a small bowl and then using a pastry brush, brush the egg over the top of each puff pastry top.  A little milk can be added to the egg if you need to stretch it to have enough for all the pies. Use a knife to cut a little vent hole in the center of each pie.

Place the pies in a 350 degree F oven for 20 to 30 minutes, or until the top crusts are shiny and golden brown.  I think mine might have baked longer than 30 minutes, but my oven has been weird lately. Just keep an eye on them to get that beautiful golden-brown color.  Remove from oven.  Let them cool slightly and then remove them from the pie tins. They can be served hot at this point, plain, or with sauce (ketchup).

If you want to serve them the next day, just let the little pies cool completely on a baking rack (removed from the tins) for about 10 or 15 minutes. Place the cooled pies in a single layer in a large zip-loc bag and then pop them into the refrigerator for overnight storage, or they can be individually wrapped, tightly, in plastic, and then placed into a zip-loc bag and into the freezer for longer storage. 

The next day place the pies on a cookie sheet and pop them into a preheated 350 degree F oven for about 20 to 30 minutes.  If they are frozen they can be removed from their wrapper and baked in the same temp oven, but may take a little longer to reach a safe 165 degree internal temperature.  We also tried reheating them in the microwave for about 3 minutes and that worked also.  Serve plain or with sauce.  (My hubby likes salsa on his – he likes salsa on everything. Ha!).


Outback Barbie (what we States-side would just call a BBQ

Once a good fire is established in the firepit, put on some shrimp (what we call prawns), snags (sausages – kind of look like fat hot dogs or short smoked sausages), and Barramundi (a type of fish).  There’s also many things that are and have been cooked up over fire in the wild, and that’s what Australians call Bush Tucker (Bush Food).

NOTE: many of the foods in Australia are like the foods we have in America.  They harken back to both of our British roots.  In Great Britain the meat pies are often served as a pie floater, which means they are perched in a pool of mushy peas. 

Other common foods are beef stews, chicken and dumplings, pot roast, meatloaf, baked chicken, and that sort of stuff.  There is a large Malaysian, Polynesian, and southern Asian influence also, just as there is Chinese food, Italian, French, Cajun, etc. foods here in the U.S.  There are also animals, berries, fruits, and herbs (and even bugs) that are native to Australia, like Wattleseed and Lemon Myrtle, that are often used in Australian cooking.  I enjoy watching Marion Grasby’s You Tube channel.  She makes lots of Asian infused Australian foods.
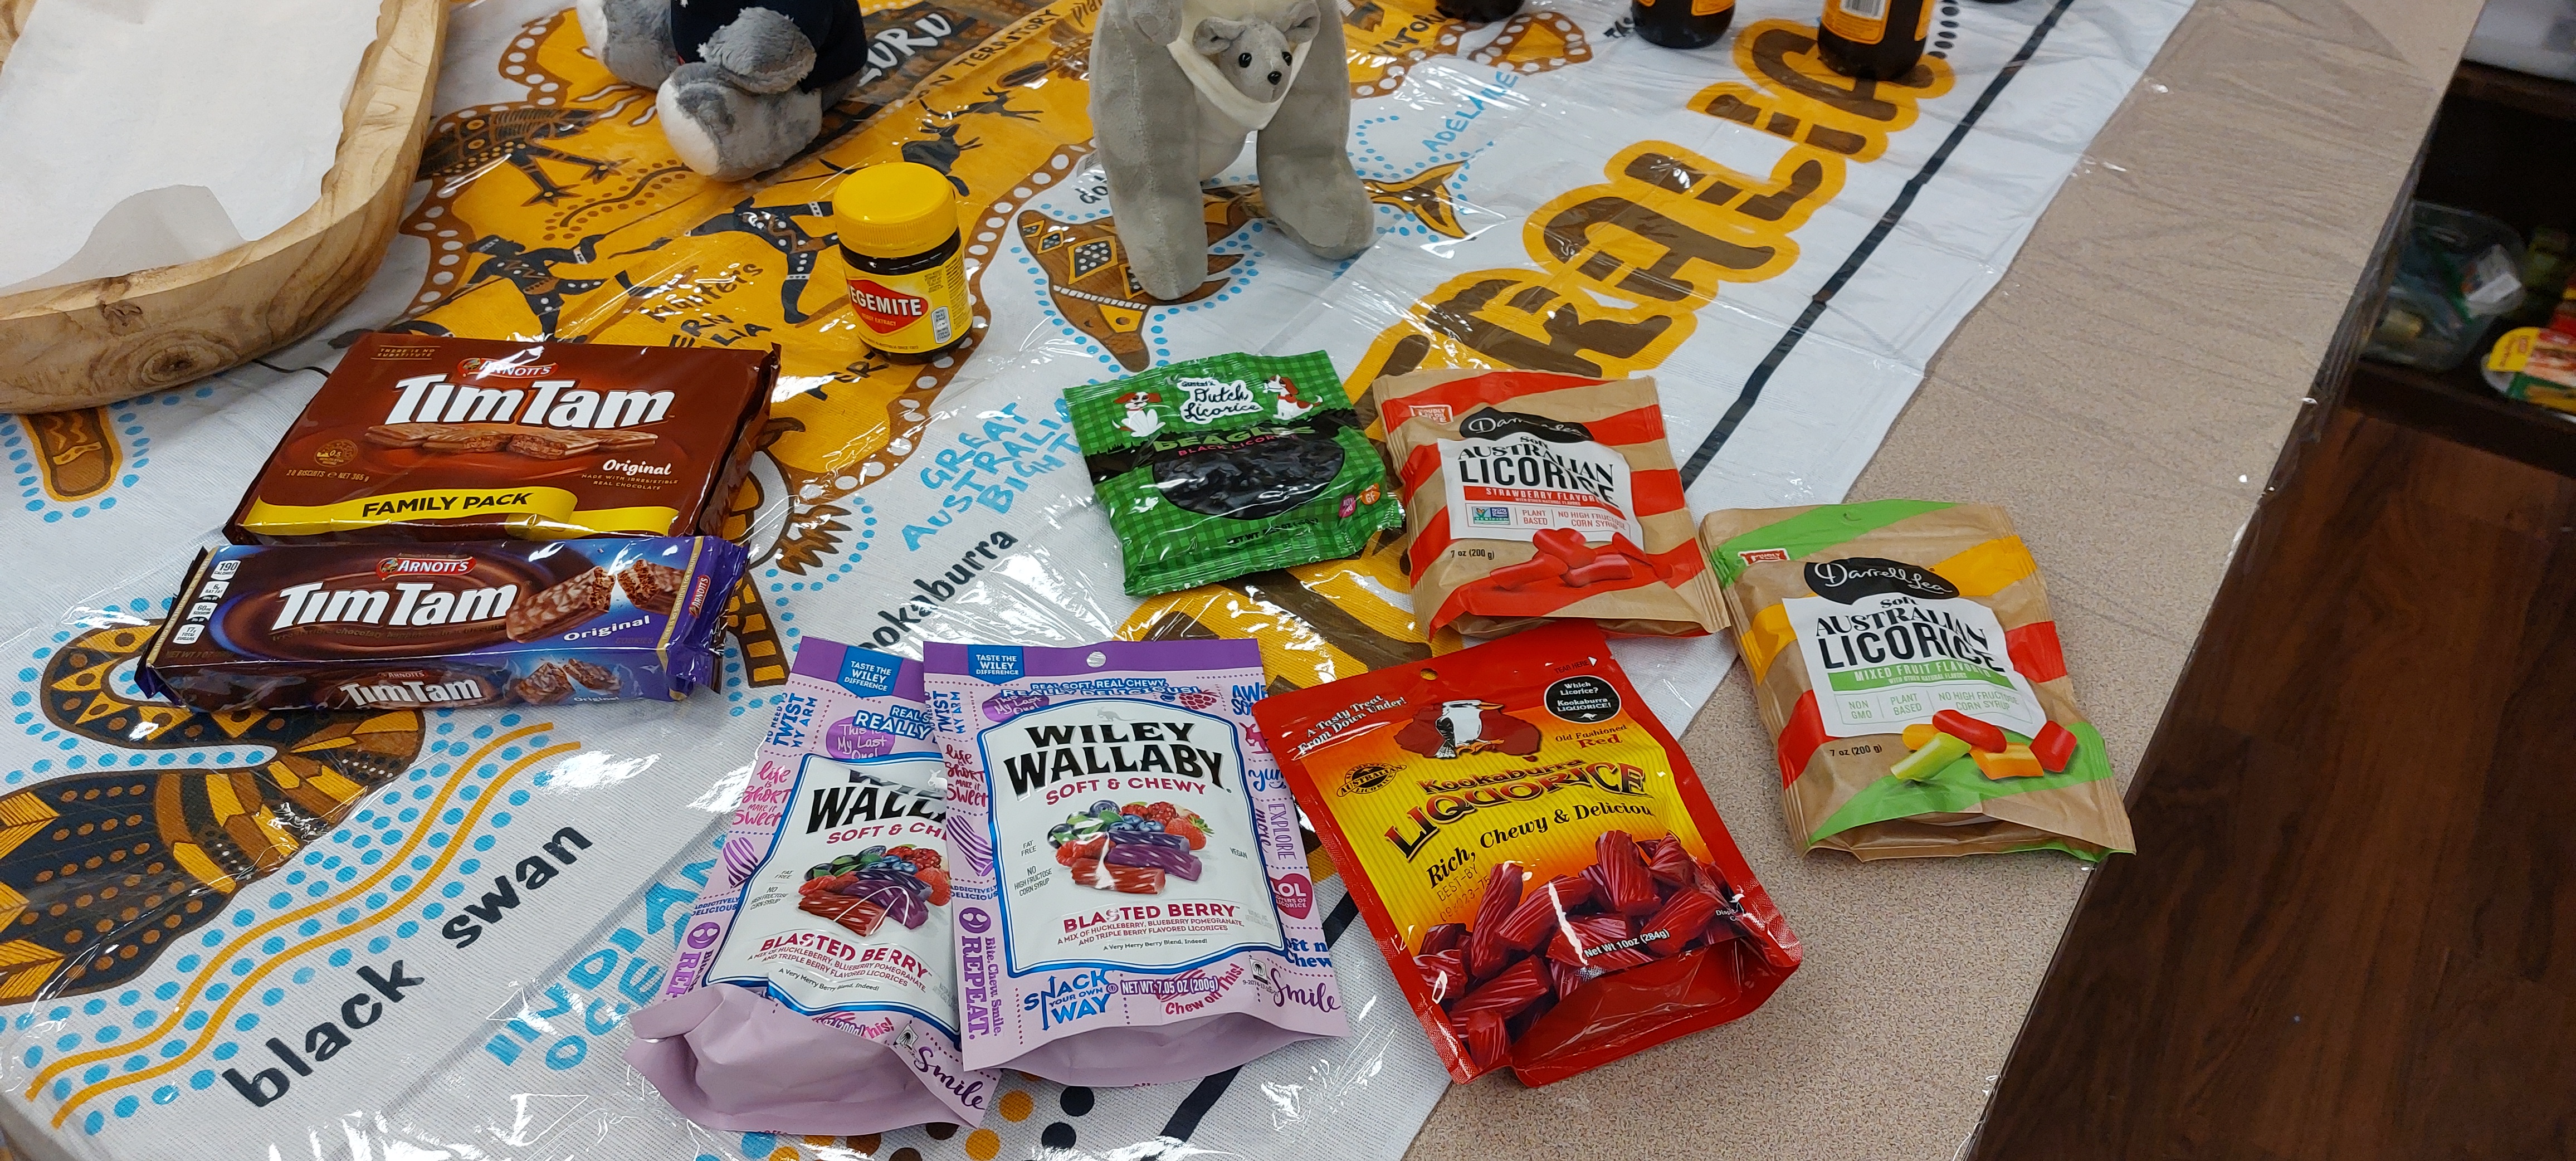

Tim Tams

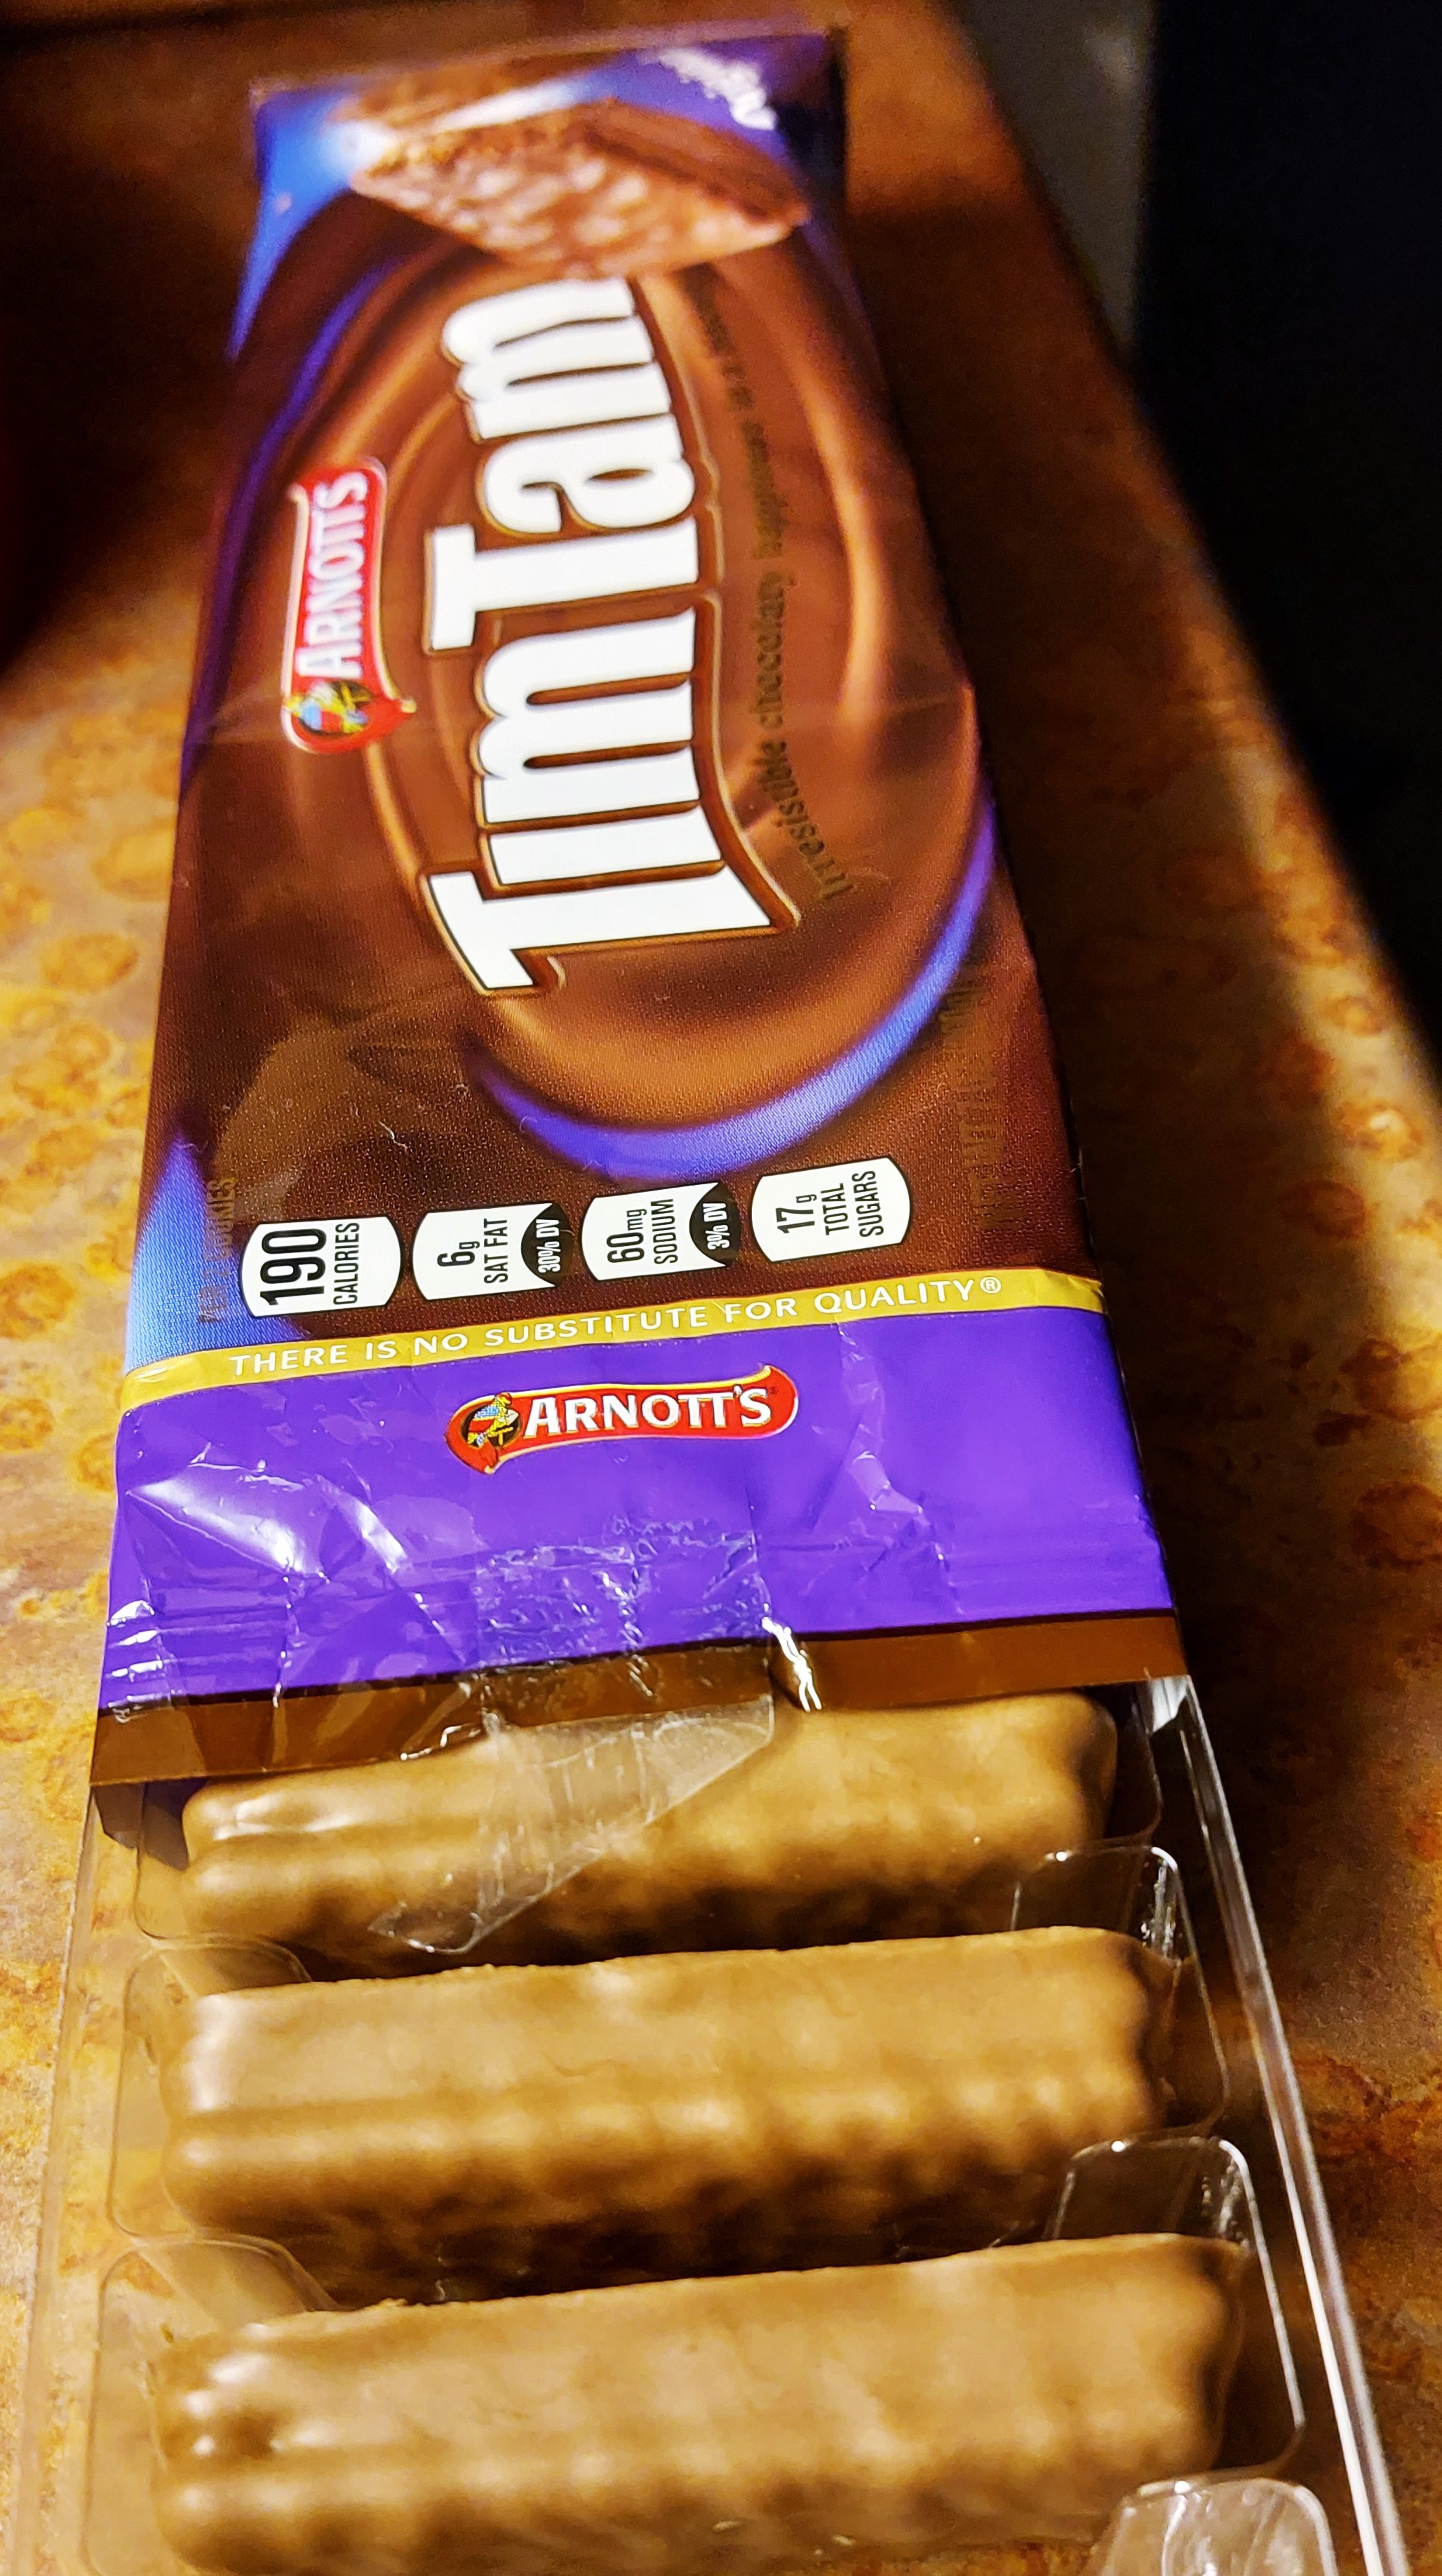
Tim-Tams can be purchased in the U.S.  Amazon has them, and they are at World Market.  They are kind of like a chocolate wafer/biscuit sandwich with cream filling, and then coated in chocolate.


ANZAC Biscuits

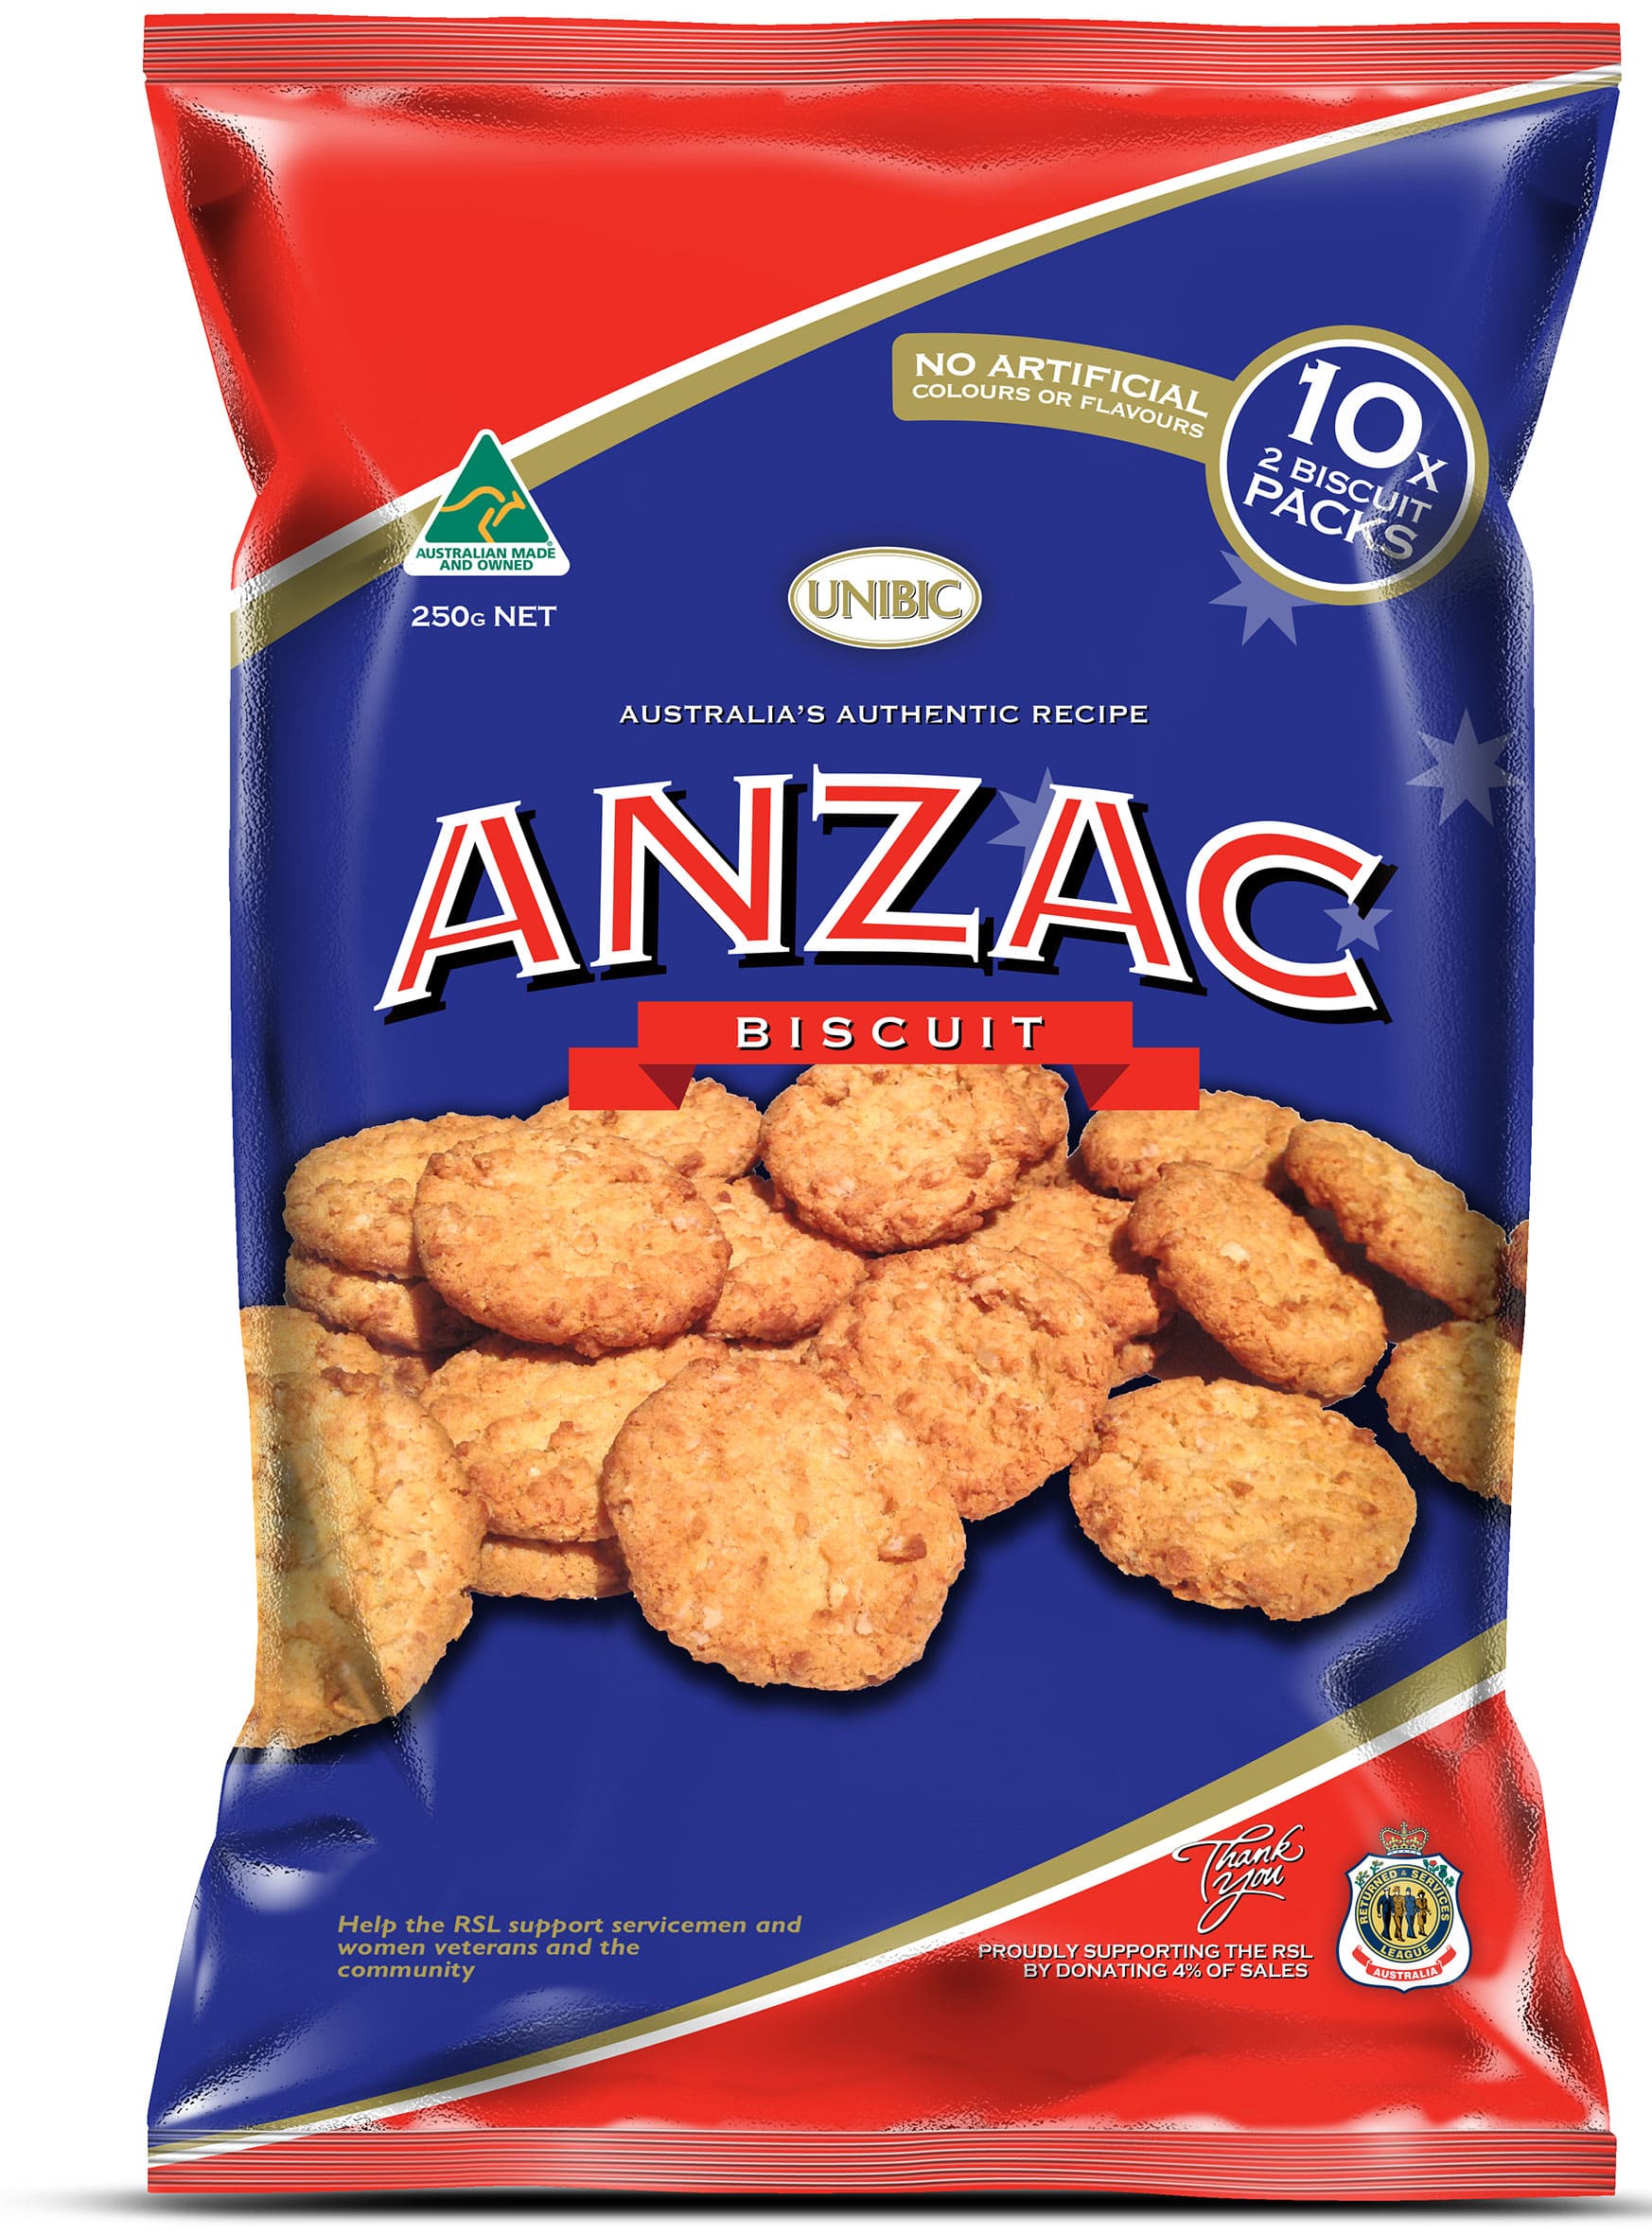
ANZAC Biscuits were a type of eggless oatmeal cookie that were sent to the soldiers who were off fighting in war.  They are made of oatmeal and coconut, and to make them properly you must use Lyles Golden Syrup.  Australia celebrates a national holiday called ANZAC Day every April which gives the whole country a public holiday from work.  It is a day for Aussies and New Zealanders to honor those who fought and lost their lives at war and also to honor those who serve in the military for the freedom of their country. Similar to our “Memorial Day” in the USA.

Australian Women’s Weekly published this “Best ANZAC Biscuit Recipe of All Time.”  I say we give it a try!

Ingredients

4oz butter, chopped

2 tablespoons golden syrup or treacle (see tips)

1/2 teaspoon bicarbonate of soda (baking soda)

2 tablespoons boiling water

1 cup rolled oats (see tips)

1 cup plain (all-purpose) flour

1 cup firmly packed brown sugar

3/4 cup desiccated coconut

Method

Preheat oven to 350°F. Grease two large 9 X 13” baking pans; line with baking paper.

Stir butter and syrup in a medium saucepan over low heat until smooth. Stir in combined soda and the water, then remaining ingredients.

Roll level tablespoons of mixture into balls; place 2 inches apart on lined trays, then flatten slightly.

Bake for 12 minutes or until golden. Cool biscuits on trays.

Notes

Spray your measuring spoon with a little cooking oil spray before scooping up the golden syrup; this will help prevent the syrup from sticking to the spoon. Make sure you use rolled oats rather than quick-cooking oats as they will produce a different result. Store biscuits in an airtight container for up to 1 week.
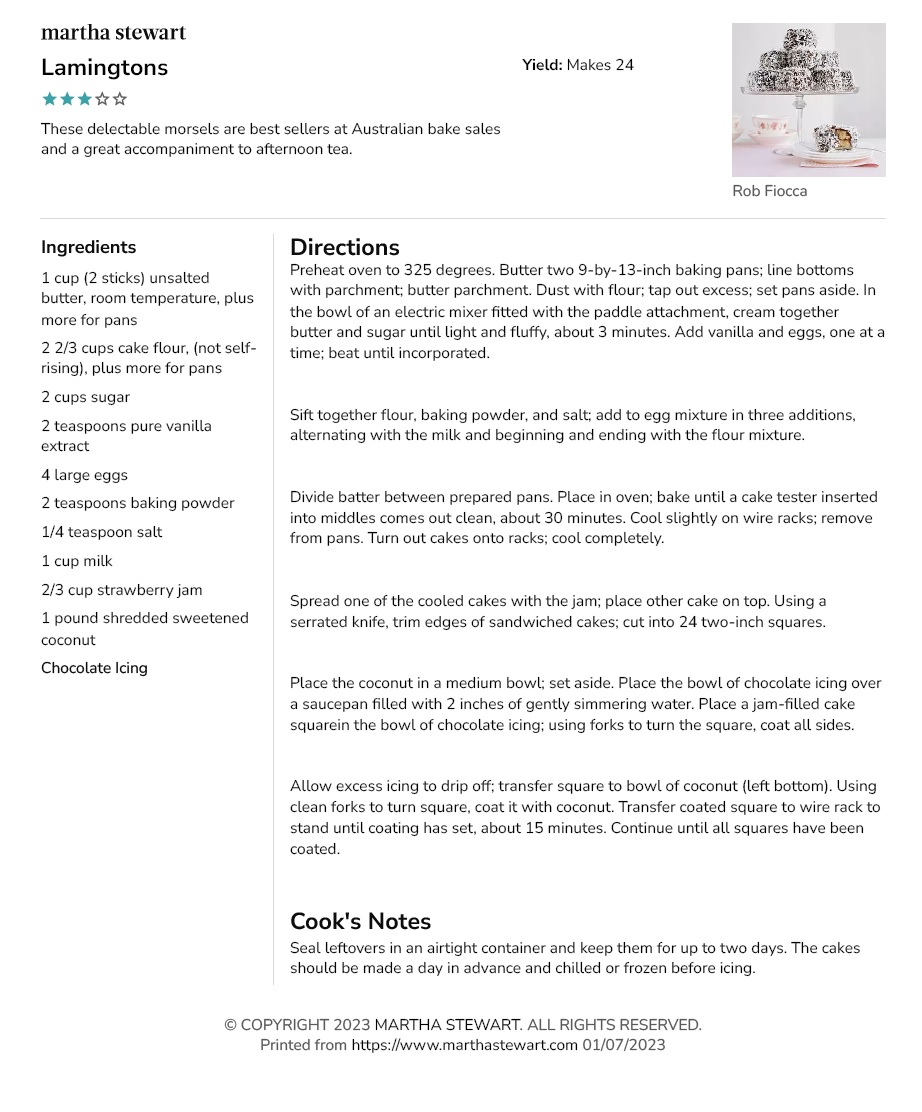

Lamingtons

These can be purchased, but are not difficult to make. They are basically a sponge cake cut into blocks, dipped in chocolate icing, and then rolled in finely chopped desiccated coconut.  Martha Stewart has a lovely recipe; click on this link (Martha Stewart’s Lamingtons) and you should end up there, unless they have moved it since this post was created. In that case here is a print out:

Lollies

I found a variety of licorice at World Market. It’s a little bit different from the licorice we’re used to. Sooooo yummy!!!


Pavlova

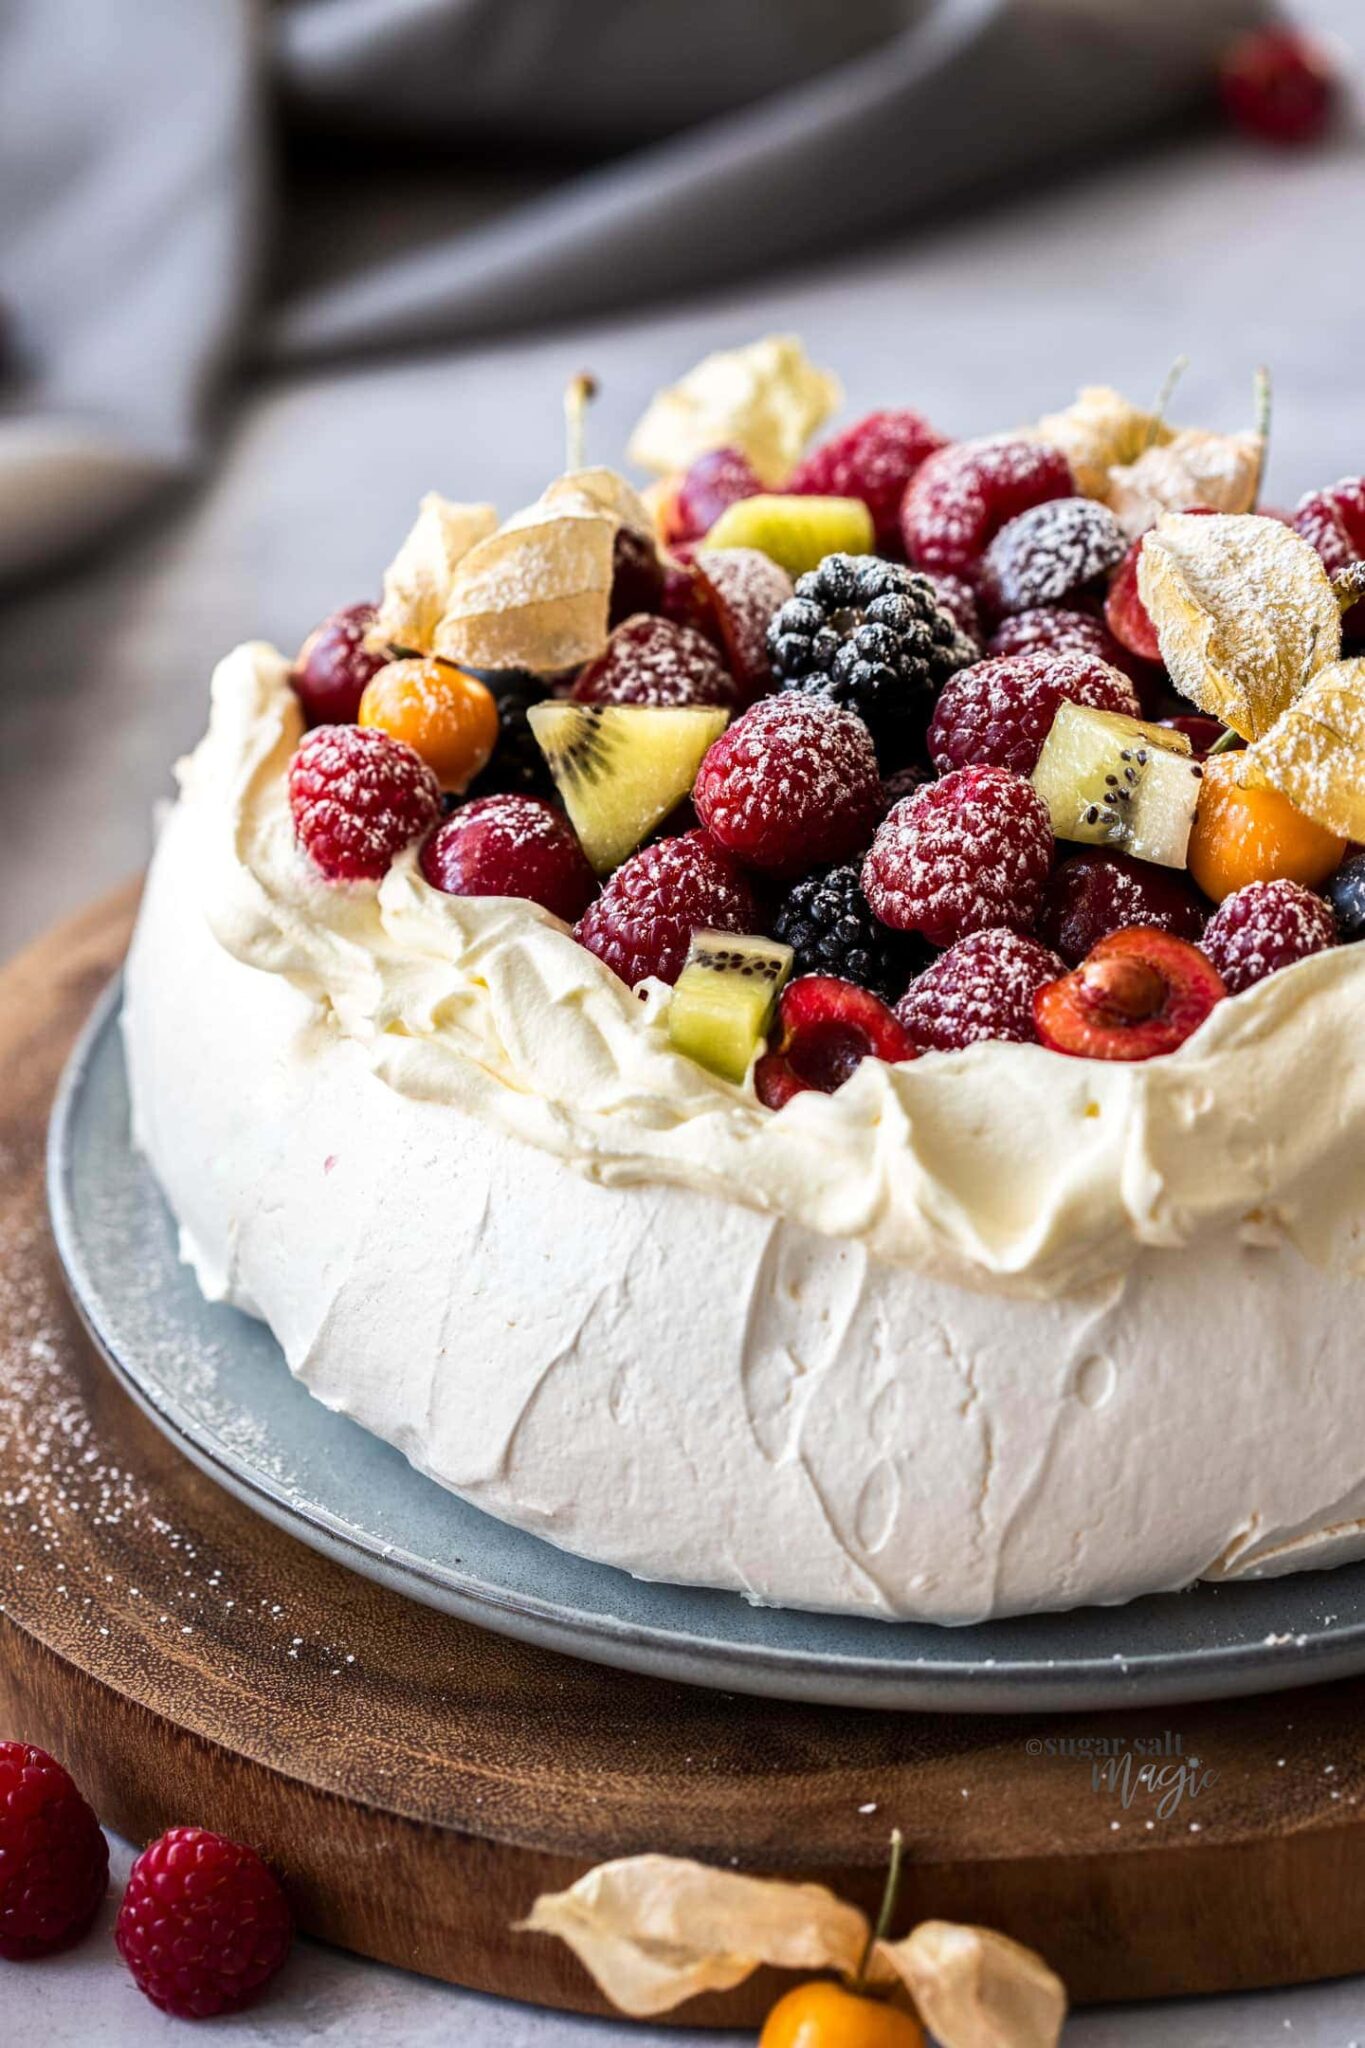
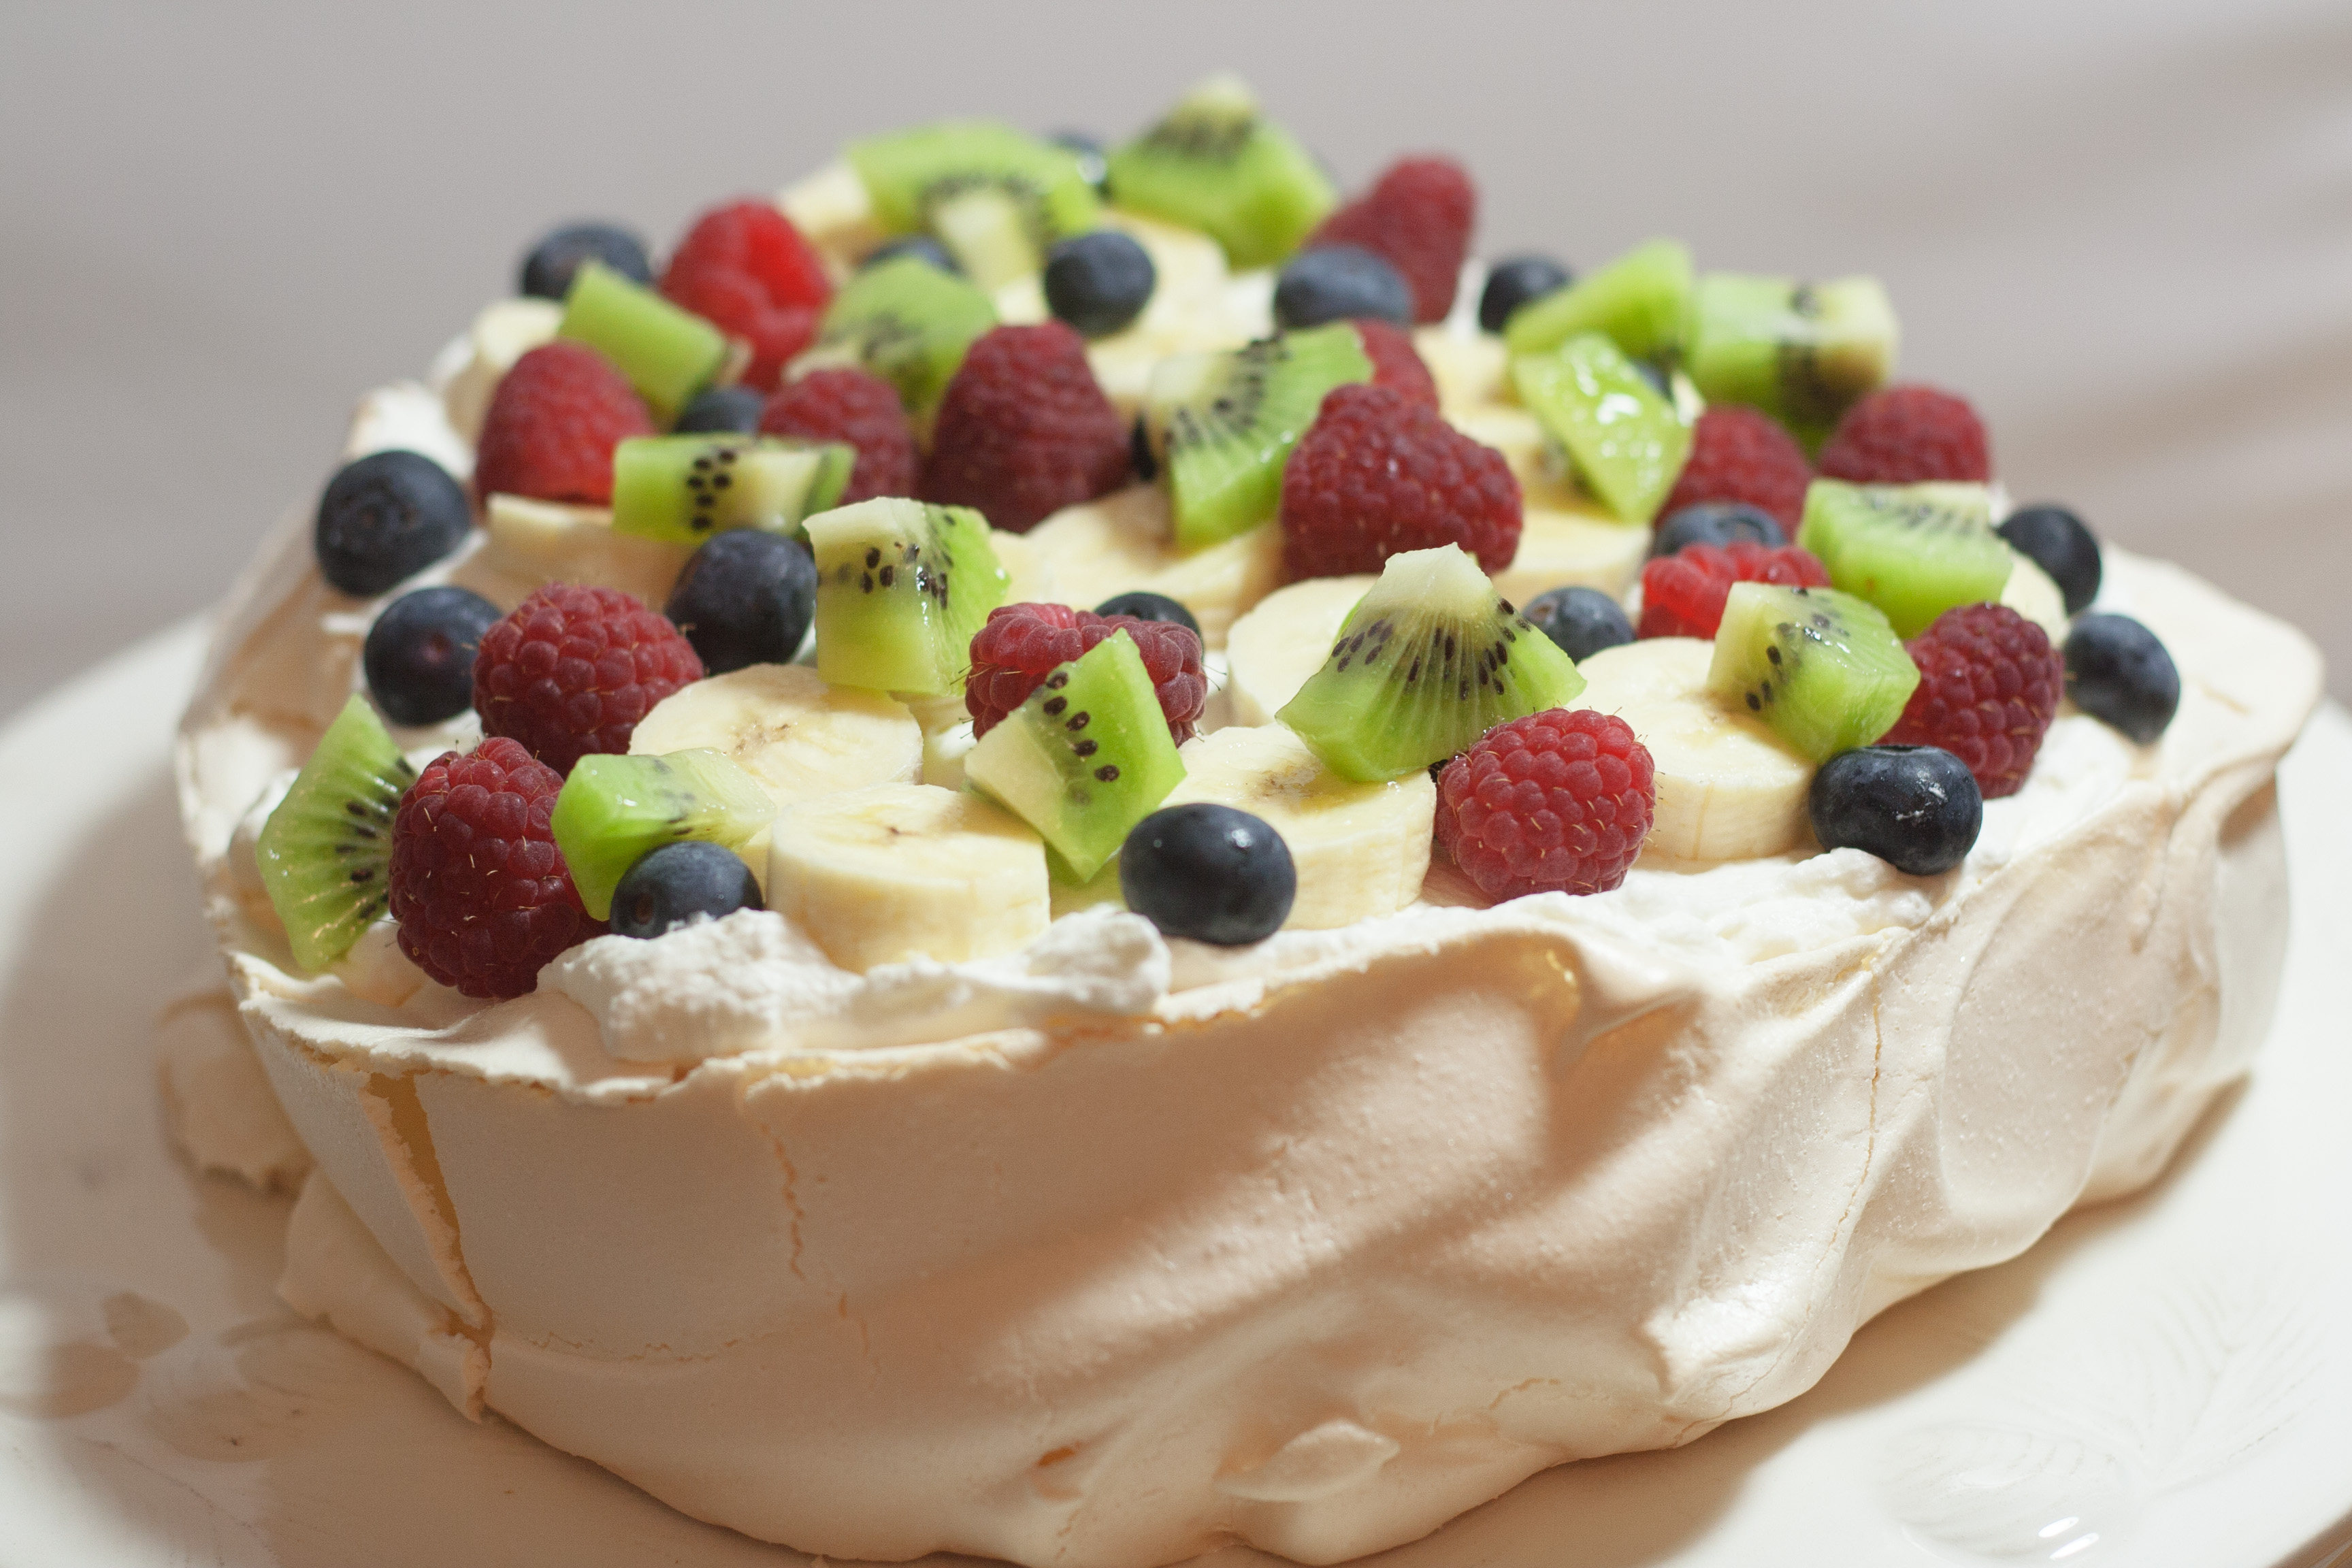
The utter queen of desserts.  It is a meringue-based dessert named after the Russian ballerina, Anna Pavlova.  It is said to resemble her flowing layered ballerina skirts.   It is crisp on the outside and marshmallowy on the inside, and topped with whipped cream and various fruits.  There are vanilla Pavlovas, and chocolate Pavlovas, and I even saw a lemon Pavlova – which would be a perfect way to use all the egg yokes (lemon curd) and help counter balance all the sweetness.

I decided to try using a carton of liquid egg whites to see if it would work, rather than have several egg yokes to have to deal with.  It didn’t work quite as well as it probably would have with freshly cracked egg whites, but it did work, and got raves from all of those who sampled it at the party for the first time ever in their lives.

1 cup cage-free 100% liquid egg whites + 1 freshly cracked egg white (save the yoke to brush on meat pies)

2 cups of regular white sugar

½ teaspoon of pure Vanilla

1/8th teaspoon of Cream of Tartar (or may substitute 2 tsp of lemon/lime juice or white/apple cider vinegar)

2 teaspoons Corn starch

You will also need parchment paper, a large cookie sheet, a 340 degree preheated oven, a pan with water, and a rubber spatula, and then some fresh sweetened whipped cream, and an assortment of fresh fruits.

I decided to do the Swiss Meringue technique, which is to dissolve the sugar in the egg whites in a double-boiler before whipping.  I placed about 2 inches of water in a saucepan and turned it on to boil.  While I waited for that, I measured my egg whites and sugar into a stainless steal bowl that I could perch on top the pot of water.  As soon as the water boiled, I turned off the heat and let the water cool for a few minutes.  Then I set my bowl of egg whites and sugar on top and used a whisk to stir, stir, stir, lifting the bowl from the pan of water occasionally, just to make sure I didn’t cook the eggs at all.  I reached in and mushed the mixture between my fingers a couple of times to see if it was still gritty, and once it felt not gritty I took it off the water completely and started mixing it with the mixer. 

I only have a hand-held Kitchen-Aide mixer, and wasn’t sure if it was powerful enough to do the job.  It seemed like it took forever for the eggs to start turning a glossy white.  Finally, after 10 minutes or so I began to see a soft white mixture, and that is when I added all the other ingredients (vanilla, Cream of Tartar, and Corn Starch, and I also added a splash of lemon juice in case my cream of tartar wasn’t up to snuff – it’s not something I use very often).  I scraped down the sides of the bowl and went back to mixing.  It took a really long time, maybe 20 minutes or so, but it finally started getting the stiffer peaks.  The videos I watched said you can’t over whip it, so I just kept whipping, and whipping, hoping to achieve stiff peaks I saw in videos.  When I thought I had achieved it finally, I stopped whipping.  My poor little mixer was getting warm.

I got a large cookie sheet, put a dab of meringue in each corner, and placed a sheet of parchment paper to cover the pan (the dabs of meringue keep the parchment from moving around.  Then I dumped the meringue in the middle of the pan.  I didn’t fuss with trying to shape it.  I just sort of made a depression in the center and called it good.  Mine didn’t set up tall and hold its shape like the ones in the videos, which is when I realized I probably gave up beating it too soon.  Oh well.  I guess we’ll see.

I placed the meringue into the oven and immediately turned the temperature down to 190 degrees F, and set the timer for 65 minutes.  After the 65 minutes I turned the oven off, but did NOT OPEN THE DOOR.  I left the meringue in the oven overnight.  I did peek through the window though and it looked to be the same size and shape as when I put it into the oven (hallelujah), only it had a slight baked tint to it, and only had a couple of hairline cracks on the side. Praise the Lord – so happy!!!!!!  Hoping for the best.

While the Pavlova was in the oven, I made my whipped cream.  I put about 2/3 of a pint size carton of heavy whipping cream into a cold bowl.  I added about 2 slightly heaped Tablespoons of powdered sugar, and ½ a teaspoon of pure vanilla.  I started the whipping process slowly to incorporate the sugar, and then as the mixture started to thicken a little, I increased the speed.  It was messy and there was spatter, but as soon as firm peaks appeared, I whipped a smidge more and then stopped beating (fearing I’d end up with butter).  I immediately transferred my whipped cream to a covered container and into the fridge to be used on my meringue first thing in the morning.

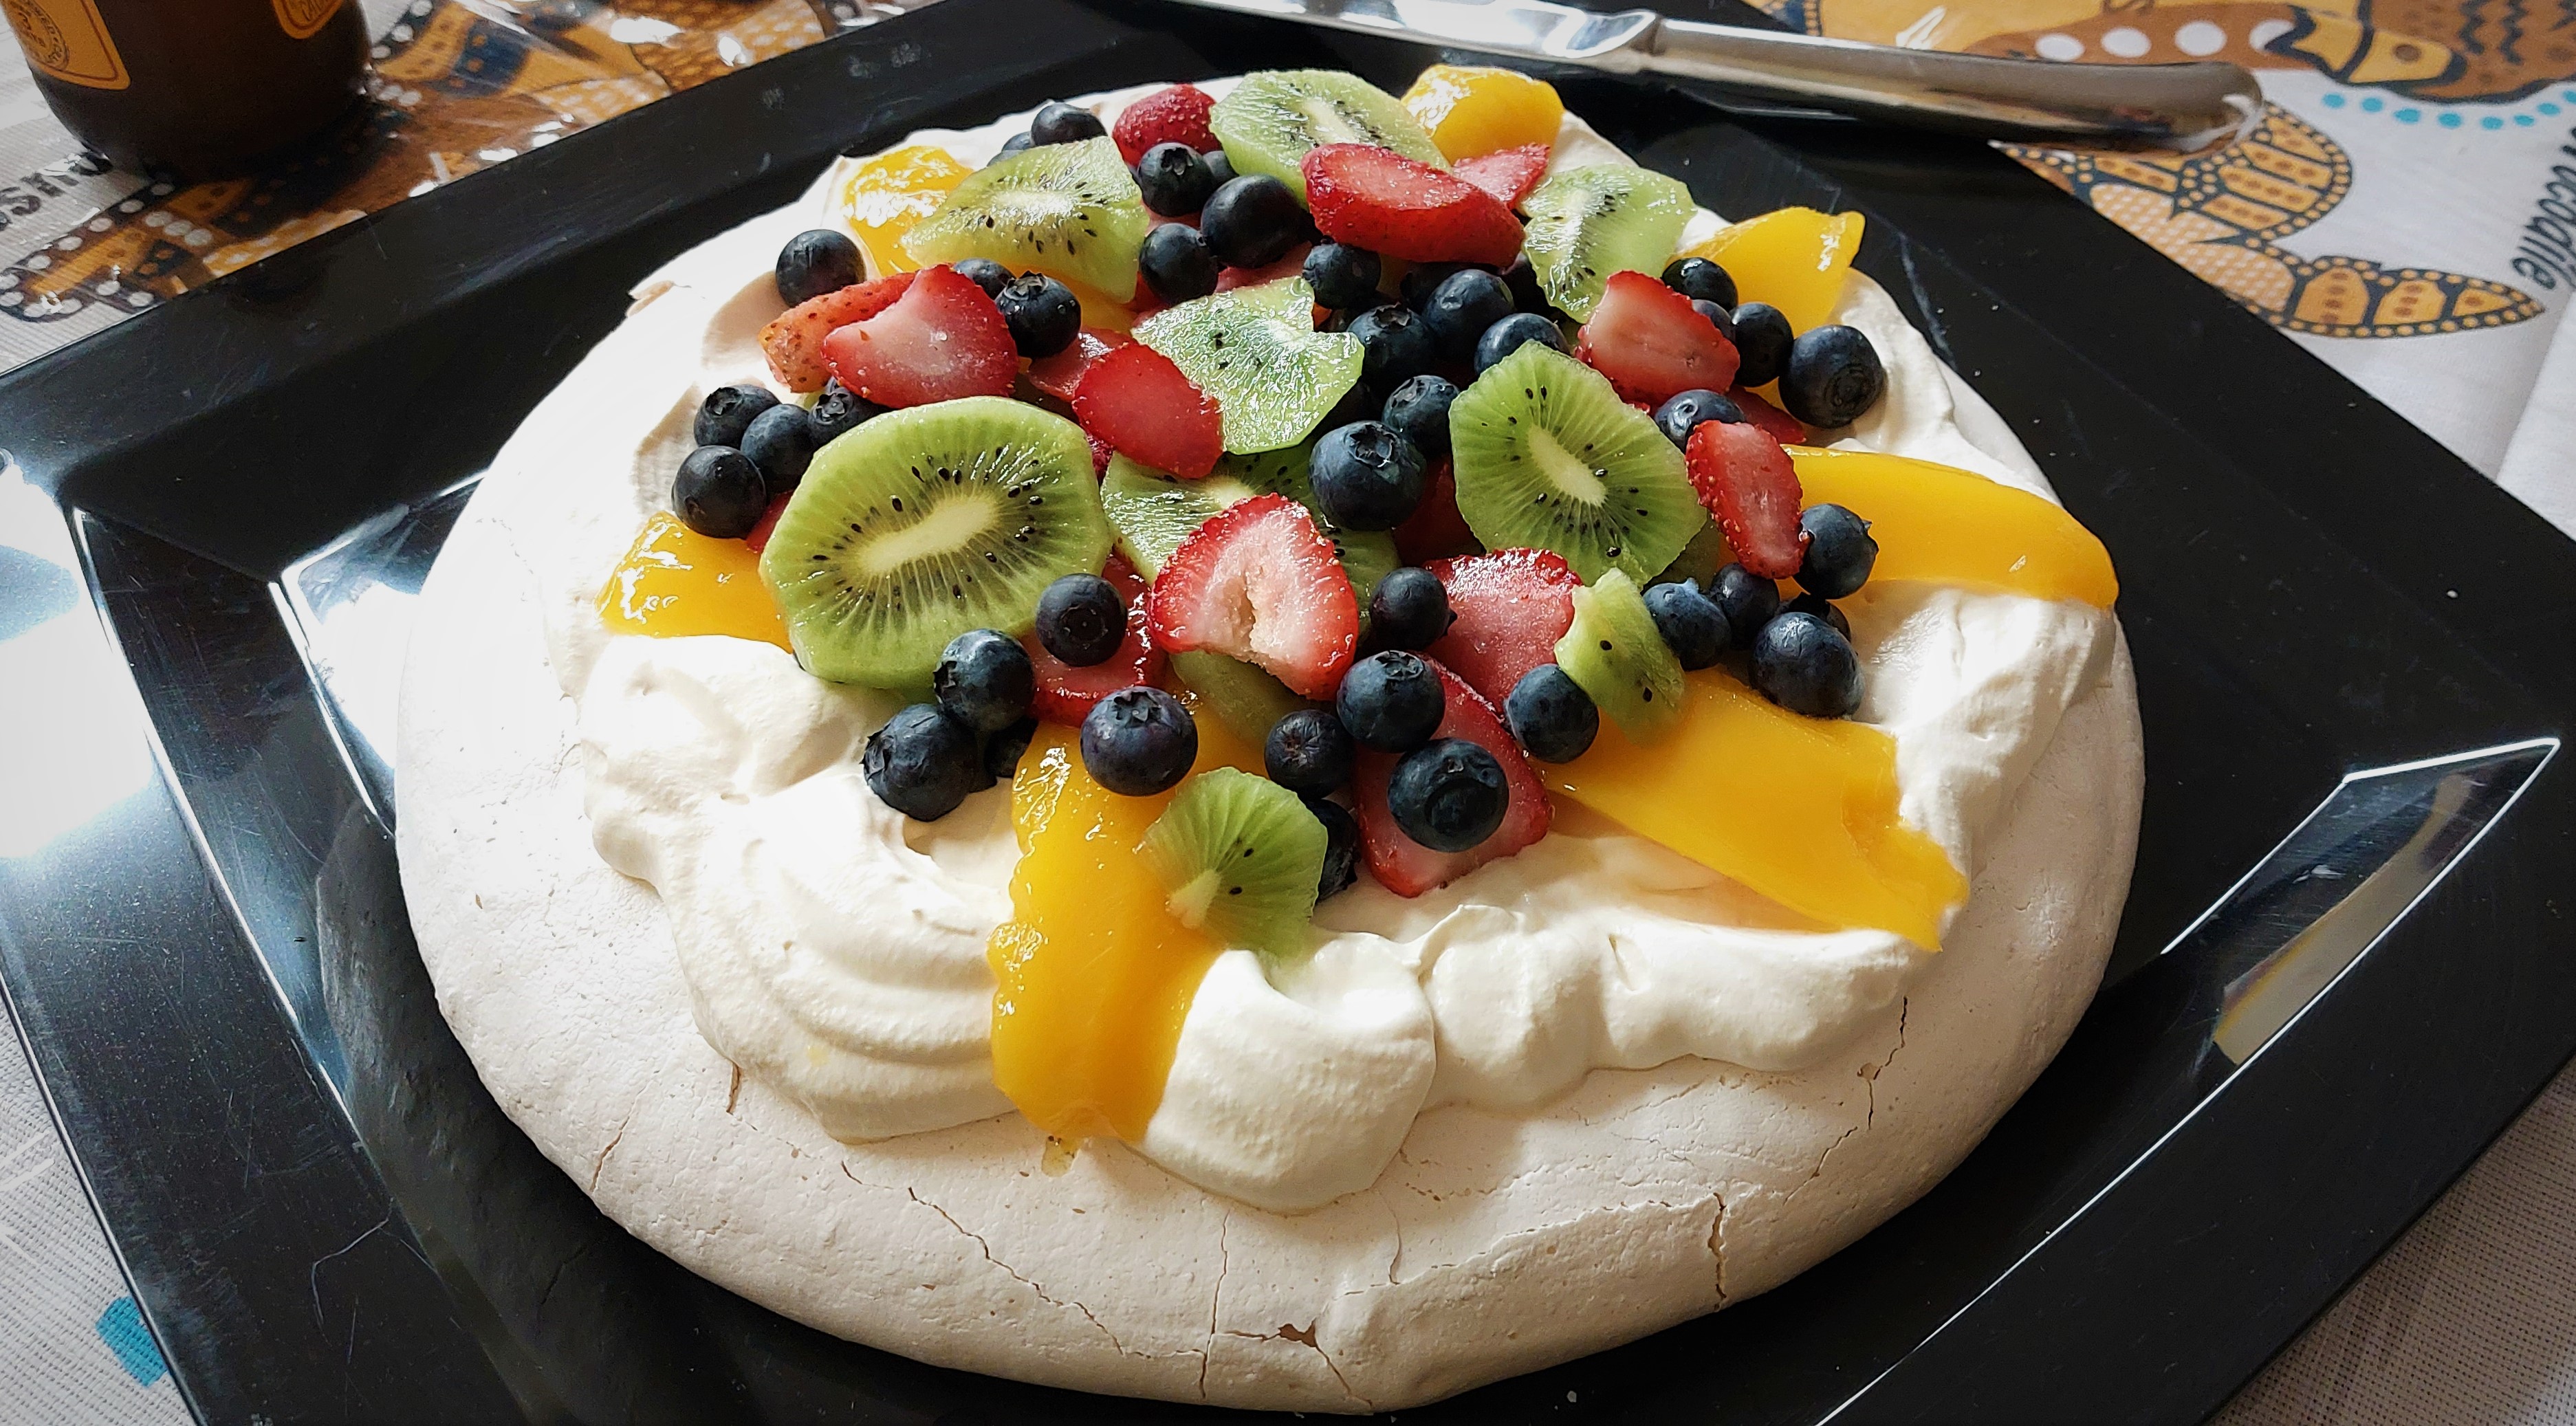
I decided on the following fruits:  Strawberries, bananas, canned mango drained, blueberries, and kiwi.  I waited until right before serving to top and decorate my Pavlova.  I started by removing the meringue from the oven and carefully and gently peeling away the paper.  I placed my meringue in the center of a large platter, and then dumped my whipped cream on top and spread it out a little.  Then I started decoratively piling on the sliced fruits and blueberries (Uh Oh, what happened to my banana? Okay, minus the banana, I must have dropped it on the sidewalk somewhere between my car and the school).  

OMGosh, it looked amazing!!!!  The kids thought it was fantastic, and the teacher and other staff who sneaked in to try it said it was to die for.  No one had ever eaten Pavlova before – which is probably my saving grace.

This is a photo of my attempt:


And what to drink? …

—————————————————————————————————

In conclusion, if we want to sound like Aussies for a day here are some Australian Vocabulary Words:

G’day Mate = hello

No worries = not a big deal

Sanga = sandwich

Lollies = sweets/candies

Bush Tucker = Outback Food (that’s native to Australia, and grows in the wild)

Aussie (pronounced Ozzie) and is why Australia is sometimes called Oz

The land down under = Australia

Wallabys = kangaroo (aka ROOs)

Joey = baby kangaroo

Billabong = a pond in a dry river bed

Dingo = a wild dog native to Australia

Footy = What Aussies call football

Kookaburra = a type of bird native to Australia

Walk-a-bout = a hike or vacation (traveling)

To “Captain Cook” something = is to Take a Look at something

To “John Dory” = is to tell the story

Dunny = Toilet

Bloke = male

Sheila = female

Crickey = WOW!

Snag = a sausage


• Other Links:

David Hudson website: https://www.davidhudson.com.au/

(Bullroarer, You Tube video)  https://youtu.be/Gy05kWu88u0

2nd Digeridoo playing instruction:  https://youtu.be/F1hnDwjuLGM

• Movies featuring the Land Down Under:

The Man from Snowy River

Quigley Down Under

Crocodile Dundee

Feast on This, Kids Stuff, Parties, School Events

Hear Ye! Hear Ye! It’s a Junior High Renaissance Escape Room & Feast, Come One, Come All

That’s the way our little affair got started. Let me tell you the tale of a Renaissance Escape Room that happened recently, one very foggy mid-autum’s day. The Jr. High students of our quaint little school had been looking forward to this day for weeks. They picked out costumes from the Drama Department’s costume closet and daydreamed through chapel just waiting for the chance to crowd into their classroom and see what awaited them there. Their laughter and excitement filled the room, but in just a moment it was all abrutly interupted by aTown Crier with news! She shouted out to them in a booming voice, and that is when they discovered their mission.

She then exited stage left and our dear “Mrs. Hollingsworth” appeared (which just so happens to be a real English renaissance family name from my own family’s history – how about that for a little historical fiction to go with our turkey legs). She was dressed as the rest, but in a red velvet costume, and when she cleared her throat a faux English accent came out. She addressed the students thustly:

Hello, I am Mrs. Hollingsworth.  I’ve come to help you.  We are going to have to be sneaky and very quiet so as not to draw attention to ourselves.  We’re going to need to split up.  Here, I’ve put some slips of paper in this black sock.  Each of you must draw a slip out and then sort yourselves into your teams. 

White team, your area of the room is over there. [she pointed]

Red team, yours is over there. [she pointed]

And Green, yours is there.  [she pointed]

You must stay in your area until you have completed your tasks.  I’ve put together an envelope for each team.  You will find them once you enter your area.  Read the outside of the envelope and follow its instructions.

Your knowledge of the Renaissance is all that will save you now.  Okay, be off!!!!!  And good luck.

The room was divided into 4 areas, using long classroom tables. Each area was clearly labeled, Red, White, and Green. The kids were divvied up into their 3 groups and sent away to their respective areas to begin their escape. It started with reading the outside of the envelope and then dumping out the contents. They had the choice of solving a puzzle that would tell them where to look for their 8 questions, or they could just look for them if they were feeling lucky. Most decided “just looking” sounded good. They found questions stuffed in bottles, and questions stuffed in boxes, others stashed in books , and books made out of boxes. They were high up and low down, on top of things, and underneath.

Let’s start with the Envelopes, please…

(In the interest of full disclosure, the images on the envelopes for the questions and puzzles were taken from a purchase of materials at Teachers Pay Teachers. I’ll tell you more about that a little later in this post. But I used their template for the question cards,although I made many of my own questions using our school’s World Studies Textbook, along with information found in various other books, such as these, and some online sources).

I organized all the Level One questions to be about Famous Artists & Architects of the Renaissance. Level Two questions were about Famous Explorers & Navigators of the Renaissance. Level 3 questions were about Famous Inventors & Humanists of the Renaissance. Level 4 questions were about Famous Thinkers & Philosophers of the Renaissance. Level Five questions were about Famous Writers & Composers of the Renaissance. And, Level Six questions were about Famous Mathematicians & Influencers of the Renaissance.

I made a cheat sheet for each team, printed on both sides. I wanted them to be able to check their answers, but also, since I had included some information that wasn’t in their textbook, I wanted them to be able to find the correct answer for the things they didn’t know about. Here are the CHEAT SHEETS, and QUESTIONS, and MASTER LOCK CODE SHEETS for each team…

Level One Questions Cheat Sheet.  Did you know that the Renaissance was a “rebirth” of art and architecture, deliberately anti-Gothic/Medieval? Because of the wealth of citizens, and the church, many works of art were commissioned (that means the artist was hired and paid a certain amount of money for his creation). During the Renaissance the wealthiest and most influential members of Italian society were called Patricians.  Before the Renaissance, only royalty, religious leaders, and the very wealthy could afford to have their portraits made. The Renaissance produced a booming economy, and ordinary people could then afford such things. There was a humanist (human virtue) interest in art, and a renewed interest in mythology as subject matter for art. The Medici family, the richest and most prominent family in Florence, used their wealth to sponsor new artists and help fund the humanist movement.  The Medici family became wealthy from banking, mining, and trade. The Medici family paid Brunelleschi to build a massive domed cathedral in Florence.  Brunelleschi studied ancient Roman ruins to help create his unique architecture.  Architecture during the Renaissance combined perfect mathematical proportions, domes, and classic columns. Religious works, portraits, and landscapes were mostly displayed in public; while mythologies and nudes were generally displayed in private homes.  Some of the greatest artists and architects of this period are listed below. 

Famous Artists and Architects of the Renaissance:

• Filippo Brunelleschi – famous for the dome of the Cathedral of Florence

• Ghiberti – famous for the doors of the Baptistry of Florence

• Sandro Botticelli – famous for his Adoration of the Magi, Primavera, and The Birth of Venus

• Titian – famous for The Assumption of the Virgin, Pesaro Madonna, Bacchus and Ariandne, and Venus of Urbino

• Leonardo da Vinci – often referred to as a Renaissance man, was a painter, sculptor, architect, inventor and writer.  He created the most famous painting in the world, The Mona Lisa. Her portrait demonstrated his mastery of 2 new painting techniques, Sfumato (blends colors to create a smoky effect) and Chiaroscuro (uses light and dark to create depth and texture).  Some other paintings include Adoration of the Magi, The Virgin of the Rocks, and The Last Supper.  His sketch books contained drawing of various machines, some that could be used as military weapons, and others that were beneficial to the advancement of medicine. The final drawing in his sketchbooks was the Vitruvian man inside of a square and a circle. The term Renaissance Man refers to a person that was talented in may areas.

• Raphael – was a painter and architect born in Italy.  He painted his greatest work called The School of Athens.  He also did an oil painting called The Sistine Madonna.  It features two cherubim (angels) at the bottom.  These angels have been featured on stamps and t-shirts, and many other memorabilia of modern day.

• Donatello – famous for his Bronze David and his later stone David sculptures, as well as many Biblical figures, his innovation of shallow bas-reliefs, and his larger architectural reliefs.

• Michelangelo di Lodovico Buonarroti Simoni, otherwise known by his first name.  He created a statue of David which features realistic muscles, joints, and veins.  His works also include the sculptures of Bacchus and Pietà, and painting of the Sistine Chapel ceiling, which was commissioned by Pope Julius II.  He also designed the dome on top of St. Peter’s Basilica in Rome.

• Giotto di Bondone – was the first Renaissance painter in Florence, Italy.  He broke away from the typical Byzantine style.  He painted people and objects that looked natural, not abstract.  His paint style became knows as realistic painting. 

Level Two Questions Cheat Sheet.  Did you know that the Renaissance was a “great re-awakening” of exploration and navigation? During this period, there was a great renewal of interest in the ideas of ancient Rome and Greece. Many of the leaders of the Renaissance, who were born in the different city-states of Italy, found inspiration in these ancient writings and wanted to know more by studying art, architecture, and culture. Some brilliant minds pursued knowledge through the study of math, geography, and science.  All of this expansion of knowledge contributed to the exploration of the world, which was both good and bad. The famous Silk Road, a once-prosperous trading route, had become very dangerous with tribal groups reclaiming land and charging fees for passage, or taxes on goods. Europe was desperate to find a route to China and India (where their most treasured exotic goods came from), that would avoid these dangerous middlemen. Many explorers and financiers of the age were also unfortunately desperate for fame and fortune and conquest. Part of the reason explorers were able to travel farther from home had to do with advances in navigation and shipbuilding techniques.  Not only did Europeans hope to find direct routes to places with exotic goods, some European kings and queens were inspired to send expeditions out for religious reasons as well. 

Famous Explorers & Navigators of the Renaissance

Niccolò De Conti – was a self-funded explorer, mostly by land, and one of the first Europeans to reach Indonesia and Burma. He shared many exciting stories about people, spices, animals, and geography. His travels helped to improve maps of Asia, such as the Genoese, and his experiences also helped to create a map of the world.

Christopher Columbus – made 4 legendary voyages. His maiden voyage was funded by Ferdinand and Isabella (King and Queen of Spain) in April, 1492.  That voyage included three ships, the Niña, the Pinta, and his flagship, the Santa Maria. He named the first island where he landed San Salvador, in hopes that the natives would find “salvation in Christ.”  He is credited with discovering the “New World.”

Vasco de Balboa – is best known for the discovery of the Pacific Ocean. Balboa started a European settlement in Antigua del Darien, on the east coast of Panama.  Hearing that there was a sea on the south side, he journeyed across the Isthmus of Panama and sighted the Pacific Ocean while standing on a peak. The Spaniards called the Pacific the Mar del Sur (South Sea). The expedition descended the mountain and become the first Europeans to navigate the Pacific Ocean off the coast of the New World.

Hernán Cortés – is famous for a legend where off the coast of Veracruz, he burned his ships in a do-or-die effort to conquer the land.  He warred against the Aztecs and their leader Montezuma II, and lost all of his treasure and most of his men in The Sad Night. 

Amerigo Vespucci – a great navigator, explorer, cartographer, and cosmographer and is where the continents of the Americas got their name.

Ferdinand Magellan – was a Portuguese explorer and navigator who led the first successful circumnavigation around the word. Unfortunately, he did not finish the journey, but his surviving crew members managed to complete this history-making voyage. He was the first observer of a previously unknown species of penguins, discovered galaxies, and was the first European to cross the great Pacific Ocean.  He discovered a shortcut through Chile in South America, which became known as the Strait of Magellan. Besides the strait, Ferdinand Magellan also has a rail car (Ferdinand Magellan Railcar), lunar craters (Magelhaens and Magelhaens A), and even a penguin species (Magellanic penguin) named after him. His expeditions showed clearly that all the world’s oceans were connected.

Marco Polo – though born very early in the Renaissance period, probably inspired some of the enthusiasm for exploration through his book, “The Travels of Marco Polo.” Young Marco became a trader, traveler, adventurer and storyteller. His life inspired a children’s game that is still played today.

Juan Ponce de Leon – was rumored to have been looking for the “fountain of youth.” Served as the first governor of Puerto Rico.

Sir Francis Drake – Accompanied John Hawkins in a voyage of the slave trade. Became a privateer who attacked and plundered other ships.  Was considered a pirate by the Spanish, but a hero by the English. Was given a fleet of 5 ships by Queen Elizabeth I and his expedition was only the second in history to sail around the world. He brought back lots of treasure for the queen. The queen knighted him and he was known as Sir Francis Drake thereafter.

John Cabot – was an Italian explorer sent by King Henry VII of England to the New World. It is believed that he landed in what is now called Newfoundland, in Canada, and was the first explorer to find that part of the world since the Vikings who had traveled there many centuries before.  On his second voyage his ships were lost at sea and the fate of John Cabot is uncertain.

Bartolomeu Dias, Vasco da Gama, and Pêro Da Covilhã are a few other famous explorers, but there’s not enough room to talk about them.

And these were the questions that were hidden all over the room (inside of books, and boxes, and bottles, etc.)

This was their code sheet:

Level Three Questions Cheat Sheet.  The Renaissance began in Florence, Italy somewhere in the 14th century (1301 to 1400) and lasted until sometime in the 17th century (1601-1700).  Humanism played a big role during the Renaissance?  Humanism was a cultural movement, and idea that everyone should seek to be educated in arts, science, and literature.  It was a time when human emotions were expressed in the form of art.  It made the people think about their own lives and less on spiritual ideas. This new idea about education and emotional art quickly spread to Venice, Rome, and Milan, Italy.  Eventually, new ideas spread throughout Europe.  The start of the Renaissance brought an end to the Middle Ages.  The fall of Rome brought the beginning of the Middle Ages.  People were more consumed with survival during the Middle Ages.  They didn’t have money or time to learn or to study.  They were mostly poor farmers/peasants serving the royal class.  Advances and progress in science, art, and government were lost during the Middle Ages.  This part of the Middle Ages was referred to as The Dark Ages.  The Renaissance was a time to “come out of the dark.” Renaissance means “rebirth.” The Black Death delayed economic grown in northern Europe. Many believe the Renaissance began with the invention of the printing press.  The printing press made books and written materials more easily available, and because of the rise of the middle class and new found wealth, people were eager to learn and prosper. People began to feel better about themselves and optimistic about life.   

Famous Inventors & Humanists of the Renaissance

Erasmus of Rotterdam – was one of the most highly regarded and influential scholars of the Renaissance.  He mastered Latin and Greek.  He was the first to publish a Greek New Testament, which was an essential tool for the Reformation.

Leon Battista Alberti – a humanist author, artist, architect, poet, priest, linguist, philosopher, and cryptographer.

Thomas More – was a close friend of Erasmus and served in the court of King Henry VIII of England.  His work, Utopia (which means “nowhere”) is a story about an imaginary country based on Christian principles, and the philosophy of Plato.  In this work More presented his view of an ideal state.  More supported the supremacy of the Pope and rejected the Reformation.

Johannes Gutenberg – inventor of the printing press

Leonardo da Vinci – inventor of many, many, many types of machines.

Galileo Galilei – was

Niccolò Machiavelli – created a new branch of political science based on humanist principals, where human interests were the priority.

Francesco Petrarch – was known as the “Father of Humanism.”  He studied Ancient Rome’s poets and philosophers.  His poetry became inspirational to other writers. 

Level Four Questions Cheat Sheet.  During the Renaissance, people loved learning about new ideas and having their old ideas challenged and changed.  They were thirsty for knowledge about art, biology, mathematics, astronomy, chemistry, literature – everything!  The printing press made it possible to mass produce books.  As books became readily available, more people learned to read, and new ideas spread faster than ever.  During the Middle Ages, the Catholic Church played an enormous role in European life, but during the Renaissance people began to have different religious views. The first book to be printed on a printing press was the Gutenberg Bible.  During the Renaissance, people (called humanists) were more interested in finding and studying the original versions of texts.  They began to interpret writings in different ways, and to ask questions.  Universities across Europe played extraordinarily significant roles in the Renaissance and the Reformation.  They hosted innovative research in many fields and changed forever European religion and society.  Universities and their professors may have had greater influence on society in the Renaissance and Reformation than in any era before or since.  That influence endures to this day.   

Famous Thinkers & Philosophers of the Renaissance

Francis Bacon – argued for an approach to scientific research based on observation and reason.

Desiderius Erasmus (of Rotterdam) – was a Dutch philosopher and Catholic theologian.  Among the humanists he was given the nickname “Prince of the Humanists,” and has been called the “crowning glory of the Christian humanists.” He wanted to introduce humanistic enlightenment into the Catholic Church without breaking with Rome.  He mastered Latin and Greek.  He was the scholar behind what is now known as the Textus Receptus, when the only Bible available at the time was the Latin Vulgate.  His versions were used by Martin Luther for his German translation, and William Tyndale for the first English New Testament, and also contributed to the Robert Stephanus edition of the Geneva Bible and the Authorized (KJV) Bible.

Thomas More – a close friend of Erasmus, served as lord chancellor in the court of King Henry VIII.  His work, Utopia (which means “nowhere”) was a book of social and political satire which presented his views of an ideal state. 

Filippo Brunelleschi – was at first a goldsmith, and made a living making jewelry. He competed for the commission of the Baptistry doors, but bowed out when they wanted to team him with another artist and went to Rome.  While there, he studied ancient Roman ruins, and in the process of making detailed drawings of them, rediscovered a lost artistic technique known as linear perspective.  He also solved major problems in architecture and was able to construct the largest dome ever built without wood supports. Because Brunelleschi never wrote down his designs, historians have struggled for centuries to unravel the secrets of his success.  It is still not fully understood how he accomplished what no one else has ever been able to do.

Niccolo Machiavelli, an Italian philosopher, created a new branch of political science based on humanist principals, which emphasized human interests over religious views.  He wrote groundbreaking books about politics. One small “mirror book” called The Prince, which has been translated into dozens of languages and read by millions. Adolf Hitler and Joseph Stalin kept a copy of it on their nightstands.  His last name became a euphemism for everything bad in politics.  Lying, cheating, scheming, backstabbing, killing—are all qualities associated with Machiavellianism.

Nicolaus Copernicus – worked out accurate measurements of the earth in relation to the sun.

Garardus Mercator – outlined an approach to scientific inquiry that changed several branches of science.  Queen Elizabeth gave him the nickname, “Little Lord Keeper.” He was the first English writer to use an “Essay” format.

And this was their code sheet:

Level Five Questions Cheat Sheet.  Thomas a Kempis authored the book, The Imitation of Christ, which is still in print today.  The Canterbury Tales is a collection of twenty-four stories written in Middle English by Geoffrey Chaucer and can also still be purchased today.  Did you know that the Elizabethan Era is famous for the works of William Shakespeare?  It was the Tudor period of England’s history, during the reign of Queen Elizabeth I.  This “golden age” represented the apogee (which means the peak or highest point) of the English Renaissance. The era is most famous for it’s theatre, but it was also an age of exploration and expansion abroad.  The circumnavigation of Francis Drake brought wealth to England. 

Famous Writers & Composers of the Renaissance

William Shakespeare – was an English playwright, poet, and actor.  He is credited as having written 39 plays, 154 sonnets, 3 long narrative poems, and a few other verses.  His most notable works are “A Midsummer Night’s Dream,” “All’s Well That Ends Well,” “Anthony and Cleopatra,” “Romeo and Juliet,” “Hamlet,” “Macbeth,” “Othello,” “The Comedy of Errors,” “The Taming of the Shrew,” and many more.

Petrarch – was a scholar and poet of early Renaissance Italy. One of the earliest Humanists.  His rediscovery of Cicero’s letters is often credited as initiating the Renaissance.  His notable works include odes and sonnets to Laura, the idealized subject of his chaste love, Triumphs, Canzoniere, Secretum Meum.

Dante Alighieri – wrote his narrative poem/book, the Divine Comedy in 1308.  The first part of this epic poem is Inferno, often referred to as Dante’s Inferno.  It describes Dante’s spiritual journey through hell, guided by the ancient Roman poet Virgil.  It includes nine concentric circles of torment located within the earth. Inferno (hell) is followed by Purgatorio (Purgatory) and Paradiso (Paradise/heaven).  His book is considered the greatest piece of literature written in Italian.   Iconographic images from Donte’s Divine Comedy have been painted inside the dome of the Cathedral of Florence, the brainchild of Brunelleschi.

Nicolaus Copernicus – was an astronomer and one of a handful who believed that the sun was at the center of the universe and that the earth and planets revolved around it. He proved in his book, On the Revolutions of Heavenly Spheres, that the heliocentric model was correct, backing up his theory with mathematical equations.  It was Johannes Kepler that later proved Copernicus right. Also, Galileo, developed telescopes powerful enough for astronomers to see for themselves that Copernicus’s heliocentric model was accurate.

Machiavelli – is famous for his little book, The Prince, which was a how-to or guidebook for rulers.  He was called a lot of bad things, including “devil” and “monster,” but nothing indicates that he was ever terribly “Machiavellian.”  He was influential, but never sought power for power’s sake. And every devious strategy he described in the book was based on the actions of others.

Erasmus of Rotterdam – was known as the “Prince of the humanists.”  Was a friend of Thomas More and was staying at his home when he composed what is considered one of the most important works of the Renaissance, “In Praise of Folly.”  In this work, Erasmus took a humorous approach to old superstitions and corruption in the Catholic Church.  He dedicated the essay to More.

Sir Thomas More – was famous for his book, Utopia, which was his idea of the ideal society.  He was very religious and served as lord chancellor to King Henry VIII.

Castiglione wrote a book on manners and etiquette (social behavior). His book was titled, The Courtier.

Level Six Questions Cheat Sheet.  Did you know the Renaissance began in Florence, Italy somewhere between 1350 and 1400 and lasted until the mid 1600s. The Hundred Years War took place between 1337 and 1453 and ended in a French victory. During the Hundred Years War, a peasant girl from France named Joan of Arc believed she was being led by God to drive out the English.  The French defeated the English under her leadership, but the English later captured her and burned her at the stake.  The Black Death may have started in China and by 1347 had spread to. It claimed the lives of an estimated twenty-five million Europeans. The Renaissance (which means “rebirth”) was a period of great awakening of classical arts, culture, science, medicine, education, literature, art and music. It was a time to “come out of the dark.”  The Renaissance began as more and more people were able to afford to learn to read and write, the printing press made printed materials more available, and the Italian seaports traded goods as well as new ideas.  

Famous Mathematicians & Influencers of the Renaissance

Nicolaus Copernicus – was the mathematician and astronomer who formulated the model that the Earth revolves around the Sun and not the other way around.

Galileo Galilei – was an Italian mathematician credited with creating the first modern telescopes, which supported Copernicus’s idea that the Earth revolves around the sun.

Johannes Kepler – was a German astronomer, mathematician, astrologer, natural philosopher, and writer of music.  He is best known for his laws of planetary motion, as well as his books Astronomia Nova, Harmonice Mundi, and Epitome Astronomiae Copernicanae. He was a contemporary of Galileo Galilei.

Johannes Gutenberg – was a German inventor, printer, publisher, and goldsmith who introduced printing to Europe with his mechanical movable-type printing press.

Henry VIII – was king of England from 1509 to 1547.  He is credited with initiating the English Reformation by separating the Church of England from papal authority.  He appointed himself Supreme Head of the Church of England.  He also invested heavily in the navy.  He made radical changes to the English Constitution.

John Calvin – was a French theologian, pastor, and reformer in Geneva during the Protestant Reformation. He developed a system of doctrine known as Calvinism.

Elizabeth I – was Queen of England and Ireland from 1558 to her death in 1603.  She was the daughter of Henry VIII.

Pope Julius II – was head of the Catholic Church and ruler of the Papal States from 1503 to his death in 1513.  He was nicknamed “the fearsome Pope.” He chose his name in emulation of Julius Caesar.  He was one of the most powerful and influential Popes.  He established the Vatican Museums and initiated the rebuilding of the St. Peter’s Basilica.  He invited Raphael to decorate some rooms in the Vatican. The Catholic Church – used their wealth to make extravagant cathedrals, ornately decorated inside with architecture, paintings, sculptures, expensive doors, and domes.

Martin Luther – was a German priest, author, and hymnwriter Catholic friar responsible for starting the Protestant Reformation.

Lorenzo de Medici – was a poet, known as Il Magnifico (“The Magnificent”), the wealthiest and most powerful man in Florence.  He was a supporter of humanist thinkers and a great patron of the arts.

And this was their code sheet:

The Question cards were hidden individually all over the room, but each team needed 2 puzzle cards and those were hidden together in a locked box for each team. The students had to find and answer all their questions correctly (8 per team), plus find the key for their locked boxes (which I hid in books and in a soup can), and also the locked boxes themselves. Once they figured out the codes for each of the the Questions. Those codes would then be used for finding the FINAL MASTER CODE that would unlock the final “Escape Door.”

These were the puzzle cards I used, and I got them from a kit I purchased of a Renaissance Escape Room. This is where you can get your kit: Escape Room EDU @ Teachers Pay Teachers. It is very well done and very inexpensive. They actually designed it to be used in connection with the internet, but it works easily without it. Since there is nothing on the website or in the printed materials to forbid me sharing these images with you I included them here. Please, though, go visit that website and download your own complete kit. Please support the hard working people that put these awesome things together. It is only a few dollars and very well worth it. I altered the Level 6 card.

Once some of the students had finished this first part, they needed to wait for all the teams to finish in order to go on to the next part as one big group. So this is when they were invited to feast. And what a feast it was!!!!! Bread and wine (okay, grape juice), grapes and pears and apples, cheese curds, jello – did you know that gelatin was invented (discovered?) in the Renaissance?, carved meats and roasted turkey legs, pies and tarts., beer and ale (okay Root beer, and Ginger ale). The kids sat at a table fit for King Henry VIII.

After about 10 minutes, since no one had noticed a certain incognito item that was crucial to the success of the mission, I asked if anyone had seen the tag thing that was hanging from Da Vinci’s the LAST SUPPER painting, which was hanging on the wall by the table of food. Of course the kids made a bee-line over there to check it out.

The tag was attached with a string to a note that was taped to the back of the painting. It said:

“What is missing from DaVinci’s Last Supper Table, that is always part of our Communion Table?” 

They searched and searched…

…and someone blurted out, “THE CHALICE!”

Under the CHALICE was a note tucked inside of a little blue envelope that said:

“Look under the drawbridge!”

…and so they did!

Under the drawbridge was this TAP CODE/Polybius Cipher puzzle which needed to be solved. It required all teams to come together with their Master Lock Code Sheets, plus the box that had the 3 colored blocks in it (which hadn’t served a purpose yet), and a cipher key.

This was the cipher key to the TAP CODE/Polybius Cipher:

If you’ve never done one of these before, each letter of a word is represented by two numbers. It helps if the first thing you do is draw a slash between each pair of numbers in the puzzle. Then tackle the first pair, which in our case is 55. First go 5 spaces across the top, and then 5 spaces down. So 55 equals W. 32 is 3 spaces over and 2 spaces down and is an H. 43 is 4 spaces over and 3 spaces down, which is O. So, the first word is WHO. To make the puzzle more challenging, remove a few letters in this key.

After solving the puzzle, the question is asked, “Who found the blocks in the box?” One of the kids remembered and ran and grabbed the box. There were three blocks in the box. One block was Green, one was White, and one was Red. The Green block had a code written on it: “Level 3/Q2/Digit2” (or something like that). The White one and Red one also had a similar written code. Each number of the escape code came from a different team’s code sheet.

The kids were sure they had figured it out. They jumped up and ran to the door. They twisted the numbers on the wheels of the luggage combination lock to enter the code: [?] [?] [?] and voila, SUCCESS!!!!!!!!! The lock popped open and the kids escaped, exactly 30 seconds before the end of the class period.  YAY!!!! They got to keep their heads.

Inside the locked pouch I had placed bookmarks, one for each student, with their names on them, and an exclamation that said, “I Escaped the Renaissance!”  The kids got to keep their drink goblets and the bookmarks as souvenirs. And they seemed to have had a really fun time. Half of them had to hurry off to their next class, but the other half stayed and helped me clean up, and haul all my decorations and food service out to my car. What a great group of kids.

“To be, or not to be: that is the question.” — “Hamlet”

“All the world’s a stage …” — “As You Like It”

“O Romeo, Romeo! wherefore art thou Romeo?” — “Romeo & Juliet”

“Is this a dagger which I see before me…” — “Macbeth”

“Be not afraid of greatness…” — “Twelfth Night”

“If you prick us, do we not bleed?” — “The Merchant of Venice”

“The course of true love never did run smooth.” — “A Midsummer Night’s Dream”

“Shall I compare thee to a summer’s day?” — “Sonnet 18”

Family Fun, Feast on This, Kids Stuff, Parties, Recipes, School Events, Summer Activities for Kids

Mr. Popper's Penguins, Classroom Book Party

I just so happen to know a classroom of 2nd Graders, who are about to finish their book, Mr. Popper’s Penguins, and a teacher who is generous to allow an ol’ gray-headed granny to workout her party animal muscle on an excited group of fun-seeking little readers.

Like most classroom book parties, this one features decorations, games, snacks, and a movie. I did some research here in order to gather ideas, since I have not read this book.

I thought the kids might like dressing up like little penguins (large white t-shirts with long black jackets, and puffy yellow penguin-feet slippers) and then putting on some of the same acts from the book, that Captain Cook, Greta, and their adroable waddling mini-mes did, for their teacher and classmates. I’ll divide the classroom into three groups. They won’t know why until I take the first group outside in the hallway where they’ll put on their costumes and then hear my instructions for putting on a silly show. The first group will come out on stage and do some marching – which may involve the passing off of a penguin egg or baby penguin (stuffed animal), and I’m hoping they will really get into character to make the show entertaining for their audience. That group will then exit the stage, take off their costumes, and take their places back at their desks. The next group will enter the hallway, don their penguin apparrel, take their turn on stage, and have a silly boxing match with oversize boxing gloves and some silly fancy footwork. Finally, the last group will take the stage, climb up on bean bags and slide back down, to the whoots and cheers of their adoring classmates.

I’ll put up a map of the United States on one of the classroom walls, and during the movie, pause to let the kids move penguin stickers across all the places where the penguins put on their shows.

The kids will get to watch the movie and at the same time nibble on some fun snacks, which I’ll serve on penguin paper plates, with penguin paper cups and napkins.

SNACKS:

undefined Penguin Rice Crispy Treats

— OR — a more healthy alternative

undefined 
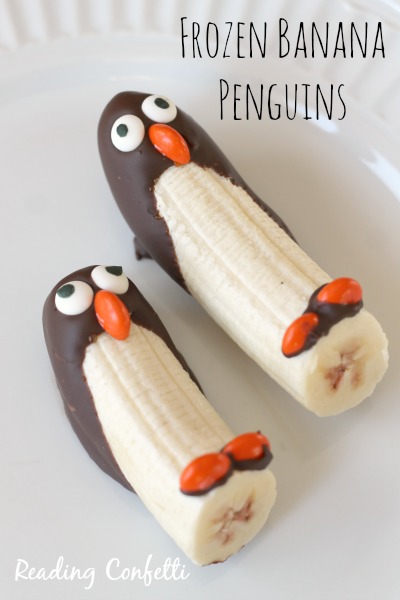
Penguin Banana Snacks

Goldfish crackers undefined

undefined 
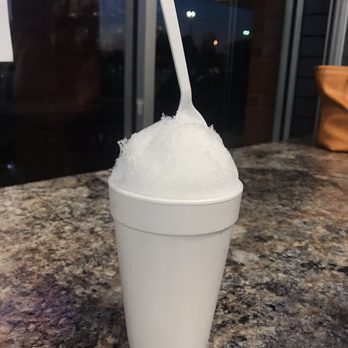
Snowcones in a cup – our little school happens to have a snowcone machine – hurray!!!!

undefined

Easy Sonic Ocean Water Recipe

5 min·Yield: 3

You have to try this Sonic Ocean Water Recipe. Make your favorite Sonic Ocean water at home.

Ingredients

  • 3 tbsp Water
  • 3 tbsp Sugar
  • 1 tsp Coconut Extract
  • 4 drops Blue Food Coloring
  • 24 oz Sprite ((can be 3 cans or from a 2-liter that you can get for cheap))

Soooooo, now you know my plans. I’ll head back to this post in a few weeks and add pictures, just as soon as my little munchkin-hearts get to have their epic-antarctic party!!!! I’m so looking forward to it. ❤

Feast on This

Fourth Grade King Arthur Medieval Book Party

DECORATIONS:

Make a trench/moat in front of the classroom door using a blue bedsheet for the water.

Make a drawbridge to lay over the moat, using a long piece of cardboard with wood-board-patterned bulletin board paper glued to it. Attach paper chains, (or, I found plastic chains at Goodwill when they had all their Halloween stuff out) to each side of the drawbridge and string them up to the door frame.

Make a stone frame around the door using gray construction paper, and mount homemade torches on either side (left and right), made out of paper sacks, twisted into a cone shape, with red and orange tissue paper tucked inside to look like flames. (I used Dixie cups, spray painted to look like iron, cut out the bottoms, pinned them with thumb tacks to the door frames, and set my torches inside of them).

Hang an iron-looking portcullis from the top of the doorway, made of strips of cardboard, held together with brass fasteners/brads, and then spray painted to look like rusted iron.

Make a beautiful sign that says, “Camelot ” to hang above the door

Arrange the student’s desks into a big circle – round table, and place a small, homemade sword on the center of each desk. Make the swords out of long, wide popsicle sticks, with hilts made of smaller popsicle sticks, glued together and spray painted, then decorated with old buttons or jewels.

COSTUMES:

Make a king’s crown, queen’s crown, maiden’s head covering, lady-in-waiting head covering, magician hat, friar robe with hood and cross necklace, and some knights helmets (lots of ideas for these on Pinterest).

FOOD:

Set up a buffet table with simple foods:  Bacon/ham/sausage, fruits (grapes, pears, apples, berries), whole raw veggies (carrots, parsnips, cabbage, sugar snap or snow peas) or a veggie pottage – like mushy peas (remember the old song: Peas Porridge hot, Peas Porridge cold, Peas Porridge in the pot nine days old?), hard cooked eggs, cheeses, various small rustic-type breads (wheat, barley, rye, with seads, etc.), homemade butter (see CRAFTS below), oatmeal porridge, and humble pie (which in reality was animal guts pie, but ours will be mincemeat).

Served on pewter plates or large pieces of flat bread (Naan).

Make a table decoration out of a small pig (toy or stuffed animal) with an apple wedged in its mouth, skewered, and roasting over a spit of fake charcoals

(Food photos from UCA Medieval Feast 2021)

BEVERAGES: ginger ale and root beer, served in golden goblets (grails)

OUTDOOR GAMES:

Set up a gauntlet on the playground:  First a Balance Beam, then walking on stilts (bed risers with attached ropes), followed by hurdles over alligators, then walking on a teeder-todder beam end to end, followed by having to jump high up to grab a flag, then shooting an arrow (or tossing bean bags) at targets, after that crawling through a large box with crape paper taped all over inside of it like a spider web, then walk on a balance beam again while avoiding swinging balls of various sizes, after that a leap over dragon stuffed animal, and finally pulling Excaliber from a stone

INDOOR GAMES:

Divide the kids into small groups of 5 or 6 and give each group a different game to play. After 20 to 30 minutes switch the games to another group.

KINGS in the CORNER  (2-6 players, ages 7 and up)

FIVE CROWNS   (2-7 players, ages 8 and up)

Castle Panic by Fireside Games (1-6 players, kids 7 & Up)

Kingdomino Award Winning Family Strategy Board Game by Blue Orange Games (2-4 players, ages 8 and up)

Queendomino Strategy Board Game (2 to 4 players, orup to 8 players when the game is combined with Kingdomino)

Era Medieval Age (1-4 players, ages 14 and up)

Wiz Kids TOURNAMENT AT CAMELOT (2-6 players, ages 14 & up)

PASSE-DIX  (unlimited players) How to play:

3 six-sided dice are rolled: 10 and above wins double the stake, below loses the stake; after each roll the bank passes to the next player.

Probably one of the most, if not the most, ancient dice game in history. Passe-dix was allegedly specified by Matthew’s gospel (Matthew 27:35) as the game the Roman guards played under the site of the crucifixion of Jesus of Nazareth.

Passe-dix is played with three dice. There’s always a banker, and the number of players is unlimited. The first gamer rolls: every time he throws UNDER ten he (and all the other players in the game) lose the specified stake, which goes to the banker. Every time he rolls ABOVE ten (or PASSES TEN–whence the name of the game), the banker must return double the stake to all the players in the game. After three losses of the roller (no matter how many wins), the roller position is passed to another gamer in the circle. The banker changes after each roll.

E.g. if there are four people in the game (remember one is the Banker, and one is rolling for everyone else) and the stake is 1 penny, then a loss will result in the banker taking 1 penny from each other player, but a win will involve the banker giving 2 pennies to each player.

MOVIES:

Pendragon, Sword of His Father | Burns Family Studios (2008) Rated G. This is a Christian, Dove Award movie set in Brittain’s dark ages with a wonderful message of faith, courage, and vision. This was my first pick for our classroom party!

The Kid Who Would Be King | PG (2019) ‧ Fantasy/Action ‧ 2 hours. I liked this movie. I thought it had a thoughtful plot, great acting, and wonderful cinematography, that took from the story of King Arthur/Merlin and made it a modern message that I think kids today could really relate to. This was my second pick for the classroom party.

Walt Disney’s The Sword and the Stone (animated). This movie is a little too childish for upper elementary, in my opinion.

Merlin (1998)   PG-13 | 182 min | Action, Adventure, Drama. This would be a fantastic film for upper elementary aged kids, except for a couple unfortuate scenes, which make it unrecommendable. It is a 2-disc movie that first tells the story of Merlin (disc one), and then the story of Arthur and Merlin (disc two). Reminiscent of the Lord of the Rings movies, sort of, in the type of movie that it is. This is the parent’s guide

First Knight (1998)   PG-13 (for some brutal medieval battles). This again would be a wonderful film for upper elementary, if not for a few unfortunate scenes. Parent’s Guide

King Arthur (2004)   the PG-13 version – NOT the Director’s Cut! Rated for intense battle sequences, a scene of sensuality and some language. This movie was alright, I guess, but I personally wasn’t a fan of the sort of manly, feminist portrayal of lady Guinevere. All the Merlin magic was absent. Reminiscent of the movie Troy in the type of movie that it is. This is the parent’s guide

Free MUSIC: (to be played while the kids eat or do crafts, if desired, reminiscent of a Renaissance Fair)

CRAFTS:

  undefined 
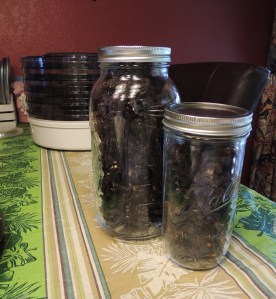
Make Butter from Heavy Whipping Cream: Fill 2 or 3 pint-sized glass jars about half way with the heavy cream. Screw the lids on tight. Have the kids take turns shaking the jars vigorously, and passing to another kid when their arms get tired, until the heavy cream separates into butter and buttermilk. Use the butter to spread on their bread. The kids can drink the buttermilk if they want, or it can be saved to make cornbread or pancakes.

Make Catapults (either using the Boy Craft Catapult Wars boxed game, or let the kids make catapults using popsicle sticks and rubber bands, erasers as ammunition, and disposable cups as targets) and have shooting duels

Create individual Coat-of-Arms using cardstock, crayons, markers, stickers, stamps, stencils, etc. These can then be transferred to clothing or made into flags using iron-on transfer kits and an iron.

Party Planner’s notes: I always tell myself, “This time I’m going to keep it simple,” but am rarely successful in accomplishing that. My imagination swirls and swoons with so many dozens of ideas and I don’t want to give anything up. I want to do it all, and cram as much as possible into a small block of time. It’s not until I’m in the middle of my ambitious plans that I realize IT’S TOO MUCH!!!! Hopefully you’re looking for ideas for a child’s birthday party, or a homeschool unit study activity, or family reunion, or something else where you can make good use of all of this stuff. Our party however will probably consist of making butter, filling plates with snacks, grabbing a beverage, watching a movie, and if we’re extra fortuitous, perhaps a game of Passe Dix or catapult wars, before the teacher wants her classroom back for educational discussion.

It’s with a heavy heart that I confess I was unable to throw this party, what with our world being in the early throes of the #CoronaVirus pandemic, which turned everything upside down, forced the shut down of schools, caused the grocery store shelves to be barren, and took a terrible toll on the health and well being of our economy and our most vulnerable citizens as well. So much uncertainty, which was not unlike the medieval dark ages themselves, where raiding Saxons and Anglos robbed the Brittons of their gardens, farm animals, livelihoods, safe homes, and personal freedoms. Terrible plagues and famine ravaged towns and villages. It almost seems apropos to be studying the middle ages in such times as this. Perhaps remembering this part of history will help us not to have to repeat it? I pray that evil will not prosper, that we will take cleanliness much more seriously, that we will be brave to stand up to antiheroes and bullying, controling governments, and be kind and generous with our family, friends, and neighbors when it is within our power to do so. It seems good to remember the value of a brave and virtuous leader, like King Arthur, the honor, chivalry, and loyalty of his knights, their courtesy, justice, and readiness to help the weak. I pray for my countrymen and this beautiful planet, that our stressful time passes quickly, without causing too much distruction to our economy and our lives, and though our weeping might last for a night, that there would be joy in the morning as we see the mighty hand of God who got us through it.

2020 UPDATE: So, the kids did not come back to school after spring break, March 2020, but unlike many schools they did resume in the fall of 2020. My grand daughter had moved on to the next grade by then and I was diagnosed with cancer, so I call it my “lost” year. BUT, in the fall of September, 2021 I got to use my decorations, which I had feared would go to total waste, for a Medieval Feast for the high school kids. The teachers decorated a room and set it up with a feast, and all the students dressed the part, ate and drank, and played all the games that were set up for them. And the 4th grade teacher asked if I would do a Medieval party for her class for the last day of school. So, yay. The decorations won’t go to waste.

The 4th graders read Robin Hood instead of King Arthur, so after Spring Break I got to throw a Robin Hood party for them. I didn’t get to use my Camelot decorations. Instead, I used scene-setters (large canvas backdrops of forest scenes) to and make a maze at the entrance of the classroom – a secret passageway into Sherwood Forest. I thought it would be fun to blindfold the kids and lead them into the classroom for the first time, to make sure they could be trusted. We had deer jerky and garden items to snack on (veggies and berries), (root)BEER and (ginger)ALE to drink, and then I made them each pay a fee for their meal, which they paid me in pencils! Lol. And then the kids played Kingdomino in two groups for the next hour or so. No movie. No robbing passing students in the hall, or getting into sword fights with the sheriff’s men, who might have come sniffing around, although that would have been fun to arrange had I thought of it ahead of time. The dollar store had nerf-type swords which would have been perfect. I could have placed them in a bucket for the kids to grab if such an occasion arose. At any rate, we had fun.

2022 UPDATE: The school shooting at Robb Elementary in Uvalde, TX ended the school year 2 days early for the whole district – which was definitely appropriate! I am so thankful my children weren’t in harms way, and my heart is broken and grieving for the parents and families that suffered loss. So the last day party was canceled and the decorations will just have to keep

2022 fall update… my granddaughter’s world studies class is studying the Renaissance! I get to use the decorations for her class party. Woo-hoo! And in a couple years they will hopefully get used for the other grandchild. Perhaps in the meantime I will donate them to 4th grade. BTW. I’m creating an Escape Room for our Renaissance party. If it turns out I’ll certainly blog about it!

May our LORD hedge us in with His protection, cover us with His glory cloud, and lead us through these chaotic times with His pillar of fire. May He help us not to be afraid, and comfort us in our sadness. May He suit us up with His Spiritual Armor and give us courage and faith. May He forgive our trespasses and clothe us in His white robes of righteousness. May God pour out His Spirit into our hearts until our cups and lanterns are overflowing, and May He cast out fear as we walk with Him through every storm. May we have spiritual eyes to see and spiritual ears to hear, for our adversary prowls around like a roaring lion seeking whom he may devour. May we find safety and shelter in the wings of our God. And may we be ready and watching for Him when He comes to snatch us away. May He bless us and keep us forever. In Jesus’ mighty name I pray. Praise be to God! Amen.

Family Fun, Feast on This, Kids Stuff, Parties, School Events, Summer Activities for Kids

The Sign of the Beaver, Book Party

I was recently blessed with the task of throwing a book party for my granddaughter’s classroom, to celebrate their finishing reading the book, The Sign of the Beaver. It was a “Dinner and a Movie” party, in which I was asked to provide the food and decorations. The party took place over their lunch hour. I set the food up as a buffet, and arranged a few minimal decorations while the kids were in PE, which mostly consisted of stuffed animals and a river. After a brief explanation of all the foods, the kids were allowed to help themselves and eat while they watched the movie. And when the movie was over the teacher did a little activity with them to compare the movie to the book. The kids were so excited, and not only did they eat everything, they asked to take all the leftovers home with them. All that was left was a little bit of stew in the bottom of the crock pot, so I would say it was a success! What a great group of kids, always so grateful and always a ton of fun to spoil.

This has become, honestly, one of my very favorite volunteer activities in the whole wide world to do, even though it is a ton of work. It is a labor of love! In order to prepare, I read the book and made a list of all the foods mentioned, as well as took notes of some decorating ideas that I hoped would kind of bring the book to life for the kids. I had never read this book before, and shame on me, because it is a terrific little book. I am a huge fan of historical fiction and children’s novels are just my speed. I’m not much of a reader, for a plethora of reasons, but when it only takes about three hours to knock a book out, that’s in my wheelhouse. So, after reading it I set out doing some research to find authentic northeastern tribal recipes for the foods mentioned in the book. It couldn’t have been more perfect for this party to come during Thanksgiving/hunting season, and during the last harvests of our gardens. And for a beverage I brought two jugs of “Penobscot River water” and let the kids sweeten it with a bit of maple sugar.

I decided to center the party around the idea of the Bear Feast that was celebrated in Attean’s village after Attean and Matt encountered and killed a bear in self-defense while they were out retrieving a rabbit from one of the snares they’d set up. I also wanted to incorporate some of the wild game, the maple sugar Attean gave to Matt, and some of the fruits and berries and native foods that would have been eaten back then.

DECORATIONS: The book’s setting is in the late summer into early wintertime of the year, early/mid 1700’s Maine, and in the vicinity of the Penobscot River, where Matt and his dad cleared a tract of land, built a cabin, and planted a garden. Attean and his Indian tribe lived nearby. It was a wooded area teaming with wildlife, maple trees, and wild berry bushes. So for decorations I decided to gather up all the stuffed animals we had that would represent the animals in the forest: a bear rug/blanket, bunny rabbit, fox, deer, squirrel, fish, turtle, beaver, and Attean’s useless dog. I also gathered up a blue bedsheet that I used to make a river with the first time I threw this party (I used bulletin board paper the second time), a pile of sticks on one end to make a beaver dam, some rocks to line the river (and the second party I used the rocks to hold the tree upright), and because we’re in Texas, I used a Buc-ees Beaver the first time I threw this party to sit on top of the beaver’s sticks. I used some gorgeous, colorful, fall paper maple leaves to scatter around beside the river. I drug my little tree to the school to set beside the river and I used a Drimmel Tool to carve a beaver design into a tree stump, which I used as a decoration. The Teepee shown in the photo below was an afterthought, I wish I would have remembered to bring it to the party, but considering the northeastern Indians actually lived in wigwams, rather than teepees, t’was no biggy I guess.

In case you’re thinking of throwing this party and would like a great big bear rug to spread on the floor for your party, don’t go spend a fortune at an Outdoor store before you check your local thrift stores. I frequently find a giant teddy bear at Goodwill for $6, which would work marvelously as a rug with all the stuffin’s pulled out. I already had a bear blanket at home that I thought would work just dandy. BTW: Goodwill is a great budget friendly place to bargain shop for theme parties!

FOOD: Some of the foods mentioned in the book consisted of Johnny Cakes, which Matt’s dad made the last morning for breakfast, before he left his 12/13 year old son in Maine to care for the cabin and garden alone, while he went back to Massachusetts to retrieve Matt’s pregnant mother and sister. He left Matt with his good rifle to hunt with, and for self defense. Some of the animals they hunted were deer, rabbits, and fish with one precious fish hook.

I made deer jerky out of a couple packages of deer cutlets gifted to me by one of the parents. My sister has the absolute best jerky recipe on the planet and so I used it, and only modified it slightly, so it wouldn’t be too spicy for the kids. This is my adaptation:

Sister Geraldeen’s Beef (or venison) Jerky

1  3-lb roast, fresh, raw (it is easiest to slice if placed in the freezer for about an hour)

16 oz. Soy Sauce

2.5 oz. liquid smoke

1 cup dark brown sugar

1 tsp Salt Lick dry rub, with garlic (equal parts cayenne powder, black pepper, and garlic powder)

Stir together in a large oblong glass baking dish until sugar is dissolved.

Using a sharp knife, slice lean meat into thin strips (1/4 to 1/8” thick and 1/2  to 1” wide).  Slice across the grain for a tenderer product.  Lay the slices down into the marinade until the meat takes up most of it.  Cover with plastic wrap, pressing it down on top of the meat so the marinade covers the meat completely.  Place in refrigerator overnight. 

In the morning, drain off and discard all of the marinade.  Then mix together these dry ingredients in a separate small bowl:

1 Tablespoon cracked Pepper

1 Teaspoon Crushed Red Pepper flakes

1 teaspoons of Chili powder

Sprinkle over drained meat strips and toss with hands to coat evenly (I use latex gloves).  Preheat food dehydrator.  Lay strips of meat on each rack leaving small spaces in between the pieces for good air circulation.  Stack the racks in the dehydrator, cover, and allow to dehydrate undisturbed for about 8 hours.  Check the meat for doneness, and let it dehydrate more if still wet or bendy when cooled.  Depending upon your dehydrator, it could take up to 24 hours or more for the meat to fully dry.  Meat is done when a piece removed and cooled will break in half easily and not bend or fold at all without breaking.

If you don’t have a dehydrator you can buy a package of disposable Aluminum Grill Liners (I use KT’s Clean BBQ brand available from Home Depot) or online, and completely cover the racks in your oven with them, then lay the strips of meat on those. Also lay a sheet of aluminum foil in the bottom of your oven to catch the drips. Adjust the racks to that they are placed in the center of your oven, and then set the oven temp to its lowest setting. Mine will only go as low as 170 degrees F. Prop the oven door open a little bit with a wooden spoon so the moisture can vent out as the meat dries. It won’t take as long to jerk your meat in the oven at that temp as it will in the dehydrator, so check it after about 4 hours, and then every half hour or so after that until the meat is dried as described above.

Place finished jerky in clean, sterilized mason jars, and use a Food Saver to remove all the air from the jars.  Place jars in a cool, dry place for up to two weeks.  For longer storage, place in refrigerator and eat within a month.

Johnny Cakes

I ran out of time to make these for the the first party (poor time management the morning of the party), but I did make them for the second party, and the kids loved them, especially with real butter and pure maple syrup on top. YUM!

Ingredients

1 cup flour

1 cup cornmeal

2 eggs

2 1/2 teaspoons baking powder

2 tablespoons sugar

1 teaspoon salt

3/4 cup milk

1/2 cup water

1/3 cup melted butter

1 teaspoons vanilla

1/2 teaspoon nutmeg

Butter or oil for frying

Instructions

1. In a large bowl, mix cornmeal, flour, sugar, baking powder, nutmeg, and salt. Make a well in the center, and pour in milk, water, egg, vanilla and melted butter. Thoroughly mix until pancake mixture is smooth.

2. Heat a lightly oiled cast iron or frying pan over medium high heat. Scoop about 2 tablespoons of the batter onto the pan.

3. Fry each Johnny cake until brown and crisp; turn with a spatula, and then brown the other side.

4. Remove and serve immediately with syrup and/or butter. These can be eaten hot for breakfast, or cold as a snack later in the day.

Three Sisters Harvest Stew  (a.k.a. Bear Stew)

INGREDIENTS

1 pound beef stew meat

1 teaspoon ground cumin

 Kosher salt, as needed

 Black pepper, as needed

2 tablespoons neutral oil, such as canola

1 large yellow onion, diced

3 garlic cloves, minced

4 cups turkey, chicken, or beef stock, or combo (low sodium bone broth),

1 rib of celery

1 large carrot

8 small red or yellow potatoes, cut in half

1 medium yellow squash, diced

1/4 cabbage, chopped

1 (15-ounce) can kidney beans, drained

2 cups fresh or frozen cut green beans

1 (14 1/2-ounce) can chopped tomatoes

2 cups fresh or frozen corn kernels

1 (4-ounce) can roasted green chilies (1/2 cup)

Add 1 jalapeno, unless using spicy green chilies

½ bunch fresh cilantro, roughly chopped

PREPARATION  (YIELD: 8 servings – TIME: 1 hour 40 minutes)

Season beef with cumin, salt and pepper. Heat oil in a Dutch oven or large heavy-bottomed saucepan over medium-high heat until it shimmers. Add beef, in batches if necessary, and cook, turning as needed, until lightly browned on all sides, 5 to 6 minutes. Transfer beef to a bowl and set aside.

Add onion to pan and sauté, stirring occasionally, until translucent, 5 to 7 minutes. Add garlic and sauté, stirring occasionally, until lightly colored, 2 to 3 minutes. Return beef to pan, along with stock and bring to a boil.  Lower heat to medium simmer and cook meat until almost tender.  Add carrots, celery, potatoes, and bring to a boil.  Cook 20 minutes, then lower heat to medium.

Add beans, tomatoes, corn, chilies and squash, and cook, uncovered, over medium heat until stew has thickened, about 10 to 15 minutes. Reduce heat to medium-low and simmer, covered, for about 10 minutes. Add cilantro and season to taste with salt and pepper.

COOKING NOTES

Three sisters is so-called because Native Americans inter-planted corn, beans and squash in the same mound. The 3 thrive together because corn provides a natural pole for the beans to climb, the beans fix nitrogen in the soil, and the squash leaves shade the ground to prevent the growth of weeds, and also helps to hold soil moisture.

Recipe adapted from: https://cooking.nytimes.com/recipes/1016956-three-sisters-stew

Grandmother’s Indian Cornbread (Broadswords)

The Iroquois Indians made a wonderful boiled corn bread. They made flour by pounding corn into corn flour. To make bread, they mixed water with the corn flour. Sometimes cooked beans were added, or berries or nuts. The bread was kneaded and formed into small loaves. The loaves were dropped into boiling water and cooked until the bread floated. Boiled corn bread was served both hot and cold. They also used the same bread mix to bake bread by putting it on clay tablets in the fire. They used sunflower oil to fry bread. Below is a recipe for steamed corn bread with beans, wrapped in corn husks. It is remarkably similar to tamales. This was the kids’ FAVORITE food of the party. I would have bet against that. Good thing I made a big batch!

Ingredients

  • 3 cups masa harina (corn flour used for tamales)
  • ½ cup rendered bacon fat (many traditional Native American recipes use fat as a flavor element and source of vital nutrients)
  • 2 teaspoons salt
  • 2 teaspoons baking powder
  • 1 cup cooked beans (really any type of bean will work but small brown beans are traditional. I used great northern beans)
  • 2 cups hot cooking liquid from beans
  • Dried corn husks

Directions

  1. Set up a steamer on your stove top using a steamer basket fitted over a pot with plenty of gently simmering water.
  2. Thoroughly rinse about 25 corn husks. Place corn husks in a large pan of boiling water. Place another smaller plate or bowl on top of the corn husks to keep them submerged. Set husks on low heat to soften while you prepare the dough.
  3. In a large mixing bowl, combine masa harina and bacon fat. Using your fingertips (I used latex gloves), work the lard into the flour until it is evenly distributed. Add salt, baking powder, beans, and the hot cooking liquid from the beans. Use a spoon to stir mixture until a thick, sticky dough comes together, it will be about the consistency of chocolate chip cookie dough.
  4. Use your hands to scoop ¼ cup-sized portions of dough, working quickly as dough will still be hot from the bean cooking liquid. Shape the dough into a ball and flatten slightly into a 1-inch thick oval, which is your “broadsword.” Wrap the broadsword in a corn husk, folding the husk around the dough on all sides to completely enclose it. Tear off small strips of corn husks to use as ties around the broadswords to hold them closed. Place the wrapped broadswords vertically in the steamer basket as you go. When all broadswords have been added to basket, lower it over boiling water, cover the steamer basket with a tight fitting lid, and allow broadswords to steam covered for 1 hour or more.
  5. After 1 hour, check the bean bread- if the corn husk pulls away easily, the broadswords are done cooking.
  6. Broadswords may be eaten hot, or stored in refrigerator to be eaten cold or rewarmed in oven or microwave.

Roasted Pumpkin

Members of the Chippewa tribe near Lake Superior have been enjoying this sweet and savory side dish for generations.

Ingredients:

1 small sugar pumpkin

1/4 cup maple syrup or maple sugar

1/4 cup melted butter

Instructions:

Cut the cap off of pumpkin and stab it about 4 times with a sharp knife.  Scoop out membranes and seeds.  (Wash seeds in a colander and discard all membranes. Place seeds in a bowl and add 1 tablespoon sea salt, toss and allow them to soak a bit while you prepare the pumpkin, then spread seeds on a very lightly oiled, or parchment lined cookie sheet and sprinkle with some extra salt. Place seeds in oven with pumpkin, but check and remove seeds once they have roasted – about 15 minutes or until you hear one or two pop. Check by removing a seed, let it cool, and then eat it. If it is crispy it is done). Add butter and syrup/sugar to the pumpkin.  Replace cap on pumpkin and place whole in a large ovenproof bowl .  Place pumpkin in a 350 °F oven for about 1 hr. and check for tenderness. Depending upon size, and variances with ovens, it may take up to 90 minutes for pumpkin to cook fully. You know it is getting close when the pumpkin looks like it has a tan and the sides are soft to the touch. Check tenderness by piercing side of pumpkin with a fork.  If the fork punctures through the skin and into the flesh easily, it is done.

Dried Fruit & Nut Cake

I’m not much of a fruitcake person, but I think it is because I don’t care for the usual candied fruits that come in fruitcake, such as pineapple and green cherries, etc. Using dried fruits is so much better.

Ingredients

3 cups all-purpose flour, sifted

1 cup firmly packed dark brown sugar

1/3 cup Molasses

1 ½ sticks of Butter (3/4 cup), softened

3 teaspoons baking powder

1/2 teaspoon salt

3 large eggs

3 teaspoons pure vanilla extract

1 cup each rough chopped dried: apricots, plums, figs, pears, dates, golden raisins, blueberries

1 cup each: walnut halves, pecans, almonds, pistachios

Instructions

1. Position a rack in the lower third of the oven and preheat the oven to 320°F (150°C). Spray the loaf pans (either two 9-by-5-inch 8-cup loaf pans or 8 mini loaf pans) with vegetable oil spray and then line the bottom and sides with parchment paper.

2. In a large bowl, mix the first eight ingredients together using a mixer on low speed.  Increase speed to medium and beat until batter is smooth, scraping the bowl often with a rubber spatula.  Stir in the dried fruit and the nuts and mix thoroughly, with your fingers if necessary. Set aside.

3. Use an ice cream scoop or scrape batter into the prepared pans.

4. Bake until the top is deep golden brown and the batter clinging to the fruit seems set, about 30 minutes for smaller loaves, 10 to 15 minutes longer for a large loaf. Insert toothpick to check for doneness. Toothpick should come out clean. Don’t let cake overbake or it will be dry. Tent loosely with foil if the cake appears to be browning too much. Cool completely in the pans on a rack.

5. When completely cool, remove the cake from the pans. The cake keeps, wrapped airtight in foil or plastic wrap, for several weeks at room temperature or at least 3 months in the refrigerator. It can also be frozen for at least 6 months.

6. To serve, cut into thin slices with a sharp heavy knife.

Dried Fruit and Nut Cake Recipe adapted from © 2007 Alice Medrich. All rights reserved. All materials used with permission. Alice used dates, dried Angelino plums, and dried pears.

Fire Roasted Fish

I didn’t make the fish for the first party, although I was given some trout for the party and had a wild daydream about having the kids following me outside to the park just a block from the school, where my husband could be tending a fire next the creek that runs through it, and on the way having them mark their trail just like Attean showed Matt to do in the book, so they could find their way back to class, but reality check – there really wasn’t enough time for that kind of shenanigans, and besides that, the only way to eat trout is freshly caught and properly cleaned, otherwise I think it would have been a waste of time to try and fix it for the kids. I’m sure they would all have turned up their noses and shied away from having even one tiny bite of the stinky fish, plus the teacher was surely not going to appreciate her room smelling of stinky fish for days either. For the second party I cracked open a can of Herring fillets, and to my surprise the kids ate the whole can.

This however, is an outstanding recipe for any fish. Give it a try with walleye, snapper, perch, bass, cod, redfish, tilapia, etc. If using fillets, lay all the ingredients on the fish and wrap with bacon rather than placing the bacon inside.

Ingredients

Salt and Pepper

1 Big Fish (Salmon, Trout, Perch)

Butter

Lemon Slices

Onion slices

Green Bell Pepper slices (or Jalapeno strips)

Several strips of thin sliced precooked (but not crispy) bacon

Directions

  1. Set up an outdoor kitchen: a hot fire with glowing coals surrounded by large flat rocks; a big jug of fresh clean water for rinsing the fish, plus the knife, and your hands.
  2. Carefully kill, gut and scale each fish immediately upon catching it, and rinse well in clean water.
  3. Sprinkle inside of fish with salt and pepper.  Place pats of butter, lemon, onion, and bell pepper slices inside the fish and lay a strip of precooked bacon down on top of them in the cavity of the fish. Tie wet string around the fish to hold the stuffings in and to hold it together while it grills.
  4. Or, rub fish with butter on both sides and wrap tightly in a big piece of tinfoil and crimp the edges closed.  Wrap again in a second piece of tinfoil.
  5. Bake on a smooth flat rock really close to the fire (but not in it!), or if you have a grate, lay the fish on the grate above the fire. Or, fry in butter in a heavy cast iron pan over the fire.
  6. Use a long handled spatula to carefully turn the fish about half way through cooking and also to remove it from the fire.
  7. Note: The amount of time it takes to cook varies depending on the size of fish and how close it is to the fire. Just keep checking it, it will be done when the flesh flakes easily with a fork.  May take from 15 to 20 minutes if on a grate over the fire, or to up to an hour if laying on a hot rock next to the fire.

Recipe adapted from one found by Lauren McArdle …who learned this from her Mohawk Grandmother in Saskatchewan.

“Remember Your congregation, which You have purchased of old, the tribe of Your inheritance, which You have redeemed…” Psalm 74:2

Family Fun, Feast on This, Kids Stuff, Summer Activities for Kids

Kid’s Summer Reading Program, A Parent’s Primer


Bevery Cleary

Soooooooo… Each summer I try to think of creative ways to seize the moments with my grandchildren.  The first year I focused on skill building/tutoring type stuff and learning styles (see my School’s Out for Summer blog post).  The next year I went with daily themes/ boredom busters (see Summer Survival Guide).  This year my focus has been on Summer Reading.

I wanted to get them some fun books they would want to read, but realized fairly quickly that picking books is a little more complicated than you would think, if you want to be successful. For instance, did y’all know that the reading level of books is usually printed near the bar code? Yeah, I had no clue. But, in all fairness it isn’t obvious.  It’s like a secret code that only a few privileged people get to know about – such as an alphabet letter inside a triangle, or something like RL:2.1.  A child’s reading level, I’ve discovered through much research, is super important when picking books, because it will directly affect their enthusiasm for reading.  When developing a love for reading in a child the books cannot be too easy or too difficult, and therefore it is super important to get that part right.  I’ll explain more of what I’ve discovered about the reading level codes and such in just a minute.

In the meantime, I began my book search at Amazon.com, first gathering several highly rated, award/medal winning, quality books that were at my granddaughter’s reading level into my shopping cart.  I probably ended up with about 30 or 40 books.  After that, the next time she was over for a visit, I grabbed her up in my lap and we went through each and every one of those books, read the back covers together and flipped through the pages, weeding out the ones she was less interested in until she had picked her top ten. Some of the books were thicker and would take longer for her to read, some were thinner books that could maybe be read in an evening; some were dog stories, a couple were Roald Dahl, and so on.  After giving her the opportunity to do the picking, you can imagine how excited she was for those books to come in.  And now that they have, the child has been a reading fiend ever since, and her sister also.  Her first pick: James and the Giant Peach.

Great choice, because Roald Dahl books have a ton of other trappings and odds and ends to go with them.  So many have been turned into movies – which makes for a perfect celebration activity when the kid finishes a book, plus there are activity sticker books, a crazy Revolting Recipes cookbook (two actually) with recipes for all the wierd foods featured in his books, a dictionary which includes the crazy made up words he uses in his books, and there’s even a cute video game app (free) featuring the Twits that is super fun, if a little bit nerve-racking for kids!!!!!  There’s even a Roald Dahl website with even more to offer, like a Party Pack for his 100th birthday celebration, and the subsequent Party Packs for his next two birthdays (2017 & 2018), which includes crossword puzzles, word searches, coloring pages, drawing activities, games, classroom decorations, party hats, invitations, and so much more.  All of which are great for public school classrooms, home-school classrooms, and generally support a child’s enthusiasm for his books.

This is one of the activities we did together recently as a family after my granddaughter read James and the Giant Peach:

J&GP Dinner & a Movie

I surprised her with this “family supper” one night.  The Revolting Recipes cookbook is loaded with recipes that are intended to be made together with the child.  (I did a little ad-libbing with my renditions of the foods.  I made a gravy for my Mud Burgers, rather than serving them on buns.  I used my own deviled egg recipe for the Stink Bug’s Eggs, and rather than an apple for the Hot Frogs I used peach halves – in keeping with the peach theme, and they would have been even more delicious with grilled fresh peaches rather than the canned peaches, plus I let them swim in warmed tapioca – “frog eye soup” – rather than pudding).

And did you know James Patterson writes kid’s books now?  Many are highly rated on Amazon.  My granddaughter thought Dog Diaries would be fun to read, and she was right; she can’t wait to read it every night before bed, and tells her mom and me all about what she read because it is so funny and entertaining!!!

So, this is what has inspired my blogging today.  I just wanted to pass along the knowledge I’ve discovered, and some terrific ideas that have worked really well for us.

Book Collage Two

ASSESSING READING LEVEL

Most modern chapter books show a reading level somewhere on the bar code label (or the inside pages at the front of the book). Poof *mind blown* I did not know this, did you? Look for either a number such as RL: 2.1, OR a letter inside of a triangle. The example RL: 2.1 translates to Reading Level: 2nd grade, 1st month. If the bar code shows a letter inside of a triangle, this is the Fountas & Pinnel reading level system. In this system A-C is Kindergarten levels, D-J is First Grade, K-P is Second Grade, Q-T is 3rd Grade, U-W is 4th Grade, X-Y is 5th Grade, and Z is 6th Grade and into middle school. There is also a Lexile measurement, but it is a little more complicated. (Note: if you really want to be an expert on your child’s reading level and ability, visit Reading Rockets).

Book BarCode

So now, when we are out shopping with our kids and they run to us with a book they want to read, we can quickly decide if it is anywhere near their right age level or not.

If you can’t find the reading level on the book anywhere and you happen to have your smart phone with you, you can check it at the Accelerated Reading website (arbookfind.com). If the book title comes up, it will give you the reading level.

It is also helpful to check the reading levels of the last few books our kids have read and talk to them about them. Who were the characters? What was the story about? Was it easy to understand? Was there anything in the story you didn’t understand? Were there any words that you didn’t know how to pronounce, or that you didn’t know what they meant? Was the story hard to follow? If the last few books that they read were pretty easy for them (matched their grade level), the child was motivated to read them all the way to the end, and is able to tell you lots of details about them, chances are they were a pretty good reading level fit. Armed with this information, we might want to challenge them to go a little bit harder with their next book.  It will add words to their vocabulary among other things.  BUT NOTE that if a book is too easy children will lose interest out of boredom, and if a book is too hard for them to understand the child will lose interest out of frustration.  Finding books that match their reading level is crucial to fostering a love of reading in them.

If you are looking for a way to more officially test your child’s reading level, I found websites that offer free reading level assessments, like: macmillanreaders.com/level-test/

Beginner Readers

If a book is on your child’s correct reading level and aimed at her interests, and is also well written and entertaining to her, she will at least be tempted to read it without a lot of coaxing on your part!!!!!  My youngest grandchild was struggling with confidence issues.  She didn’t think she could read so she didn’t even want to try, but I knew she recognized letters and that she had the skills to sound out words.  So I picked up these beginning readers and they were just the ticket. The very first page offered words she recognized and words that were easy to sound out.  When she realized she could read her confidence skyrocketed. These little readers were not only filled with beginning sight words she was familiar with and easy words she could sound out (at her reading level), but they are “irresistible” as advertised.  Not only can she read them, she comprehends what she is reading, which is very exciting!!!!!

There are also ways to sweeten the deal, incentives to help motivate and encourage kids when their attention span is waning, which I’ll delve into in detail a little further down!!!!  Biggest thing to remember is that this is NOT SCHOOL!  There are no time constraints.  There is no test at the end.  There is no right or wrong way to read – our kids have the luxury of getting to read books they got to pick, which they can read by themselves, or if they would rather we can read them together.  Reading should be FUN not a chore.  It should be exciting, not drudgery.  I sooooo want my enthusiasm to spark their enthusiasm.  I want to be a cheerleader and a good role model.

Book Collage Three

ASSESSING LITERARY VALUE OF BOOKS

Caldecott and Newberry give “medals” to books with high literary value. You can also Google: Notable Children’s Books or Literature and see what comes up.

After you’ve nailed down their correct reading level, next make a pile of medal winning books (online shopping cart -or- brick & mortar bookstore), and finally go through the pile of books together. Flip through the pages and see how long it is and how small the print is. Read the back covers. Read a few pages.  Narrow down the giant pile to about ten books that most interest them. And then…

Book Collage One

ASSESSING SUBJECT MATTER

Once you have the giant world of children’s books pared down to a child sized pile of quality literature that matches her interests and reading level, you can weed out the ones that might have objectionable content. Obviously there is really only about one or two ways to go about this. One, is to read the books ourselves before we let our kids read them. The bonus for this way is that it comes in handy later when we want to ask them questions about the book to access their comprehension, or come up with follow-up activities.

The second, is to read reviews at websites we trust the opinions of. Perhaps, like me, you are concerned with certain subject matter being appropriate and would like a good Christian review? In that case, you might find the following websites helpful:

RedeemedReader.com (Children’s Book Reviews for Christian Parents)

www.cbn.com/entertainment/books/new-christian-book-reviews.aspx

ccbreview.blogspot.com/

https://www.commonsensemedia.org/book-reviews

https://www.christianforums.com/threads/childrens-book-review-warriors.7328543/

https://www.pluggedin.com/book-reviews/

These websites will usually alert parents to subject matter which might be offensive, controversial, or a maturity level that we would prefer to preview and prepare our kids for ahead of time.

* * *

DON’T FORGET – FIND A GOOD BEDTIME STORY BOOK

Depending upon our kids’ ages, we might want to consider also picking up a great story book that we can read to them. Everything I’ve read says it is good for kids to hear books read to them by someone who reads really well. It is bonding as well as skill building. I remember as a kid what a great reader my mom was, how soothing her voice was, and how much I looked forward to the nights when she had time to read bedtime stories to my sisters and me. She had a big book of bedtime stories that included Tall Tales, Fairy Tales, Aesop’s Fables, and Classics, like Black Beauty, Swiss Family Robinson, and Peter Rabbit. The fluid way she read, her voice inflection, her own enthusiasm for the stories, made them come right off the pages and into my imagination. I wanted to grow up to read just like her.

61votstr8tl

These are a few such books:

A Treasury of Children’s Literature (Hardcover) by Armand Eisen

The Book of Virtues, A Treasury of Great Moral Stories

The McElderry Book of Aesop’s Fables (Hardcover) by Michael Morpurgo (Author), Emma Chichester Clark (Illustrator)

American Tall Tales (Hardcover) by Mary Pope Osborne (Author), Michael McCurdy (Illustrator)

* * *

ACTIVITIES AND REWARDS

Some kids are naturally attracted to reading and will take to it like a duck in water.  Oh glorious days!  Others are more math minded, or science minded, or just lazy.  It’s not a lost cause to get them to want to read, it’s just a matter of getting creative to find the subject matter that will hook them.  Finding books about kids with their similar likes and dislikes is one way to do it.  Maybe comic books would be more their thing.  Maybe reading to them instead of beating our head against a wall trying to get them to read on their own?

Motivating our kids to read by letting them picking great books of interest to them is one way, but also following up their efforts with fun activities is, well, jam on the peanut butter…is chocolate syrup on the ice cream… is icing on the cake!

In trying to make reading fun for my grandkids I had to ask myself, “What makes reading fun for me?”  I’m one who hated (all caps, bold letters, double underlined, and triple exclamation mark – HATED!!!) reading in school, and I am still not a huge book reader as an adult.  I do however enjoy Bible study.  Family history research, old photographs, and pedigree charts.  I like audio books when I’m going to be stuck in the car for a long drive.  It is more motivating to me to read if I am part of a book club or something that involves fellowship and food once a week.  I like historical fiction.  I enjoy mysteries.  I like stories like the Little House books – I’m not sure what that genre is, biographies or dramas maybe?  I honestly prefer children’s books because they are a quick read and I have a short attention span.  I don’t like horror, romance, science fiction, or fantasy.  I love writing and illustrating so much more than reading.  Our kids are not so different in their likes and dislikes and tastes from us.  Sometimes all it takes to motivate a kid is to give them opportunities that are so appealing they can’t resist.

Kids who like to read might find it enjoyable to have a favorite little nook to read in.  Maybe a secluded space by a window, with a shag area rug, a bean bag chair or giant stuffed animal to lounge on, and a groovy free-standing lamp sitting next to it, tucked away in a secret corner of the attic, or in a tree house, or a lovely little bench in the garden?  Maybe our child would enjoy reading with soft noise in the background or music – classical music, piano or guitar music, or white noise like thunder, lightening, and rain, or ocean waves, or gentle wind?

Kids who don’t ever sit still long enough to read might enjoy taking a drive through pretty country, looking out the window with binoculars and listening to an audio book that captures their imagination?  Or, rather than listening to the audio book in the car, they would prefer to listen while we all as a family do some project together, like draw, or color, or paint, or clean a room?

When my kids were little I created opportunities for us to get out and read.  We would pack up some drinks and snacks, and a big blanket, and we’d head to a shady, secluded spot in one of our city’s huge sprawling parks, or we’d drive up to a lookout or back country road on the mountain with our snacks and big blanket.  Sometimes we’d invite grandma to join us, and spend an afternoon browsing magazines, perusing cookbooks, or thumbing through whatever print material that suited our fancy that day – even puzzle books, quiz books, illustrated dictionary, and catalogues counted.

Sometimes what kids hate about reading (me) is having books chosen for them, with subject matter that isn’t the least bit interesting to them, not to mention all the painful formalities of the classroom – oral book reports, testing, reading out loud, etc.  UGH!  Maybe they just have ants in their pants and can’t sit still long enough to get into a book.  Perhaps just creating an environment that is geared toward their unique dispositions might just help them blossom into the burgeoning reader we are hoping for them to be???  We just need to find that gateway drug that gets them hooked.  🙂

Maybe all my kid needs is to get to go to the library or book store once a week and hang out looking at all the books available to them there?  Or, maybe it is getting to do an activity that is featured in a book they are reading – especially if it’s one they never heard of before (playing a game of marbles, catching butterflies in a net, making a cane pole and trying to catch fish with it, floating on a raft, flying a kite, building a tree house or fort, etc.)? Perhaps the introductions to such new discoveries will trigger something in them?

In my research, I came across this comment in a thread of a post on Facebook and it is just too apropos not to pass along:

“Jon David Groff writes: As a junior/senior high school English Language Arts teacher, I have stopped doing the traditional novel study. After reading The Book Whisperer, by Donalyn Miller, one summer, I went out and gathered together a decent classroom library. Come September, I told students that we would no longer do a formal novel study. They loved it. Then I told them they’d instead have a goal to read 40 book — one a week. They were not happy.

However, they could read what they wanted, didn’t have to write reports or assignments on what they read, would have some class time dedicated to reading, had no marks whatsoever tied to how many books they read or didn’t read, could abandon books they didn’t like, books over 350 pages counted as two books, and they could get books from wherever they wanted.

Most kids loved it. One grade 12 boy that year came to me after two weeks and said he’d finished the first book of his life and wanted the second in the series. I had a parent come to me at After a Christmas and day on vacation her daughter insisted on taking books into restaurants even though she’d never liked reading before. I now play ball on a team with a student who graduated who has thanked me for getting her into reading by using this approach.

I’ve since reduced the book count to 20 books a year — one every two weeks. I read when students read. They keep a book journal online that tracks their genres, book totals, and a any comments they want to make. I do also. I report their book count on each report card (but there’s still no grades) and use their own reflections about reading to help parents understand if they are happy having read 50 books or 5 for the year. For some, those 5 books are more than they’ve read over the previous 5 years. For others, their 50 books is a bit of a disappointment.

Last year, I began a monthly book challenge, completely optional, and most having nothing to do with reading speed. Challenges like, “carry a book EVERYWHERE for the month” or read in the craziest place and get a pic or vid (staff voted on the winner), or read to another person under age 10 or over age 60 — bonus entries for length of time, groups of three or more, and if they were strangers (haha). Every month I’d take those who chose to participate and entered them in a draw for a $15 Chapters-Indigo gift card.

Next year, my grade 8 students will participate in a Gamification class that attempts to do a lot of crosscurricular between LA and Social. They will have mutant powers and travel through history to stop a villain. And they will need to read a book about time travel in order to adopt that method of time travel for their own. They’ll create a visual text of the time travel method. But again, the choice of book will be there’s. (If you have any suggestions or want to donate books on Time Travel to my classroom library, please please please let me know. My summer reading is all time travel books and I’m trying to scrounge up enough books for 55 students, which means roughly 75 books if I’m going to be able to offer choices. That’s a lot of books and money.)

I’m trying to make reading fun and done in a way that adults read rather than the way school typically make kids read. Because even I don’t like reading books I’m told I have to in order to write a test based on someone else’s opinion of the book. We learn our curriculum using short stories, short films, movies, poetry, non-fiction, and other types of texts. We save books for enjoying, sharing, discussing . . . and actually reading!

*I’m sorry for the long response, but I wanted to share what I’m doing and to let others know that not all teachers are happy doing things the traditional way.”

MORE IDEAS

»Encourage your kids to spy out new words and perhaps make a word-journal.  We could even pay them for every 10 words they find that they didn’t know how to pronounce or what it meant before, and let them choose what to do with the money.  We could make those new words into a game where we are all challenged to use those words, like a secret word a day game, in sentences with other family members.  Remember on Pee Wee’s Playhouse where they would have a secret word and any time someone said that word, bells and whistles would go off.  Yeah, maybe kind of like that!

» If our child chooses a book that has been made into a movie, we can reward the completion of the book by going to the movie, or renting the DVD and making a family movie  night out of watching it. Maybe set it up as a backyard movie with a popcorn bar and root beer floats, and even let them invite their friends, or extended family, if they want.

» Choose an activity from the book to do together as a family (ie. Maybe the people in the book went out for Chinese food and ate something unfamiliar – like dim sum, or there was a horse race, or a dog parade, or the family went camping by a lake or on the beach, or there were racecars, or star-gazing, or gymnastics/dance/skating, or fishing, or picking berries and baking a pie, or watching/playing a ball game, or making Indian crafts, or growing a garden, or visiting a museum, etc.). If the story was about an artist, maybe the family would like to take an art class together? If it was about a nurse or fireman, perhaps the family would like to take a CPR class together or visit a hospital/firestation/police station? If it had a part in it about sailing on a boat (I’m thinking of Stewart Little) – maybe find a nearby sailing regatta to attend?

» If the book was a spy book, we could send the child on a spy adventure. Give them a pen and notebook and camera and let them do some detective work to see and report back on what the family cat does all day, or who mows the lawns in the neighborhood and on what days, or what time the mailman delivers the mail each day and how much of that mail is advertisements (junk). We could reward them with a puzzle book and some fancy mechanical pencils.

small-boy-readingbook

» Does your town have a few Little Free Libraries tucked away here and there in various neighborhoods or public parks near you?  The kids might enjoy making a habit of taking their unwanted books and trading them or donating them to a Little Free Library.  Sometimes if there is a bench nearby one of these Little Free Libraries, its fun to just sit and look through some of the books rather than take them.

» Pin a world map on the wall and locate where the stories take place. Then rent a travel video of the places and watch it together. Or pin-up a history timeline and locate the time period when the stories each took place. And then find what other things were happening in the world during that time, or how things are done differently now than they were then. We could visit an antique store, or spend a morning going to yard sales and trying to find knick-knacks or dress-up clothing from that time period that they kids could use to create their own backyard play with.

» Allow our kids to change their mind about a book, and move on to something else if it is boring or too difficult to get into.

» Maybe comic books are your kid’s thing!

» Perhaps a children’s Bible Study is right up their alley.  The Quest by Beth Moore is one suggestion, and Kay Arthur has written some as well.

» Maybe our whole family would love listening to an audio book to pass the long miles of a road trip vacation?  Take along a sketch book so they can doodle while we all listen, or take along a craft (needlepoint, crochet, knitting, weaving, whittling, yarn and finger games like Cats-eye, bead necklaces, friendship bracelets, tying flies, kenetic sand, playing solitaire on an i-pad, or watching out the window to spot eye-spies on a checklist/scavenger hunt) that can be done on one’s lap while listening.  Or encourage the kids to make up a story to tell to all of us using story cards (like Tell TaleStory War –included here only for a suggestion on how to play such a game, or Create-a-Story Board).

» We could give the kids an opportunity to write their own stories, and make their own books, with homemade book covers (cloth/scrapbooking paper/wall paper samples and cardboard), let them take and add pictures, or draw illustrations. Help them to make a rough draft, use some of the new vocabulary words they’ve learned, do some editing, and then re-write it in their very best handwriting. The books, if they are very well done, would make great gifts for grandparents at Christmastime, or a great gift for their teachers at Back-to-School night in the fall, or just to keep as a keepsake in their baby books forever.

Okay, well, I guess that’s all I’ve got for us for now.  I hope I’m not coming across as a know-it-all.  Far be it for me to tell anyone else what to do when I don’t even have it figured out for myself yet.  Just gathering my research into one place, and sharing it with the hopes that you feel as encouraged and empowered as I do now to foster a love of reading in our precious kiddos over the summer, and hopefully for the rest of their lives!  God richely bless you!!!!!

Book Collage Four

“Train up a child in the way he should go, and when he old he will not depart from it.” Proverbs 22:6

Feast on This, Summer Activities for Kids

Schoooooooool’s OUT… FOR… SUMMER!!!!! A Parents Survival Guide

Okay…alright… the fighting has to stop.  Go outside, both of you!  Eye-yiee-yiee!

Colleen on Carosel, CFD
Cheyenne Frontier Days Rodeo and Carnival

I don’t know about you, but I always looked forward to the sipping-slushy-lemonade-on-a-hammock-in-the-shade summers when my kids were young.  Really.  I’m not being facetious.  It was my time of year when I finally got to have my kids back…BACK from the dizzying morning rushes… BACK from the frantic wardrobe malfunctions… BACK from the homework overload… BACK from all the rigors and influences juxtaposed against our family’s personal favorite pastimes and faith.  Summertime was always our time…to regroup, to cuddle in the chase lounger or romp in the great outdoors, and be a comfortable, connected family unit again.  I spent my kids’ youth working for the school district so I could be on their schedule.  (It was hell, but somebody had to do it.  Ha.  I’m kidding).  It was a twelve year investment worth every moment.

Now I share this article with you because maybe, like me, you also get to hang with your kiddos in the summers, but maybe unlike me YOU are about to pull your ever living hair out.  Maybe it’s the rough-housing, or constant need for food?  Maybe you are just tired of the noise and them being underfoot when you are trying to clean house?  Someday, I know you won’t believe me, but you’re gonna miss this.  These days go way too fast.  I encourage you to “redeem the time” and the purpose for this particular post is to show you how.

There were always three parts to our summers when my kids were young: 1. Learning….2. Play….and 3. Vacation.  In this post I will start with the “L” word (learning), and you just stop that moaning right now.  This is going to be a total blast and besides that, extremely rewarding.  Who’s gonna be a “home team” player?

* * *

Summer School at home

books The first thing for me was to keep them reading (rather than watching TV or video gaming all day).

  • Enroll the kids in the summer reading program offered at your local library, and then make it a fun part of all your lives by….

Spending at least a couple hours every day reading in a beautiful outdoor setting (on a blanket under shade trees next to a babbling brook at a city park, in a hammock at a mountain campsite, while sunbathing at a pool or pond, or on a boat or a raft floating a river or lake, or in a tent by flashlight under the stars at night, etc.).  My kids loved doing this.  It didn’t have to always be books either.  It could be comics or magazines or poetry or jokes or whatever tripped their trigger.  Even books on CD were allowed.  We’d listen to them on road trips, or while we did crafts, painted, or doodled.

Reward each finished book with a prize (like finding all the lending library boxes in the neighborhood and browsing them for fun, new books to exchange, renting and watching the film version of the book, doing some activity featured in the book – like gardening, cooking a certain dish, being a detective and solving a crime, starting a journal, treasure hunting, getting a puppy/kitty, taking a day or weekend trip to somewhere new, making something, baking something, finding dress-up clothes at second hand shops, going to see animals, etc.  In our town there was an emu ranch that we visited, and also a lady who had a wild bird rescue with a large variety of owls.)

I spent so many winters watching my kids struggle with this subject or that one, and always wanted very much to help them understand, but our lives were so compressed and pressure-cooked during the school year (with school and homework, after school sports and activities, eating and sleeping and keeping up with laundry) that it was impossible to devote much time to truly helping them.  So when summer finally arrived that was my goal.

I enrolled one of my kids in an online eSylvan program for a while, which proved to be marginally helpful.  And otherwise, I created my own home tutoring programs, Math Camps, Science Camps, or Writing Camps.  I remember using hop-scotch and water balloon piñatas to teach various concepts.  I used a ton of indoor and outdoor games and activities to help my kids catch on to whatever it was that had them road blocked during the school year.  Being fresh out of school, truly the last thing I expected they wanted to do was MORE schooling, so I never told them.  Because, really, it’s not like any schooling they’d ever done before, and what they didn’t know wouldn’t bore them. So, whatever you do, DON’T label any of the rest of this “tutoring,” “learning,” “school,” or “educational.”  Just pretend it is fun and games – and one giant summer-long field trip.  Kids love field trips.  But don’t be surprised if your kids ask to do “school” because they find out they LOVE it!

And before we get started I hope you’ll pick up the reading materials that I discovered in my quest.  I’ve listed them below.  They will help you and your kids soooooo much.  It’s going to be a little bit of work for you up front to read through it all, but I promise by about the middle of whatever first book you choose you’ll start getting excited.  There is just something exhilarating about being empowered, seeing a challenge from a new angle, and having the tools to tackle it.

The first thing you will want to do with your kids once you’ve read the books is to have them take the assessments ( oh dear, but whatever you do, don’t call them assessments, or tests, or anything that even sounds like that.  Pretend you are doing quizzes, yeah, like the ones that are in the teen magazines and all over the internet.  For some crazy reason we all like to take those silly quizzes, thinking we will find something new about ourselves.  I think it is uniqueness we are hoping for.  Well, that’s exactly what these assessments are looking for too.  So make it fun, maybe as an activity while you are on a family road trip, or make a picnic lunch and while everyone is lounging on the big blanket out in a park somewhere, whip out the quiz and lay it on them.  It’s best to do the quizzes one-on-one, so that one kid is not influenced by another kid’s answers.  Stay positive and enjoy the conversations that are triggered.  When you are done you’ll have all the info you need (praying also for God’s wisdom) to get started fashioning games and activities that match their learning styles; ones that will help them with whatever subjects they are having troubles with in school.

And the reading materials are:

Discover Your Child’s Learning Style by Mariaemma Willis, M.S. and Victoria Kindle Hodson, M.A.,

The Way They Learn by Cynthia Ulrich Tobias,

The Five Love Languages of Children by Gary Chapman and Ross Campbell, M.D.,

Awakening Your Child’s Natural Genius by Thomas Armstrong, Ph.D.,

Eight Ways of Knowing, by David Lazear,

Frames of Mind: The Theory of Multiple Intelligences by Dr. Howard Gardner

In 1983 Dr. Howard Gardner, Director of Harvard University’s cognitive research project, published his book, Frames of Mind.  The prize winning book introduced a new model of intelligence – Gardner’s Theory of Multiple Intelligences.  His cognitive research has provided educators a solid foundation upon which to identify and develop a broad spectrum of abilities within every child.  Some of the best schools in America use the eight intelligences (which are a part of every human being).  They are:

Multiple Intelligence

These intelligences are the magnets that draw our kid’s interest and attention.

Once we’ve found a way to draw their interest, it then helps to know their learning style

Learning Styles 001

Anthony D. Gregorc has written the definitive volume for identifying and understanding his model of learning styles.  Sometimes it is more easily predicted by seeing how our kids handle stress?  The Way They Learn is an awesome book for explaining learning styles, and modality

Modality Checklist 001

 Learning styles researchers Walter Barbe and Ramond Swassing present three modes of sensory perception (ways of remembering) that we all use in varying degrees.  These are referred to as modalities.  The most easily recognized are: auditory (hearing it), visual (seeing it), and kinesthetic (touching it).

In Discover Your Child’s Learning Style these authors provide assessments for all ages, along with a plethora of explanations, encouragement, and practical teaching techniques and ideas for every type of learner.  Their biggest thing is to make everything fully multi-sensory.  And they warn that not everything billed as “multi-sensory” truly is, by their standards.  They believe that every single kid on the planet benefits when the materials are presented to them in a truly multi-sensory way (hearing it, seeing it, and touching it).   They also make the good point that teaching and learning are two entirely different things.  You can teach or present materials ad nauseam, but it’s the kid asking questions who is learning.

Now before you get too overwhelmed with all of this, please don’t give up on my article yet.  Let me give you some examples that demonstrate why this is good information.

IF for instance you happen to have a “Nature Smart” kid (one who is always capturing insects and small critters, and who notices the colors and textures of leaves, and quickly identifies one bird call from another, or animal track from another, and who is always staring out a window when inside a building); and if this kid is also very “Concrete Random” (innovative, curious, creative, instinctive, adventurous); and this same child seems to need to “touch” things, even when they constantly get in trouble for it, if this child is struggling in math, these are some ways and means that might be beneficial to their learning success…

Let your child gather various leaves into a pile, bugs into a pile, feathers into a pile, seeds into a pile, etc.  Let them choose what they want to collect.  Then use their collection to help them understand counting, adding, subtracting, multiplying and dividing, colors, arrays, patterns, sequences, etc.  Let them be the leader and patiently answer their questions by demonstrating with the objects all around them.  Do everything outside in the fresh air where they will be distracted and connected and curious.  You can make ordinary hikes into learning experiences.  Ask him or her lots of questions about what they see and hear, and how things smell and feel.  Let them make collages and collections with the objects that they’ve gathered.  Give them a backpack filled with a camera, sketch book and colored pencils, plaster kits for capturing animal tracks, and let them journal what they see, make scrapbooks, hang their works on the wall.  God made this world to be seen and touched and heard.  He is just as much a nature lover as our child is.  Your kid might grow up to be a park ranger, a farmer, or work for the Audubon Society or National Geographic one day, and all because you saw their potential, that they are fearfully and wonderfully made in the image of their Creator, and you used their natural interests to help them learn and grow.

The Music Smart kid might benefit from math facts, geography, history facts, and language facts that are taught by using catchy tunes.  Or they may enjoy doing chores, reading, or doing a science experiment if there is music playing in the background.  Show them how King David in the Bible invented many instruments, and wrote psalms, and how he danced in the streets and worshipped God with his gifts.  David was a man after God’s own heart.  God put the music in him, and He put it in your child too.

Logic Smart Kids might do better appreciating poetry if you show them the mathematical side of it – limericks, for instance, have FIVE lines.  Lines 1, 2, and 5 rhyme with each other, and lines 3 and 4 rhyme with each other.  Challenge them to make an equal number of syllables for lines one, two, and five, but half as many for lines three and four.  Show them how the limerick has its character because it is mathematically balanced.  Show them that if music isn’t mathematically precise (4/4 beat or 3/4 beat) it will just sound like noise.  If a painting doesn’t have the rules of balance, movement, and complimentary colors it isn’t as appealing.  A joke isn’t funny unless the timing of the punchline is perfect.  Show them how mathematics created a map of the stars in the universe, which can be rolled forward and backward like a huge clock.  Show them that God is logical, and that your little darling was created in His image and likeness.

People Smart kids need friends; they derive energy from being around people.  Put them in populated environments when you are trying to help them understand something.  Create fun group activities and games where your child can interact with other people, see their reactions and responses, and talk about things.  Take this child with you when you help serve at a soup kitchen, or visit children in the hospital.  Turn those visits into learning experiences (how many kids have blue pajamas? and how many kids are there all together? etc.).  God loves people too and He wants each one of us in His life.  He created us for the pleasure of knowing us.

I could go on, and on, and on…but you get the idea, right?  Isn’t it exciting?  Aren’t you buzzing already with enthusiasm?  Tell your friends.  And let’s help our kids realize their worth and intelligence and unique place in this world.  Who knows which one of them will find the cure for cancer, help to end world hunger, or finally invent that Jetson’s car we’ve been wanting for all these years.

Click here for my other Summer Survival Guide!

“Train up a child in the way he should go: and when he is old, he will not depart from it.”  Proverbs 22:6

* * *